Empty Pudding

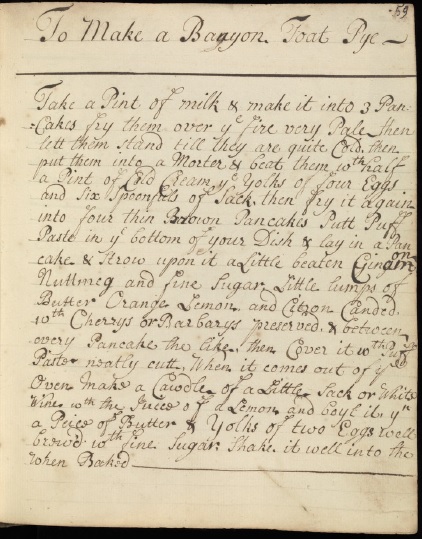
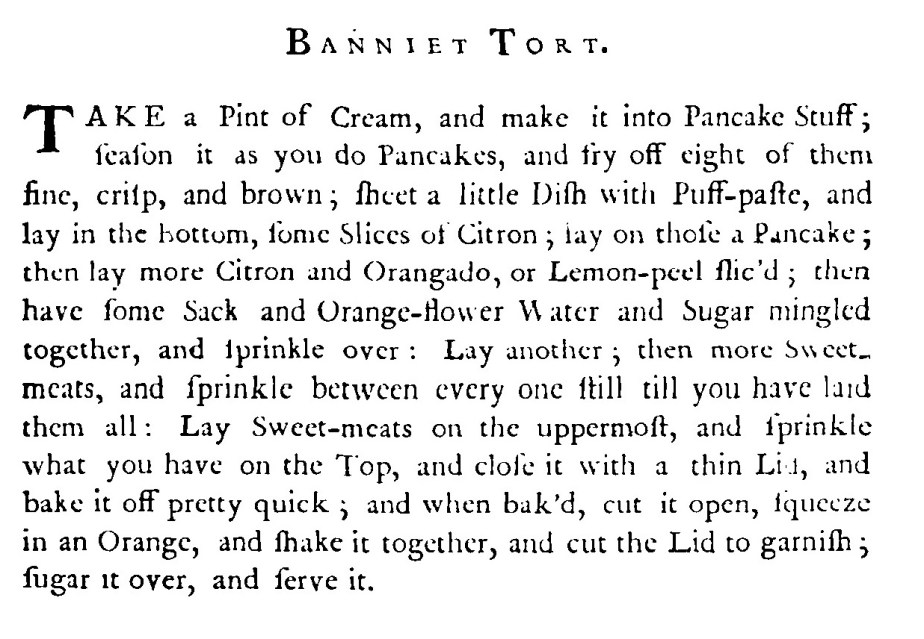
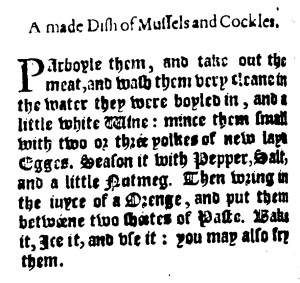
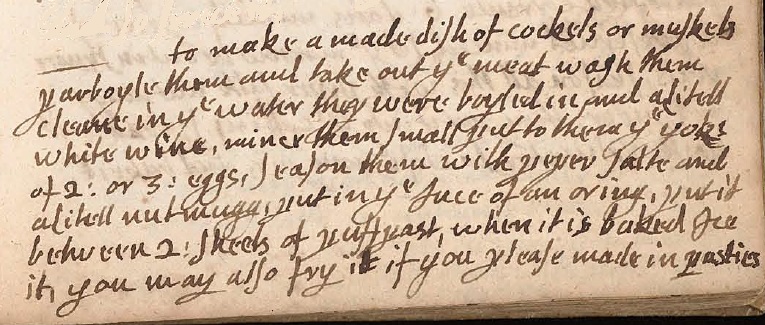
Sometimes I stumble across a hidden gem of a recipe when I am supposed to be hunting out something else. Thus it is with this recipe that I found in a nondescript Edwardian cook book¹.

There are several things that drew me to this recipe. Firstly, the name, which is curious, and after following the recipe, is also extremely accurate. Secondly, the ingredients list. It is incredibly short. Just three ingredients. Which I find rather exciting – the possibility of creating something out of practically nothing is great fun. Especially since, in this case, the recipe has been costed at 9d, nine old pence, less than a shilling for, what appears to be, pudding for four. More so if it is delicious. Which this is. But I’m getting ahead of myself.

This recipe so caught my attention, I don’t even remember what recipe I was searching for in the first place, so I was keen to read on and discover the secrets within. Alas, the fourth thing that drew me to this recipe is the confusing way it is written.
EmptyPuddingRecipe
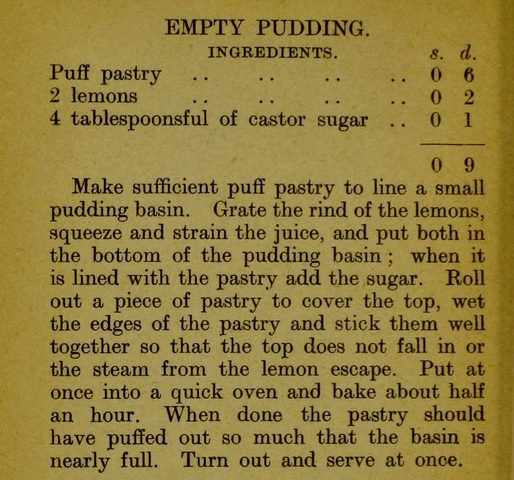
As can seen above, the instructions call for one to:

  • Make pastry
  • Put zest & juice in the pudding basin
  • When basin is lined with pastry, add sugar.
  • Seal a pastry lid on top.

This didn’t seem right at all: juice trapped between the basin and the pastry would steam in the heat of the oven and prevent the pastry from becoming crisp, surely? Why use puff pastry if you didn’t want it crisp? How can you seal the pastry and prevent the steam escaping if the thing making the steam (the lemon juice) isn’t inside? This last instruction was, for me, the key, or rather the ‘permission’ to break my number one rule with old recipes and NOT bake it as written in the first place, and put the zest and juice inside the pastry.

And it worked wonderfully. I baked my puddings in individual-sized metal pudding bowls, to shorten the cooking time.

EmptyPie

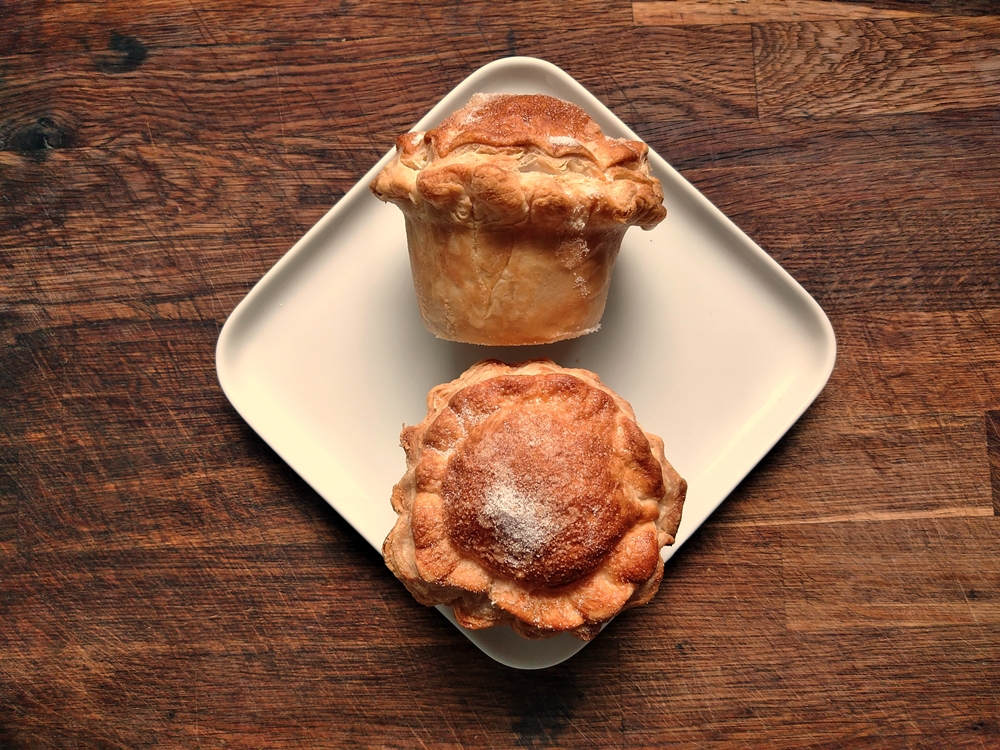
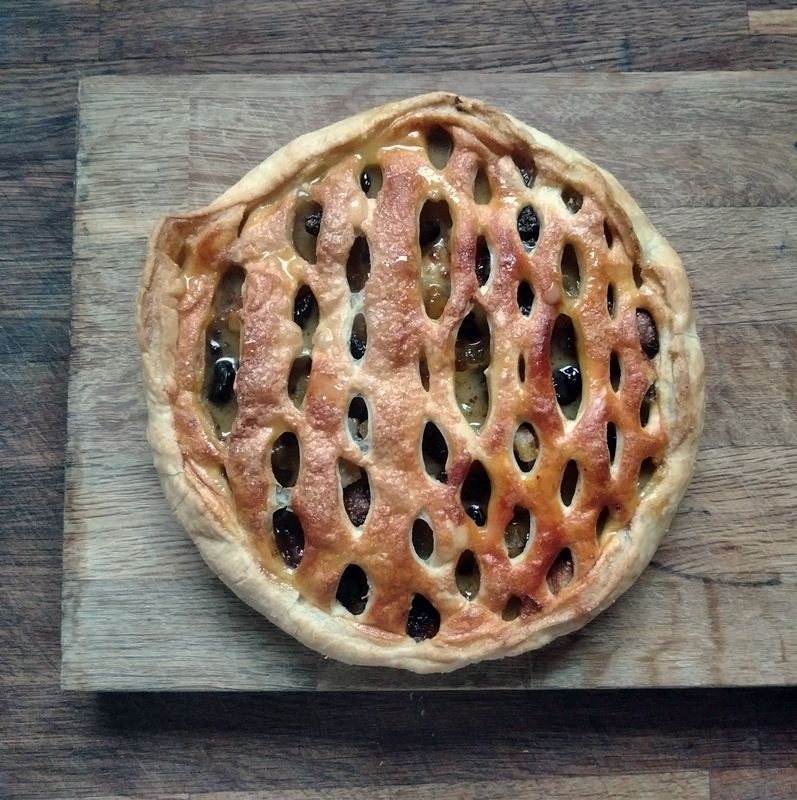
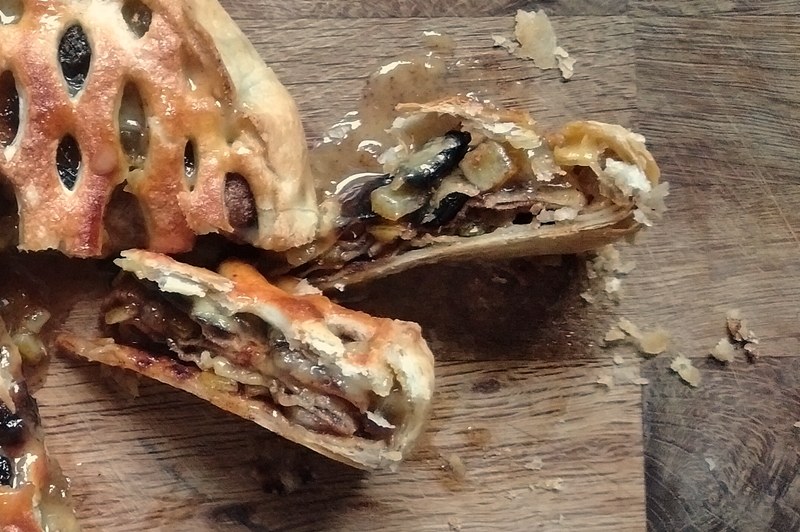
And here’s how they turned out. Beautiful, golden pastry and a puffed and crispy lid. Inside, the lemon zest and juice combined with the sugar to make an incredibly zingy lemon syrup, which really packs a punch.

LiquidPie

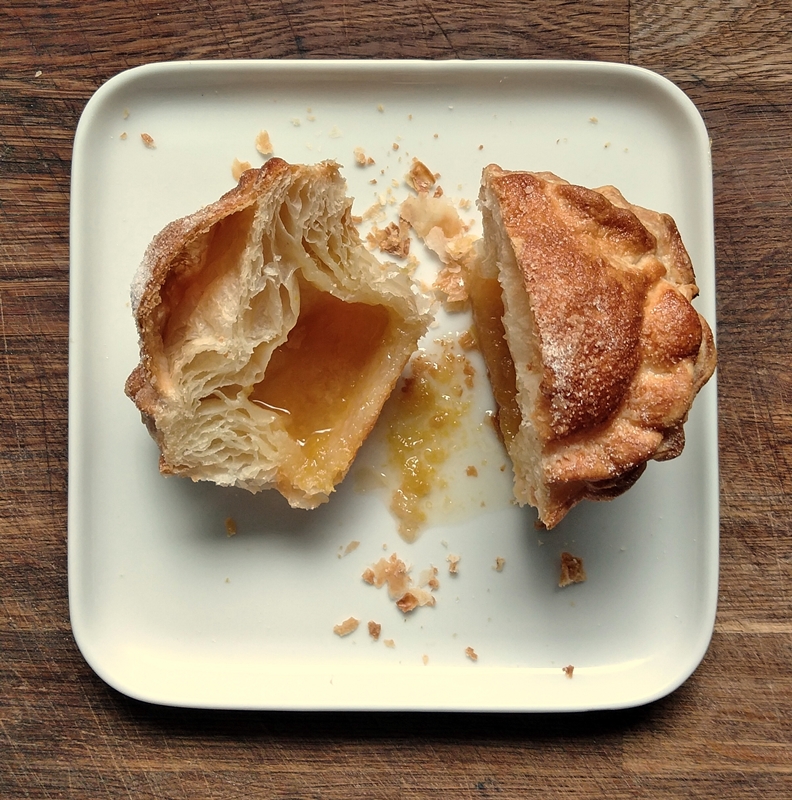
The heat from the oven creates steam from the lemon juice inside the pudding, which in turn helps fluff the puff pastry into soft, delicate layers. The contrast of flavours and textures is amazing.

But there’s more.

Because not all of my puddings turned out perfectly. Two of them sprung a leak during baking, as can be seen here (arranged upside down).

LeakedEmptyPie

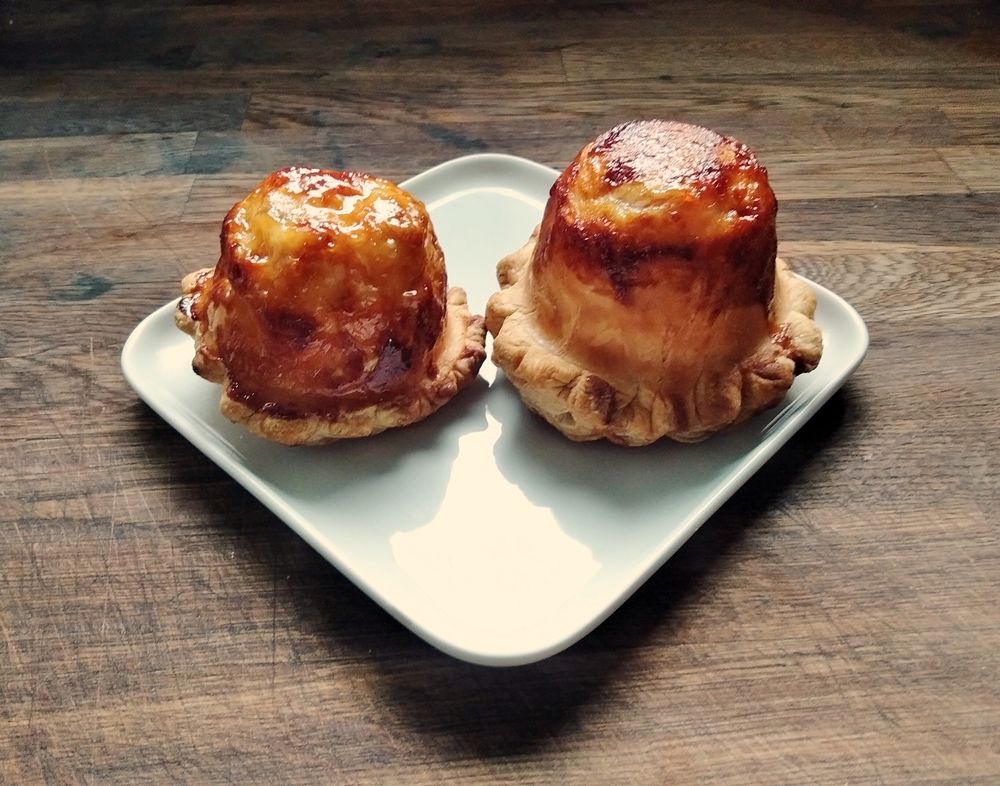
But here’s the thing: it’s not a disaster! The zest and juice still combined with the sugar to make a syrup, which, after the leak, coated the outsides of the pastry and made an amazing lemon caramel. Not all the liquid leaked out, so the insides still benefitted from steam, and puffed out fantastically. The photo at the top shows the insides of one of the ‘leaky’ puddings. These are also brilliant, as the lemon caramel hardens in the best traditions of creme brulee, and gives even more flavourful contrasts with the crisp pastry and soft interior. I might even like this variation more than the original. So if your puddings bake perfectly, or whether they spring a leak, it really is a win:win situation!

An extravagance: I used two blocks of puff pastry for just 4 puddings, because I wanted to use freshly-rolled pastry for the lids and the linings, in order to get the best ‘puff’ during baking. On reflection, this might have been unnecessary, as the basins do such a good job of ensuring the pastry puffs inwards whilst keeping the outsides smooth. Certainly, the lids were spectacular, so I’m going to recommend cutting lids from freshly-rolled pastry, and then re-roll the trimmings for the basin linings, which means you could probably get everything from a single block of puff pastry. I haven’t tested this, so I recommend having the second block of pastry on standby, just in case.

Empty Pudding

Serves 4

2 blocks puff pastry
2 lemons
4tbs caster sugar
butter for greasing
milk and caster sugar for glazing

  • Butter your pudding bowls generously. If your puddings spring a leak, you want to ensure you can still get them out of the bowls.
  • Roll out your pastry and cut 4 lids. Make sure the pastry is a little larger than the diameter of your pudding bowls, to ensure there is enough to make a firm seal.
  • Cut pastry to line your pudding bowls. Make sure the pastry overhangs the bowls a lttle to make a firm seal. Re-roll the trimmings if necessary.
  • Put the zest of half a lemon into each pastry-lined bowl.
  • Put the juice of half a lemon into each pastry-lined bowl.
  • Put 1tbs caster sugar into each pastry-lined bowl.
  • Moisten the edges of the pastry lids and attach to the rim of the bowls by pressing down firmly.
  • Chill the bowls in the fridge for at least 30 minutes to allow the pastry to relax and firm up.
  • Preheat the oven to 200°C, 180°C Fan.
  • Place the chilled bowls on a baking sheet and crimp the edges between finger and thumb.
  • Brush the tops with milk and sprinkle with a little caster sugar.
  • Bake for 20 minutes, then turn the baking tray around and bake for a further 10-15 minutes. NB Puff pastry takes a surprisingly long time to be properly cooked, so when in doubt, cook a little longer. You can also return them to the oven for extra browning when turned out. See below.
  • Remove from the oven and turn out as follows.
    • Ease a knife around the edge of the pastry to loosen it from the sides of the bowl.
    • Gently test whether you can lift out an un-leaky pudding.
    • If you suspect your pudding has leaked, turn your pudding out upside down.
    • Depending on your pastry colour, you might want to return your puddings to the oven for some extra colouring. If your pudding has leaked, I would definitely recommend returning them to the oven (still upside down) to harden the lemon syrup/caramel mixture until glossy and brown.
  • Serve with custard, cream or as they come.

¹ A little book of cookery by Dora Luck, 1905, Sands & Compy., London ; Edinburgh.


Advertisement

Banyon Toat Pie

This recipe is bonkers: bonkers name, bonkers method. I’ve spent ages trying to work out what, in the 18th century world of erratic spelling, the name is supposed to be, and drawn a blank¹. I’ve pondered many an hour over the pancake-ception involved in the filling, and been baffled. It’s a true one-off. I’ve never read anything like it – and I’ve read a LOT of recipes. Finally, ealier this month, I decided to grab the bull by the horns and just make it, and see how things go. The result, after a little tweaking, is insanely delicious, so I thought I would share in time for Pancake Day (February 16th), so you can enjoy the deliciousness yourself.

Banyon Toat Pye
Banyon Toat Pye (1700-1735), MS1797, Wellcome Collection

Aside from the already-mentioned bonkers title, the method of this pie is very unusual: make some pancakes, mash them up, mix in yolks, cream and sherry, fry this mixture as thin pancakes, then layer them in puff pastry with candied peel, dried fruit, sugar and butter. When baked, pour a sherry/lemon custard (caudle) through the holes in the lid.

The adding-the-sauce-after-baking was an acceptable approach for pies at this time. Usually the pastry served mostly as a container for the contents and to keep in steam and moisture, and an interesting sauce was added at the end.

It was the pancakes-made-from-pancakes that really intrigued. And so I set to with a vengeance, and initially, it all went swimmingly. Unfortunately, the second batch of batter proved a giant stumbling block. The recipe called for it to be made into thin pancakes, but even using single cream, it was more like bread sauce. Trying to dilute the batter with more cream meant it just wouldn’t hold together. Batch after batch was scrapped, which meant I then had to re-make the first batch and pancakes before working on the second. I must confess, I got a little tetchy, telling myself: it’s a pancake batter! How can I mess up a pancake!?

Eventually, I came up with a compromise, and made just a single, standard pancake batter, but with the flavourings and enrichment that had been used in the second batch. This did indeed make wonderfully thin pancakes, which were delicious in their own right.

Once this hurdle had been successfully leapt, the rest of the recipe was almost straightforward. The pancakes are layered in a puff pastry case, with each layer being sprinkled with sugar, spices, dots of butter, candied peel and dried fruit. A cut-pastry top, 40 minutes in the oven and the addition of the caudle sauce finished it off quite easily, and I must admit, being rather impatient to taste the result.

Well, gentle reader, you’ll be pleased to discover that it is bonkers. DELICIOUSLY bonkers! The pancake layers keep the filling evenly spread, but are light and delicately flavoured with no hint of ‘stodge’. The spiced filling mixture is reminiscent of mince pies, and rich-tasting and thanks to the sharpness of the sour cherries/barberries neither heavy nor cloying. The sauce/caudle really brings the zing, with the sherry and lemon-juice adding freshness and richness. I commented on Twitter after the first trial that it was ridiculously delicious, and I stand by that claim. I literally had to hold my daughter at bay until I had photographed the smaller pies, as she is so taken with them!

Now that I have sorted out the pancake problem, it’s a very straight-forward recipe: much more an assembly rather than anything complicated. If you’re short of time, you could even opt to buy the pancakes rather than make them, although that would mean on missing out on their delicate flavour.

Slices of hot Banyon Toat Pie

There are no quantities given in the original recipe for the filling, so you can be as generous or as careful as you like. The quantities below make for a flavourful, rich pie without overdoing it, but for special occasions, you could really layer them thickly.

Banyon Toat Pie

This can make whatever size and shape of pie(s) you like. One large (20cm) pie will serve 8 generously. Due to the richness, a smaller, 10cm pie can be shared between two. The instructions and quantities below are for one large pie, but, as mentioned above, can be scaled up or down easily.

For the pancakes
50g plain flour
1 large egg
1 large yolk
100ml milk
50ml cream sherry

butter for frying

1 x 500g block of puff pastry

Filling
40g candied citron peel, diced small
40g candied orange peel, diced small
40g candied lemon peel, diced small
40g dried sour cherries or barberries
40g butter
4tbs caster sugar
1tsp ground cinnamon
1tsp ground nutmeg

Caudle
2 large egg yolks
juice 1 lemon, strained
50ml cream sherry
15g butter
2tbs caster sugar
2tsp cream sherry to finish

Egg white and caster sugar for glazing

  • Whisk together the pancake ingredients and make four thin pancakes. Use a 1/4 cup measure to ensure the batter equally. Lay the cooked pancakes on kitchen paper and leave to cool.
  • Grease your pie tin(s) and line with thinly (5mm) rolled puff pastry. Leave a generous edge overlapping the sides of the tins, to help secure the lid. Cut a lid a little larger than your pie. Chill the lid in the fridge.
  • Pile the pancakes on top of one another, and place your  lined pie tin on top. Cut around the base of the tin, to make four pie-sized pancakes. Eat the pancake offcuts and enjoy!
  • Layer the pie contents as follows. For each layer:
    • Place a pancake.
    • Sprinkle 1tbs caster sugar.
    • Sprinkle ¼tsp ground cinnamon.
    • Sprinkle ¼tsp ground nutmeg.
    • Sprinkle 10g candied citron peel.
    • Sprinkle 10g candied lemon peel.
    • Sprinkle 10g candied orange peel.
    • Sprinkle 10g sour cherries or barberries.
    • Cut 10g butter into tiny pieces and dot over.
    • Repeat for all 4 layers.
  • Heat the oven to 200°C, 180°C Fan.
  • Remove the pastry lid from the fridge.
  • Cut holes in the lid. You can do this by using a lattice wheel, or by cutting a lattice by hand. Alternatively, use small pastry cutters or even the wide end of a piping nozzle, to cut random holes in the pastry.
  • Moisten the pie edge with water and carefully lay the lid over the filling. Press the edges together firmly, to seal, and then trim the excess with a sharp edge (I use my metal bench scraper).
  • Whisk an egg-white to froth and brush it over the pastry lid. Sprinkle with caster sugar.
  • Bake for 35-40 minutes until the pastry is crisped and brown. Turn the pie around midway through cooking, to ensure even colouring. When fully baked, it will be easy to lift the edge of the pie and check that the base is also browned. If you’re making mini pies in 10cm tins, cooking time is 25 minutes, turning the tray around after 15 minutes.
  • While the pie is baking, make the caudle, You can do this after the pie has been turned, so that it is ready to go when the pie is fully baked.
  • Whisk the ingredients (except the final 2tsp sherry) in a pan over medium-low heat until the sugar has dissolved and the sauce has thickened. It should be of the consistency of single cream. If you think it looks too thin, whisk in an extra yolk. Taste, and add more sugar if needed. When ready to add to the pie, add the remaining sherry.
  • Remove the pie from the tin to a wire cooling rack. Spoon/pour the caudle into the pie through the holes in the pastry lid. Gently shake the pie to help distribute the caudle.
  • Allow the pie to cool for 15 minutes before enjoying.
  • Best served warm. Delicious by itself, if you wanted to ‘gild the lily’, you could serve it alongside some unsweetened whipped cream.

¹ Of course, a week after publishing this post, I worked out that ‘Banyan Toat’ was a variation in spelling of ‘Banniet Tort’. a recipe published in Charles Carter’s “The Complete Practical Cook”, 1730.

Cockle and Mussel Puffs

Jane Parker, 1651 adapted from A New Booke of Cookerie, 1615

The availability of British seafood has increased dramatically with the introduction by the major supermarkets of dedicated fish counters staffed by professional fish mongers. No longer do we have to live close to our coastline in order to enjoy fresh seafood. Ideally, you would create this dish from scratch, and if you have the time and the inclination, it will no-doubt be superb. However, for those with limited time, by taking full advantage of pre-prepared seafood and ready-rolled puff pastry, this can come together in less than 30 minutes.

I first came across this recipe in the household manuscript book of Jane Parker (MS3769 at the Welcome Library). I subsequently discovered that she had copied it from John Murrell’s 1615 A New Booke of Cookerie, rephrasing it slightly and adding a little note to herself about changing the shape if frying them instead of baking. As noted elsewhere, Mistress Parker was not reticent about embellishing and improving the recipes she cherry-picked from the scant number of cookbooks of the day to suit her own style and preferences.

A Made dish of Cocokles and Mussels
From John Murrell’s A New Booke of Cookerie, 1615, p20

cocklepierecipe
From the manuscript book of Jane Parker, MS3769 at the Welcome Library

I have refrained from chopping the seafood as finely as suggested, much preferring to allow the constituent parts to be both distinguishable and identifiable omce the crisp pastry reveals it’s contents. I have added only pastry decoration to the original recipe.

Cockle and Mussel Puffs

200g cooked cockles
200g cooked mussels
4 large yolks
¼ tsp pepper
pinch of salt
a little grated nutmeg
60ml white wine
60ml orange juice
2 sheets puff pastry
1 large egg for glazing

  • Preheat the oven to 220°C/200°C fan/gas 7.
  • Mix the cockles and mussels in a bowl.
  • Season with salt, pepper and nutmeg.
  • Mix 2 tablespoons of the orange juice with the yolks and stir to combine.
  • Pour over the cockles and mussels and toss gently.
  • Taste and add more orange juice if liked, but beware of making the mixture too wet.
  • Roll the pastry sheets lightly to smooth, then cut four strips of 1cm width across the shorter side of each pastry sheet. Leave one sheet for the bases, and roll the second sheet thinner (tops), to fit overthe filling easily without stretching.
  • Moisten the edges of the bases and use the strips to build up a border around the edges.
  • Divide the solid part mixture evenly between the four bases and spread out. Don’t worry about adding the liquid at this stage, wait until the pies are sealed.
  • Moisten the pastry strips with a little water and lay over the lids.
  • Brush the border with water, then lay over the lids, pressing around the filling firmly to seal.
  • Trim the edges to neaten. Use a pastry or pizza wheel, or a neat, vertical cut with a sharp, unserrated knife. The cleaner the cut, the better and more puffed the edges will become.
  • With the back of a knife, press down all around the pie, 5mm from the edge, to seal.
  • Brush the tops of the pies with beaten egg, making sure none drips down the sides, as this will stick the pastry layers together and stop them from puffing up. Cut a vent hole to let out steam during cooking.
  • Divide any leftover liquid between the pies, pouring it through the vent hole.
  • Use pastry offcuts to shape some decorations. Leaving these pieces unglazed will make them stand out more against the glazed pastry.
  • Transfer the pies to a baking sheet lined with parchment.
  • Bake for 12 minutes, turning the baking sheet around 180 degrees after 6 minutes to ensure even colouring.
  • Serve immediately.