Fruit Pudding Pies

Mary Rooke, 1770

Pudding pies used to be immensely popular in the 18th century, and describe a particular style of dish where a pastry case is filled with a thick, flavoured and sweetened porridge and the two baked together. Obviously, you’re now saying to yourself, ‘Hang on a second, that’s a tart, not a pie’, and you’d be quite right, of course, but only by 21st century semantics. In addition, the ‘pudding’ of the title is to our modern eyes, rather vague, but to those of an 18th century cook, it was curiously specific, and not for the reason you might think.

Look up the word ‘pudding’ in the Oxford English dictionary, and the very first definition is: A stuffed entrail or sausage, and related senses. Yes, no mention of warm, comforting delicacies served at the conclusion of a meal, but innards and stuff in ’em! In the 17th and 18th centuries, pudding could be sweet or savoury. Echoes of these savoury puddings are still visible today in the black and white puddings sold in butchers shops. Sweet puddings included dense mixtures of dried fruits, peel, suet and spices, either stuffed into entrails or wrapped in floured cloths and simmered in water, as the traditional Clootie Dumplings of Scotland are today.

A more accurate description of pudding from these times would be that of a foodstuff of a certain texture, and so it is with pudding pies. The texture is more akin to a baked cheesecake, smooth and dense, but with just a fraction of the richness, they’re practically health food! In this instance, the filling is flavoured with the sharpness of gooseberries. I like the way it cuts through the denseness and really lifts and brightens the filling, but any smooth fruit puree will work well, the best results coming from sharply acidic fruit.

Original Recipe
Source: D/DU 818/1, Essex Record Office

Fruit Pudding Pies

112g ground rice
112g butter
225ml milk
112g sugar
100ml gooseberry pulp
4 large eggs
zest of a lemon
½ tsp freshly grated nutmeg
4 individual pudding, or deep tart, dishes lined with shortcrust pastry

  • Preheat the oven to 180°C/160°C fan/gas 4.
  • Stir the ground rice, butter and milk over heat until quite thick, then pour into a basin.
  • Add the sugar and stir together until cold.
  • Add the gooseberry pulp, well-beaten eggs, lemon and nutmeg.
  • Mix thoroughly.
  • Spoon the mixture into the pastry-lined dishes and smooth over.
  • Put the tarts onto a baking sheet and cover lightly with a sheet of foil, to prevent the filling darkening too much.
  • Bake for 20-30 minutes, depending on the size and shape of your pie dishes. Remove the foil after 15 minutes and turn the pie dishes around if they seem to be colouring unevenly.
  • Cool on a wire rack.
  • Serve warm or cold with cream or custard.

Fruit Sponge

Of all the puddings of my childhood, this is the one that I return to the most. There is something just so comforting and delicious in the simplicity of sweet sponge, sharp fruit and cold cream.

It’s so simple it doesn’t even have a proper name, just a terse description of the ingredients; fruit, sponge. But that simplicity in no way detracts from it’s appeal.

Like all good recipes, it is incredibly versatile and can be used with almost any fruit you have to hand, although my recommendation is for sharper fruits to highlight the contrast with the other elements.

If you have some prepared fruit to hand, it can be brought together in a reassuringly short space of time. Popped in the oven as you sit down to a meal, it will be ready by the time the plates are cleared. Alternatively and indulgently, you can sit hunched in front of the oven door, spoon in hand, watching it’s progress in anticipatory delight for a brief half hour.

Serves 4
500g apple puree
250g damson puree
1 large egg
The weight of the egg in softened, unsalted butter, caster sugar and plain flour
1tsp baking powder
milk to mix
caster sugar to sprinkle

double or pouring cream to serve

  • Preheat the oven to 180°C/160°C fan/gas 4.
  • Stir the fruit purees together and pour into an oven-proof dish. Smooth over.
  • Put the egg, softened butter, sugar, flour and baking powder into a bowl and mix thoroughly to a smooth batter.
  • Gradually stir in a little milk until the mixture achieves dropping consistency – when a dollop of batter drops easily from a spoon.
  • Pour the batter over the fruit and smooth the surface.
  • Bake for 35-40 minutes until the sponge is risen and golden.
  • Remove from the oven and sprinkle with a little caster sugar.
  • Serve with chilled double cream.

Posset Pie

Joseph Cooper, 1654

The surfeted Groomes doe mock their charge With Snores.
I have drugg’d their Possets.

Macbeth, Act II, scene II

The broadest description of a posset that I can think of is that of a hot syllabub: a thickened drink of either milk or cream, sweetened and flavoured with any of a number of alcoholic drinks and/or fruit, served warm.

In the Middle Ages it was seen as a winter warmer and it’s ability to make one feel good meant that over the years it segued into becoming borderline medicinal. It was recommended for insomnia, indigestion, as a purgative and of benefit when fasting.

Recipes abound, and the styles are as numerous as their intended uses: custard posset, cold posset, apple posset, whipped posset, froth posset, sack posset, soap sud posset, posset without milk, posset without wine, posset without milk wine or beer.

Thus far, Joseph Cooper is the only person I have found that turns posset into a dessert. Twenty years later Hannah Woolley would include this same recipe in her own book, adding a few of her own details to the method.

Apples are the recommended fruit, but this would work well with almost any fleshy fruit pulp; apricots in summer, for example, and dark, sharp damsons in autumn.

Posset Pie

Sweet shortcrust pastry
Eggwhite for glazing

500g fruit puree
2 large yolks
200ml double cream
50ml cream sherry
1tsp ginger
1/2tsp cinnamon
1-2tbs icing sugar
4 heaped tablespoons dried white breadcrumbs

To decorate
2cm matchsticks of candied orange, lemon and citron peel
sugar nibs

  • Preheat the oven to 200°C/180°C fan/gas 6.
  • Roll out the pastry and line a greased shallow tart tin. My favourite shape is long and rectangular (36 x 12 x 3cm).
  • Prick the bottom with the tines of a fork to prevent blistering and line with parchment paper and baking beads.
  • Bake for 10 minutes, then remove the parchment and baking beads and bake for a further five minutes.
  • Brush the insides of the tart with beaten egg white and bake for a further 3 minutes.
  • Turn the oven heat to 160°C/140°C fan/gas 3.
  • Mix the filling ingredients until smooth. Taste and add more sugar if liked.
  • Pour into the pastry case and smooth over.
  • Bake for 20-25 minutes until the filling is almost set. It will firm up while it cools.
  • Arrange your candied peel and sugar nibs on the pie as decoratively as you like.
  • Serve cold.
Apple Posset Pie
Apple Posset Pie Joseph Cooper, 1654

Shrewsbury Pudding Tart

Georgiana Hill, 1862

Here is something a little different for the adventurous, an unusual dessert in the form of a gloriously vibrant beetroot tart: given an official Thumb’s Up™ by my daughter. I’ve tweaked this recipe slightly and baked it in a pastry case, for ease of serving. The original method was for a buttered-and-breadcrumbed bowl. The cooking times are roughly the same. The flavour is very light and delicate, the lemon counteracting a lot of the beetroot’s sweetness.

1 x 24cm blind-baked pastry shell

225g cooked beetroot
115g unsalted butter – melted
150g icing sugar
zest of 1 lemon
juice of 2 lemons
3 large eggs
60ml brandy
150-200g fresh white breadcrumbs

  • Preheat the oven to 150°C, 130°C Fan.
  • Puree the beetroot until smooth.
  • Add the butter, sugar, lemon, eggs and brandy and whisk thoroughly.
  • Add in the breadcrumbs BUT not all at once. You want them to absorb a lot of the moisture in the filling, which will vary depending on the freshness of the eggs and the moisture in the beetroot. You might not need all of them. The texture should be similar to a sponge cake mix, but still pourable.
  • Add the filling to the pie shell and place the tin on a baking sheet.
  • Bake for 25-30 minutes until the filling has set. Turn the baking sheet around after 15 minutes to ensure even baking.
  • Cool on a wire rack.

Spiced Strawberry Tart

Jane Parker, 1651 adapted from The Good Huswife’s Jewell, 1587

I was drawn to this recipe because it involved spicing strawberries and baking them in pastry, both details being so different from how we tend to use strawberries today. Originally, I was delighted to find the recipe in Jane Parker’s manuscript recipe book¹ but some months later, when I found an earlier version in a cookery book from the previous century, it became at once both more interesting and more delightful. Thomas Dawson’s recipe for strawberry tart², was published in the middle of the reign of Elizabeth I, and is, in all honesty, a little sparse on the level of detail to which our 21st century eyes are accustomed when it comes to recipes. Indeed, it is so brief I can quote it in full below:

To make a tart of strawberries

Wash your strawberries and put them into your Tarte and season them with sugar, cinnamon, and ginger and put in a little red wine into them.

No quantities, cooking times, or even mention of a pastry recipe. It would appear Jane Parker also thought a little extra detail was required, and her recipe is as follows:

Jane Parker's Recipe
Source: MS3769, Wellcome Library Collection

Whilst there’s still no pastry recipe, we do have more detail in terms of presentation: the tart should be shallow, the pastry lid should have diamond cutouts, baking time of 15 minutes and a sprinkling of spiced sugar over the baked tart. These additional details, to my mind, highlight the fact that, even if she didn’t actually make the tart herself, Jane Parker definitely got the recipe from someone who had, as these details are precisely the kind of personal touches an experienced cook would note down for future reference.

After centuries of refinement, the strawberries we now use are impressively large but much milder in flavour than those that would have been used for this originally Elizabethan tart. If you can find sufficient wild strawberries either to mix with your ordinary strawberries or, decadently, to use on their own, their deep aromatic flavour, together with the wine and spices, will make for a much more robust flavour to this unusual Tudor tart.

Spiced Strawberry Tart

1 batch of Sweet Shortcrust Pastry

600g fresh strawberries
3 tbs caster sugar
1tbs cornflour
1tsp ground cinnamon
1 tsp ground ginger
½ tsp coarse ground black pepper
60ml red wine or port
Milk for glazing
1tbs caster sugar
1tsb ground cinnamon

  • Preheat the oven to 200°C/180°C fan/gas 6.
  • Roll out the shortcrust pastry thinly. The thinner the pastry, the less time it will need in the oven and the freshness of the strawberries will be all the better for it.
  • Cut out four lids for your tarts. Cut them generously so that there is sufficient pastry to form a seal with the pastry lining the tins. Use a small diamond cutter or any small shape, to cut a lattice into the lids. Be careful not to cut too close to the edge, otherwise they will be tricky to attach to the rest of the pastry.
  • Gather the trimmings and re-roll the pastry.
  • Grease and line four individual pie tins with the pastry. Let any excess pastry hang over the sides for now.
  • Prepare the strawberries: Remove the stalks and cut into small pieces, either 4 or 8, depending on the size of the strawberries.
  • Put the cut strawberries into a bowl and sprinkle over the red wine. Toss gently to coat.
  • Mix the sugar, cornflour and spices together. Sprinkle over the strawberries and toss gently to mix.
  • Divide the strawberry filling amongst the tins and smooth over.
  • Moisten the edges of the pastry and place the lids over each tart. Press firmly to seal, then trim and crimp the edges
  • Brush the tops with milk and bake for 12-15 minutes until the pastry is cooked and lightly golden.
  • Mix the remaining caster sugar and cinnamon together and sprinkle over the hot pies.
  • Cool on a wire rack.

¹ MS3769, Wellcome Library.
² The Good Huswife’s Jewell, 1587

Nectar Rice Pudding

I received an email from a friend this week, being very complimentary about this rice pudding recipe I’d given her. She wrote “This is so yummy on a chilly winter day in Melbourne!” I made a mental note to put it on the blog in the autumn, but then I got up this morning and looked out the window at the clouds and the cold and the rain and decided that you all needed this recipe today.

Adapted from May Byron’s wartime Pudding Book (1917) it is an absolute delight in a number of ways. It’s a variation of the traditional, some would say nursery, pudding, but these variations elevate it much higher than its list of ingredients might at first imply. For a start, the method is markedly different from the traditional, first boiling the rice in water  followed by a slow simmer on the stove top, then just a brief 20 minutes in the oven. Cooking time is practically halved, compared to the traditional method requiring 2 hours baking and the result is astonishingly soft and creamy. The best part of this recipe, however, is the flavourings. Against just a suspicion of vanilla, the mandarin peel imparts a light and fragrant note, which is in turn enhanced by the aromatic honey and flakes of coconut. The whole dish is lifted out of the nursery and into something altogether more elegant and refined, whilst still retaining it’s simplicity.

Very definitely a grown-up treat for a gloomy, rainy Sunday in June.

Nectar Rice Pudding

120g pudding rice
580ml whole milk
75g granulated sugar
1 large or 2 medium mandarin oranges
½ tsp vanilla extract
280ml double cream
4 large yolks
70ml aromatic honey – acacia, orange blossom, heather, etc
2tbs unsweetened dessicated coconut

  • Bring some water to the boil and add the rice.
  • Cook for five minutes, then drain well in a sieve.
  • Put the rice, milk, and sugar in a thick-bottomed, lidded pan.
  • Peel the mandarins.
  • Eat the mandarins.
  • Put the peel into the pan with the rice.
  • Add the vanilla.
  • Cover the pan and put over the lowest heat available.
  • Simmer softly for 40 minutes, stirring every 10 minutes.
  • Mix the cream, yolks and honey together.
  • Preheat the oven to 140°C/120°C Fan.
  • After the 40 minutes is up, remove the mandarin peel and discard.
  • Pour in the cream and honey mixture. Stir briskly whilst pouring to ensure the eggs don’t cook immediately and curdle.
  • Stir the mixture over the heat until the mixture almost simmers, then pour into a deep oven-proof bowl. To achieve the perfect consistency after baking, the mixture should be about 5cm deep in the dish.
  • Sprinkle the coconut over the surface.
  • Bake for 20 minutes until just wobbling in the middle, and golden brown and bubbling on top.
  • Allow to cool for at least 10 minutes.
  • Serve warm.

Old English Bread Pudding

Mary Bent, circa 1670

I adore everything about this recipe. For a start, it epitomises the very British traits of not only being a hot pudding, but also having been created from almost nothing. The ingredients are modest, the flavouring minimal, yet these simple, little puddings are a real delight. Even more so when you realise that these were already being looked upon with nostalgic fondness when Mary Bent recorded this recipe in the middle of the seventeenth century. Where modern bread puddings tend towards the solid and the fruited, this 350 year old recipe is light and delicate as a souffle.

Original Recipe
Source: MS1127, Wellcome Library Collection

Old English Bread Pudding

125g fresh breadcrumbs
300ml milk
2 large yolks
1 large egg
2tbs caster sugar
1/4tsp salt
freshly grated nutmeg

  • Warm the milk until just below boiling then pour over the breadcrumbs and allow to soak for 15 minutes.
  • Preheat the oven to 160°C/140°C fan/gas 3.
  • Whisk the egg and yolks and pour into the breadcrumb mixture. Add the sugar, salt and grate the nutmeg.
  • Stir everything together until a smooth mixture.
  • Generously butter four pudding basins and pour the breadcrumb mixture evenly amongst them.
  • Arrange the basins on a lipped baking sheet.
  • Bake for 45 minutes, turning the baking sheet around after 20 minutes to ensure even browning.
  • When cooked, allow the puddings to rest for a couple of minutes, then run a knife around the sides of the pudding bowls and turn out.
  • Serve with a few fresh berries and whipped cream or Hard Sauce .


Plum Pudding

This pudding has a lot going for it: its fruity, spiced, zesty with candied peel, suet-free and thus vegetarian, less than 2 hours in the making/baking – and over 300 years old!

I found this recipe in the manuscript recipe book of Elizabeth Philipps (circa 1694), when I was hunting for Christmas recipes. The recipe’s full title is “An excellent Plum Pudding Hot or Cake Cold”, which is just the kind of two-for-one recipe that our modern Christmas needs – especially if you’re running late and missed stir-up Sunday. Excellent example of Deja Food too!

The recipe is marked with the annotation “daughter Green”. I think this must mean the recipe was passed on by her daughter, whose married name was Green – although there were unusual naming conventions back then; perhaps Mistress Philipps had a rainbow of daughters? We can but guess. As if the title wasn’t endorsement enough, a later hand has also awarded a tick and the comment ‘good’. This made this recipe a culinary ‘dead cert’ in my opinion: something that was so delicious when tasted, the recipe was requested and recorded by hand in the family recipe book, and this approval was then endorsed by a third party coming across the recipe at a later date.

Mini Puddings
Mini Puddings

You can bake this in a regular cake tin, but a ceramic pudding bowl works just as well, and makes the resemblance to a Christmas Pudding much clearer. The hour-long baking time creates a wonderfully dark and crunchy crust, which contrasts dramatically with the light, pale insides.  You can also bake it in individual pudding bowls (the recipe makes 10 small puddings), which looks very sweet too, although the shorter cooking time makes for a paler outside. This would be too much traditional Christmas Pudding for one person, but this pudding is a yeast-raised, light, fruited, cake texture, and much more refreshing to the palate as well as being easier on the stomach.

Plum Pudding Original Recipe
Source: MS3082, Wellcome Library Collection

Plum Pudding

375g plain flour
1/3 nutmeg, grated
1 tsp ground mace
½ tsp ground cloves
1 sachet fast-action yeast

40g granulated sugar
150g unsalted butter
150ml cream/milk
50ml cream sherry or mead
2 large eggs

300g currants
75g raisins
60g mixed candied peel [1]
40g flaked almonds

  • Mix the flour, yeast and spices.
  • Put the sugar, butter and milk/cream in a pan and warm gently until the butter is melted.
  • Add the sherry or mead.
  • If the mixture is still hot, let it cool a little first, then whisk in the eggs.
  • Add the liquids to the flour and mix thoroughly. It should form a soft dough. Add up to 150ml more milk if you think it is required.
  • Set somewhere warm to rise for 30 minutes.
  • Stir in the fruit and almonds until thoroughly combined.
  • If you are making small, individual puddings, each mould or aluminium foil cup will take about 125g of dough. Otherwise, generously butter a 1.6 litre pudding bowl and add the dough.
  • Set aside for 15 minutes while the oven warms up.
  • Preheat the oven to 180°C, 160°C Fan.
  • Bake
    • a single, large pudding for about an hour. Turn the basin round after 30 minutes and check for done-ness at 50 minutes.
    • the small, individual puddings for 15-20 minutes.
  • Remove from the oven and set aside to rest for 10 minutes.
  • Run a spatula around the sides of the basin to loosen the pudding, and carefully turn out onto your serving plate.
  • Serve warm, with double cream.
  • For later: Even though this pudding is nice cold, it really is at its best just warm, so for serving later, zap slices/individual puddings in the microwave for 20 seconds before serving.

[1] I used 20g each of orange, lemon and pink grapefruit, rinsed of excess syrup

Orange Blossom Tart

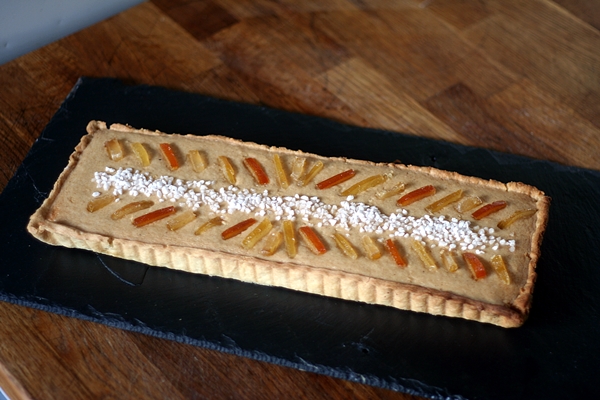
Here’s a wonderfully aromatic and delicious dessert that I have adapted from a recipe that appears in Hannah Glasse’s “The art of cookery, made plain and easy”. It must have been popular, because Hannah gives no fewer than four recipes for Orange Pudding, each slightly different. Copyright infringement back then being rife, it is highly likely that Hannah is not the original author of this recipe, but I have yet to find an older version with these particular ingredients.

Hannah calls this a pudding – and indeed it is certainly something that you might eat after lunch or dinner, but it is in fact what we would term a tart, and I can honestly say it is unlike any tart I’ve ever tasted before, for the very best of reasons.

The most striking aspect is the flavour – a mixture of Seville orange, orange flower water, rosewater and white wine. Rather surprisingly, the word that popped into my head when breathing in its aroma was ice-cream – and that was before it was cooked! Once cooked and chilled, the flavours mingle together and taste extraordinary – the only way I can think to describe it is like plunging your face into a bunch of fresh flowers – but in a good way! This isn’t soapy/perfumed – it’s light and fresh and rounded. None of the flavours overpower, it’s just fantastically floral.

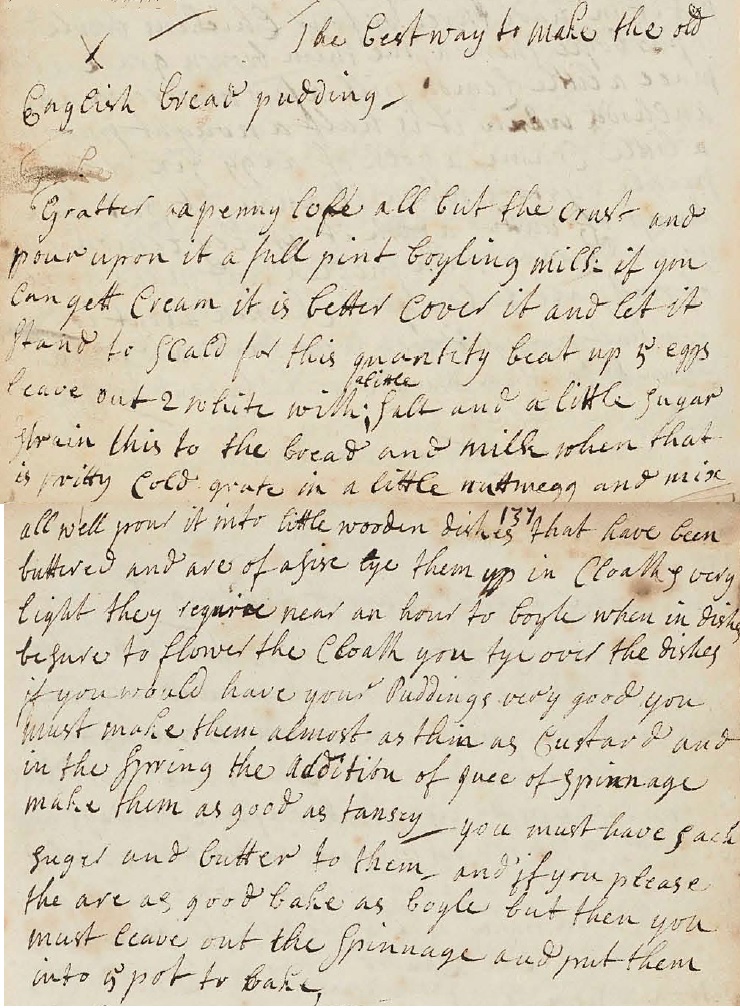
One of the challenges when adapting old recipes, is that specific quantities are sometimes a bit of a challenge. This recipe is a good example, because amongst other things it calls for “the crumb of a halfpenny loaf”. Although food prices were relatively stable before the industrial revolution, wheat, and by extension bread, was especially subject to price fluctuations due to harvest yield. So much so, specific laws were created concerning the manufacture and sale of the various types of bread (The Assize of Bread) and books of tables drawn up specifying the size of loaves depending on the cost of wheat.

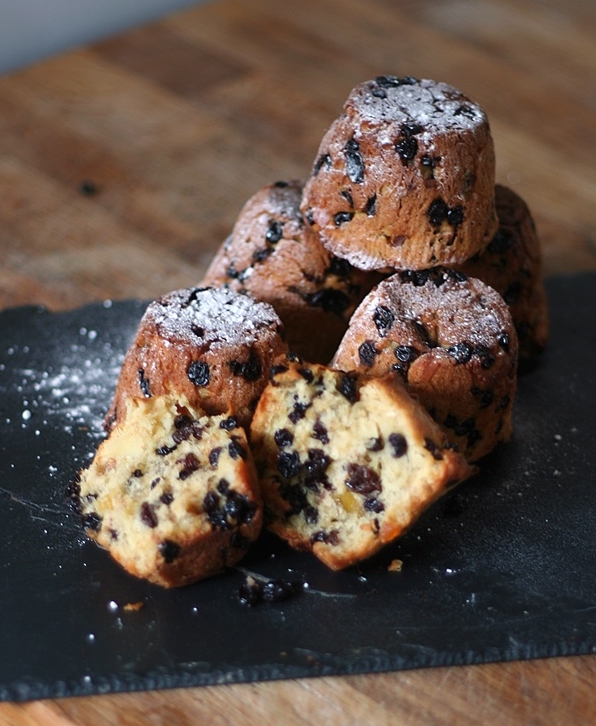
Even with the Assize of Bread tables to hand, it’s still not clear which loaf the crumb should come from: white, wheaten or household. Household bread was the coarsest, and therefore unlikely, I reasoned, to have been used for such a delicate dessert. That left either white or wheaten and at just over 6oz and 9oz for a penny loaf, the difference in the quantity of crumb was going to be significant. The only solution was to make two tarts, and try each to see if one quantity was more suited than the other.

The photograph at the top shows the result. The slice on the left was cut from a tart made with 150g fresh white breadcrumbs. The slice on the right from a tart made with just 100g. Personally, I prefer the one on the left – the texture is like baked cheesecake, but not heavy and cloying. The slice on the right has a much softer consistency – if you’re a fan of baked custards, then this is the one for you. For an even more delicate texture, you could even try with just 50g of breadcrumbs – do let me know if you try this!

This is a wonderful springtime tart and I really hope you’ll give it a try.

Orange Blossom Tart

Sweet Shortcrust Pastry
225g plain flour
140g butter
60g cornflour
85g caster sugar
1 large egg
grated zest of 1 lemon
ice cold water
egg-white for glazing

  • Put all the ingredients except the water into the bowl of a food processor and blitz until the mixture comes together in a ball.
  • If the mixture is too dry, add some ice cold water 1 tablespoon at a time until the pastry forms a ball.
  • Tip the mixture onto a floured surface and knead smooth.
  • Wrap in plastic and chill for at least 30 minutes.
  • Grease a 22cm fluted, deep, loose-bottom tart tin – a lemon meringue tin if you have one, is ideal.
  • Remove the chilled pastry from the fridge and place on a floured surface.
  • Roll out thinly (7-8mm) and line the prepared tin, gently easing the pastry into the sides.
  • Let the excess pastry hang over the sides of the tin for now.
  • Prick the bottom of the pastry with a fork and put the lined tin back into the fridge to chill for another 30 minutes.
  • Preheat the oven to 200°C, 180°C Fan.
  • Remove the tart from the fridge and trim the excess pastry. Don’t remove too much – allow 3-4cm to overhand the side of the tin – this keeps the pastry from shrinking back into the tin and can be trimmed after cooking.
  • Line the pastry with baking parchment and fill with baking beads/beans/rice.
  • Bake for 12 minutes, then remove the parchment and beads and bake for another 5-6 minutes until the pastry is cooked through.
  • Brush the inside of the pastry with lightly beaten egg-white and return to the oven for 5 minutes. This seems like a faff, but it will ensure you pastry is both cooked AND resistant to the wetness of the filling until it is cooked. *lying* I deliberately undercooked the pastry on the left in the photo to demonstrate.

Filling
150g fresh white breadcrumbs
250ml double cream
75g caster sugar
5 large egg yolks
60ml white wine [1]
1 tablespoon orange flower water [2]
1 teaspoon rose water [2]
zest and juice of a Seville orange [3]
70g clarified butter – melted

  • Mix all of the ingredients together in a bowl and set aside to let the flavours mingle. It will have the consistency of porridge.
  • When the pastry base is finally cooked, turn the oven down to 160°C, 140°C Fan.
  • Cover the top edges of the pastry with tin foil, to prevent them from burning.
  • Pour the filling into the cooked pastry case and bake for 25-30 minutes until the filling is set. There should be a slight joggle to the middle of the tart, but nothing too fluid.
  • Set aside to cool for at least 1 hour.
  • When cold, trim off the excess pastry, remove from the tin and place on a serving plate.
  • Eat slightly warm or at room temperature. Alternatively (and my own personal preference) chill thoroughly in the fridge for at least 5 hours.

[1] The original recipe called for sack, a fortified wine similar to sweet sherry. You could use sherry, madeira even marsala if you like. Whilst I love the flavours of all three, I thought them a little rich for this recipe, so I chose a regular white wine. A sweet and aromatic dessert wine would also be delightful.

[2]Both of these fragrances are available in the baking aisle at the supermarket. They also tend to vary greatly in strength and aroma according to which brand you use. The original recipe called for equal quantities of both, but the rosewater I use is rather strong. In contrast, the orange flower water that I use is rather lightly perfumed, so I used slightly more. if you use different brands, my advice is to use just 1 teaspoon at a time and taste as you go until you’re happy with the flavourings.

[3] If, like me, you made Seville orange ice cubes with the zest and juice back in January, then all you need is one cube. If not, then use the zest only of a sweet orange, together with the zest of either a lemon or lime for added sharpness.

Banoffi Pie

I’d just like to take a moment to discuss a modern British classic pudding: Banoffi Pie.

Yes, Banoffi. Not Banoffee.

That’s just one of my little niggles regarding this dessert that have ultimately led to this post.

Done properly, to the original recipe, it is a classic, sophisticated and delicious dessert, worthy of a dinner party.

But it rarely IS done properly and, over the years, I’ve seen it churned out on television in worse and worse variations, until this past week when I saw an absolute shocker and so I was propelled into making this post just to set the record straight if nothing else.

I’m convinced that the fatty, over-sweetened mess that Banoffi Pie has evolved into, puts off a lot of people, which is a shame. Hopefully, if they can be persuaded to try it as it was originally conceived, they might just become fans.

I’ve mentioned in a previous post how Banoffi Pie came into being, and one of the co-creators has also published online the back-story as well as his original recipe.

Even though I am a fan of the original recipe, I’m going to change it a little.

I know, I know……I realise I’ve just spent three paragraphs banging on about people changing recipes, but in my head this is ALLOWED – because in the past I have actually eaten original recipe Banoffi Pie. Over the years I’ve developed a personal rule of first trying a recipe in it’s original form, out of respect to the original author. That done, you can tweak it how you like, but make it their way first. I’ve lost count of the times I’ve been pleasantly surprised with the results.

Once you’ve tried the original recipe too, you can pop back and we’ll carry on.

Back already? Excellent.

Before we begin, lets just have a quick whizz around the components, which gives me the opportunity to bang on about those too:

Pastry Base: Yes, contrary to popular belief, the original recipe called for a sweet, shortcrust pastry, which is actually ideal for this dessert. We’re going to draw a discrete veil over the crushed biscuit-and-butter and (my personal bête-noir) chocolate-biscuit-and-melted-chocolate bases, which push this dessert into being sickly. The filling is so rich and sweet, having the dry, crumbly pastry is a perfect foil. I actually have a copy of the original recipe published in the second book of recipes from the restaurant where it originated ( “The Deeper Secrets of The Hungry Monk” ) which just specified ‘shortcrust pastry’. This I interpreted as carte blanche to use whatever recipe I liked. What I have for you here is the original sweet cornflour pastry which I adapted to a savoury version for the Cheese and Potato Pies. It has that extra crispness that a regular all-butter pastry lacks.

Filling: I’ve seen some people get very precious about the caramel “I make it all by hand!” they cry, ladling in the butter and cream. However, these caramels tend to be rather runny, and to be blunt, the filling can be doing without all that fat. The original is much simpler and is obtained by simmering unopened tins of sweetened, condensed milk for an extended length of time. This can be done in a variety of ways, but my method of choice is in the slow cooker because you can leave it unattended, and it won’t boil dry. Cover the tins with water, set it on Low and leave it for 8 hours. You can simmer them longer, up to 12 hours, and the caramel will gradually become darker the longer it is left in the water. The caramel in the picture was taken out of the slow cooker after 8 hours. In the UK, the most well-known producer of milk products (Carnation) have recently started selling tins of caramel. These are great if you need a dessert at short notice, but I find the caramel isn’t quite as firm as when you make it yourself, as well as being, to my taste at least, a great deal sweeter. If convenience is what you’re after, I suggest simmering more than one tin at a time and keeping the home-made spares in the cupboard.

Banana: This addition/improvement transformed Blum’s Coffee Toffee Pie into Banoffi Pie. The banana is laid on top of the caramel and underneath the cream, NOT on the pastry base. This would make spreading the caramel very difficult, as the sliced banana would stick to the caramel and slide about. And no, they don’t go on top of the cream either, because they’ll just turn brown and become very off-putting. And if you DO put them on top of the cream and then throw chocolate on top to disguise the browning, you’re fooling no-one. One variation that meets with Ian Dowding’s approval is to replace the banana with a thickened apple puree, making an Appleoffi Pie. Made with sharp, cooking apples such as Bramleys, I can just imagine the delicious contrast in both flavour and texture, although I’d probably leave out the coffee from the whipped cream for this version.

Coffee Cream:  Yes, coffee cream – whipped cream flavoured with coffee. So often this is replaced with plain whipped cream, or even vanilla flavoured cream, to the dessert’s great detriment. And, contrary to Mr Dowding’s original, in my opinion the coffee cream should be unsweetened and strong to the point of bitterness. Using espresso coffee powder turns it into a fantastic counterpoint to all the sweetness in the caramel and bananas, as well as lifting the dessert into dinner-party status. Coffee can do that. It’s almost as if it’s status as a grown-up flavour, confers adult status on everything it touches.

Chocolate for sprinkling/garnish: Whoa, whoa, whoa there, Nellie!? Whaddya doin’? You can’t go introducing a new flavour and shoving it on top of the pie just because you feel like it! Coffee, banana and caramel flavours are plenty busy enough, thankyousoverymuch! If you must sprinkle anything, a light dusting of espresso coffee powder is all the garnish it needs.

Baking Tin: You can make this dessert in any size and shape tin you like. A 20cm round tin, preferably with a loose bottom to help ease out the cooked pastry case, is traditional, but this time I used my loose-bottom rectangular flan tin (13cm x 35cm), which means the finished dessert can be neatly cut straight across in elegant, finger slices and the different layers are clean and clearly visible.

The Original(ish) Banoffi Pie

Pastry
60g cornflour
225g plain flour
140g butter
1 large egg
85g icing sugar
ice-cold water

  • Put all the ingredients into the bowl of a food processor and blitz until the mixture resembles breadcrumbs.
  • Gradually add the water, one tablespoon at a time, until the mixture comes together in a ball.
  • Knead smooth, then roll out thinly.
  • Line your chosen tart tin, easing the pastry into the corners/sides.
  • Leave the excess pastry overhanging the sides and chill in the fridge for 1 hour.
  • Preheat the oven to 200°C, 180°C Fan.
  • Remove the tin from the fridge and, now that the pastry has relaxed, trim the excess from the sides.
  • Prick the bottom of the tart tin with a fork.
  • Line the tin with baking parchment and weigh it down with baking beads/rice.
  • Bake for 12 minutes, then remove from the oven and take out the parchment and beans.
  • If the edges are already brown, cover them closely with foil and return the tart to the oven until fully baked (10-15 minutes).
  • Set aside to cool.

Filling
1 tin sweetened condensed milk turned to caramel, cooled

Unless you’re making a huge (30cm+) tart, then one tin is all you’ll need. Warmed carefully, it’ll spread a long way and a 1-2cm layer is rich enough for a treat without becoming sickly.

  • Open the cooled tin and tip into a small saucepan.
  • Warm the caramel gently until it becomes smooth and pourable.
  • Pour the warm caramel into the cooked pastry tart shell and spread it evenly over the base.
  • Lightly grease some clingfilm with butter and lay it closely over the caramel.
  • Chill until required.

To Assemble
300ml double cream
1tsp instant espresso powder + extra to sprinkle
2-3 bananas

  • Whisk the cream and coffee powder together until firm peaks.
  • Slice the bananas and lay a thin layer over the caramel.
  • Cover the bananas with the coffee cream. I like to just spoon it over, and keep it light and billowy, but if you prefer something more formal, you can pipe it. What you must do, is ensure that all the banana slices are completely covered. Just like the meringue on a lemon meringue pie, make sure the cream goes right to the edge of the tart, touching the edge of the pastry. Any banana left uncovered with start to discolour very quickly, but covered with the cream they remain delicately pale.
  • Dust the top lightly with espresso powder and chill until required.