
Marble Cake can be considered a classic British cake, still enjoyed by many all over the country. To my mind, however, it has always seemed less marble-y and more blobby, in that the big dollops of (usually) vanilla and chocolate cake batters are frequently only half-heartedly stirred together.
Well, as we all know, there’s nothing new under the sun and just over 100 years ago, Frederick T. Vine was thinking just the same thing. In his 1908 commercial baking book “Cakes and How To Make Them”, he has entries for several different marble cakes, whether by design or whether he forgot he’d already included some in the front of the book and just bunged a couple more in later on, we don’t know. His suggestions are obviously geared towards commercial bakeries turning out dozens of different cakes, as he initially suggests taking quantities of mixtures that are probably prepared on a daily basis and combining them into marble cakes a lot more colourfully than we do today.
- Marble Cake No.1: 1 batch of Silver Cake, divided, half coloured pink, half left white, 1 batch Spice Cake, 2 batches Gold Cake.
- Marble Cake No 2: 1 batch Silver Cake, divided: ¼ coloured pink, ¼ coloured brown with cocoa, ½ left white.
- Marble Cake No 3: ‘White Part’ made with egg-whites, ‘Dark Part’ made with yolks, treacle, cinnamon and dark brown sugar.
- Marble Cake No. 4: Silver Cake, with coloured and flavoured milk.
I tried a version of Marble Cake No. 1 some time ago, in a variety of loaf tins (see image below), and it certainly made a very jolly and colourful cake. However, if I’m being honest, it was still rather on the blobby side. So trying the ‘coloured milk’ method has been on the ToDo List ever since, and here we are.
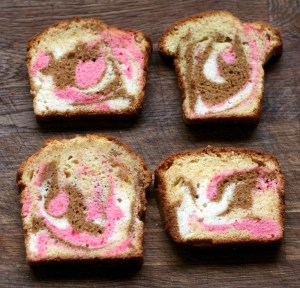
The original recipe did not call for any flavouring, aside from some brandy, so after a couple of trials I decided that a better approach was to flavour both the cake and the milk. I chose to flavour the cake with lemon and the milk with raspberry, to both preserve the paleness of the Silver Cake, and to make the milk complementary in flavour and contrasting in colour. You can, of course, choose any combination that appeals.
Using coloured/flavoured milk for the contrast allows for a much more delicate pattern to be achieved, and although a little fiddly in the construction, the results are very pleasing. The fine lines of red are a much more accurate depicion of the patterns in marble, and these are interspersed with the strong patches of colour/flavour where the milk has pooled between the spoonfuls of cake batter, almost a raspberry ‘ripple’ effect.
Marble Cake
I baked this Silver Cake mixture in mini loaf tins, but you could also use larger or smaller loaf tins and adjust the baking time accordingly.
115g unsalted butter, softened
140g caster sugar
140 egg whites
30ml brandy
zest of 1 large lemon
190g plain flour
60g cornflour
1tsp cream of tartar
½tsp bicarbonate of soda
milk (maybe)
60ml whole milk
raspberry flavouring
claret/raspberry colouring
- Grease and line 3 mini loaf tins (16cm x 9 cm x 5cm) with baking parchment.
- Heat the oven to 180°C, 160°C Fan.
- Mix the colour and flavouring into the milk. You want both to be strong, in order to be able to see and taste them in the baked cake.
- Whisk the softened butter until light and creamy.
- Add the sugar and whisk until pale and fluffy
- Add the eggwhites and mix thoroughly.
- Mix in the brandy and the lemon zest.
- Sift the remaining dry ingredients together, and gradually mix into the wet ingredients.
- If the mixture seems a little tight, mix through some milk until you achieve a dropping consistency.
- Spoon the mixture into the bottom of each tin in shallow blobs. Brush over the flavoured milk. There should be no uncoloured cake mixture. The excess milk will pool between the spoonfuls of batter and that’s fine. Each ‘layer’ should be a series of uneven portions of cake mix, rather than a smooth layer. Having the cake mix too smooth will make the flavoured marbling appear too formal. I found the best method was to scoop half a spoonful of cake mixture and lay it into the tin by ‘unscooping’ using the opposite wrist action, to lay it in a partial layer rather than a blob.
- Repeat the spooning and painting until all the cake mixture has been used up.
- Bake for about 25 minutes, turning the tins around after 15 minutes to ensure even baking. NB Be careful not to overbake – as an egg-white-only cake it will never be golden brown, and overbaking will make your cakes dry.
- When baked, remove from the oven and allow to cool for 10 minutes, before removing the cakes from the tins, peeling off the parchment and setting to cool on a wire rack.
- Store in an airtight container.
