
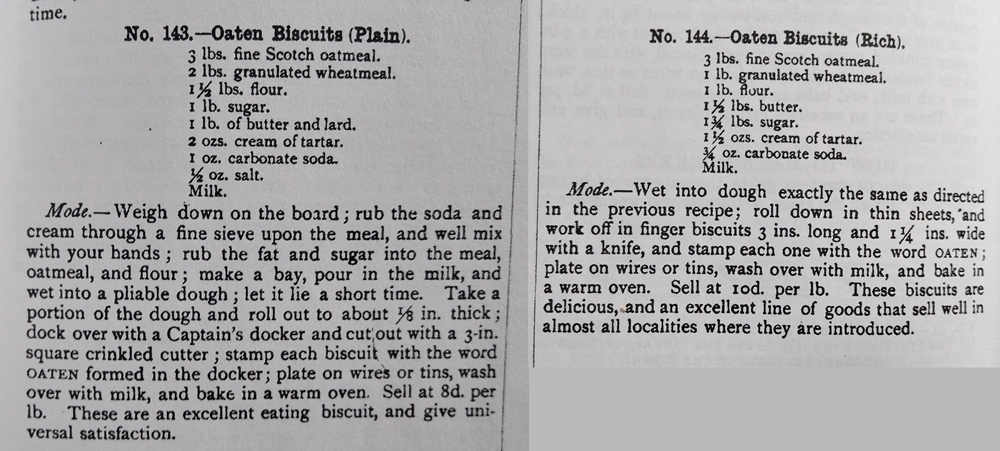
The recipes this week come from a classic Victorian book “Biscuits for Bakers” (1896) by Frederick T. Vine. They are essentially two versions of the same biscuit, one sweet, one plain. The method and baking time for both is the same, with the only difference being some of the ingredients: more sugar and butter in the sweet version (above left), different mix of flours, less sugar/butter and the use of lard in the plain version (above right).
Since the recipes are from a book for commercial bakers, the quantities given are huge and the instructions rather scant. For example, instruction to ‘bake in a warm oven’ is very much open to interpretation, forcing me to, in the end, just guess as 150°C Fan.
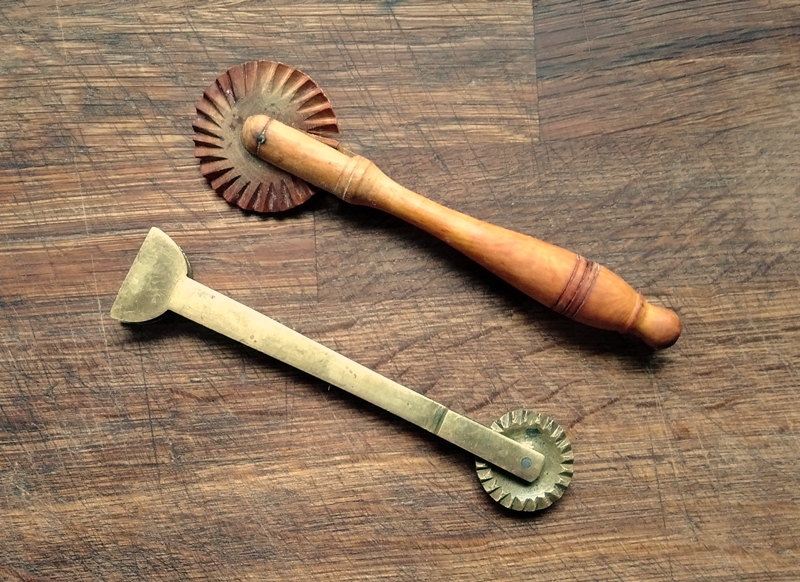
I chose these recipes for several reasons. Firstly, I love an oat biscuit – who, in their right mind, doesn’t? Secondly, the comment that different mixtures resulted in differing suggested selling price points, with the sweet biscuit selling for 10d a pound, and the plain 8d per pound, so I was keen to see whether the sweet biscuits tasted 2d per pound better (spoiler alert, they did and they didn’t). Lastly, I wanted to use some gadgets – my vintage pastry wheels (aka jagging irons) pictured below, and the lettering stamp set I’d bought last year and not yet used.
One of my pet peeves is wastage, and the rectangular shapes of these biscuits meant that I could cut them out with absolute minimum wastage. There’s nothing wrong with re-rolling – see previous post about Empty Pudding – but you run the risk of the re-rolled items baking mis-shapen, due to poor combining of scraps, or becoming tough, due to over-mixing.
So what are they like? Well, the sweet version is like a sweet digestive – sweeter than the best-selling modern brand, but not overly sweet, and crisp and crumbly. I love the texture, but they are a little sweet for my tastes. Further experimentation with a finer grade of oatmeal and less sugar might refine this satisfactorily. I tried stamping ‘Rich Oaten’ on them, but the slight spreading due to the increased quantities of butter/sugar meant the lettering veered towards the blobby, although they did become more browned during baking. The plain version held the lettering much better, and using the cutting wheel made for a very pleasing contrast between the flour-dusted top of the biscuit and the darker, unfloured cut sides. These biscuits are much more crisp and less crumbly, and although they were perfectly enjoyable plain, they really shine when eaten with a little salted butter, cheese or both.
During experimentation, it became clear that the optimum baking time for these biscuits is much longer than average, at 30 minutes. This is due to the need to ensure that they dry out completely, which in turn gives and maintains their crispness.
Oaten Biscuits
As mentioned above, the method and baking are the same for both types of biscuits, so just pick whichever style you prefer, and follow the method below.
Confession time: I was so engrossed in the lettering, I forgot to brush the biscuits for the photo with milk before baking. I quite like the results, but if you would like a browner biscuit, brush with milk.
| Plain Oaten | Rich Oaten | ||
| medium oatmeal | 170g | medium oatmeal | 170g |
| wholemeal flour | 115g | wholemeal flour | 56g |
| plain flour | 85g | plain flour | 56g |
| caster sugar | 56g | caster sugar | 85g |
| butter | 28g | butter | 100g |
| lard | 28g | cream of tartar | 1½tsp |
| cream of tartar | 1½tsp | bicarbonate of soda | ¾tsp |
| bicarbonate of soda | ¾tsp | salt | ½tsp |
| salt | ½tsp | milk | to mix |
| milk | to mix | ||
- Put the dry ingredients and fat(s) into a food processor and blitz to combine.
- With the motor running, add milk a little at a time, until the mixture comes together in a ball.
- Tip out the dough and knead a few times until smooth.
- Roll out thinly – about 5mm – and dock (poke holes) all over, either with a docker or the end of a skewer or similar.
- Cut out the biscuits. Rich Oaten are rectangles 3cm x 7cm, Plain Oaten are 5cm x 5cm squares.
- If you have stamp letting to name the biscuits, use it now.
- Chill the biscuits in the fridge for 30 minutes to help them keep their shape.
- Heat the oven to 190°C, 150°C Fan.
- Arrange the chilled biscuits on a parchment-lined baking sheet. Brush with milk if liked.
- Bake for 10 minutes, then turn the baking sheet around and bake for another 10 minutes. Finally, flip the biscuits over so the bottoms can bake well and bake for 10 minutes, for a total of 30 minutes.
- Cool on a wire rack.
- When cold, store in an airtight container.
