
I have a confession to make. I chose these recipes because I loved the idea of women baking cakes specifically for having a get-together and swapping gossip. Alas, that’s not where these cakes originate, but the truth just as interesting.
As I’ve mentioned before, I have spent quite a considerable amount of time cataloguing household manuscripts that have been digitised by various libraries around the world. Obviously, there is going to be a certain degree of repetition of the most popular recipes, but there are also those that stand out as original either by name or by ingredient, etc. Whenever I come across such a recipe, I mark it in the spreadsheet with an asterisk, so when I’m looking back over the thousands of recipes, those asterisked ones are easily highlighted as worthy of a second look. And for the other type of recipes, such as the 200+ recipes simply entitled “A cake”, I’ll get to looking at you in all your (presumed) variety soon, but to be blunt, you’re pretty low on the ToDo list.
The first recipe I found was this one, dated early 18th century (1738), at the Wellcome Collection.
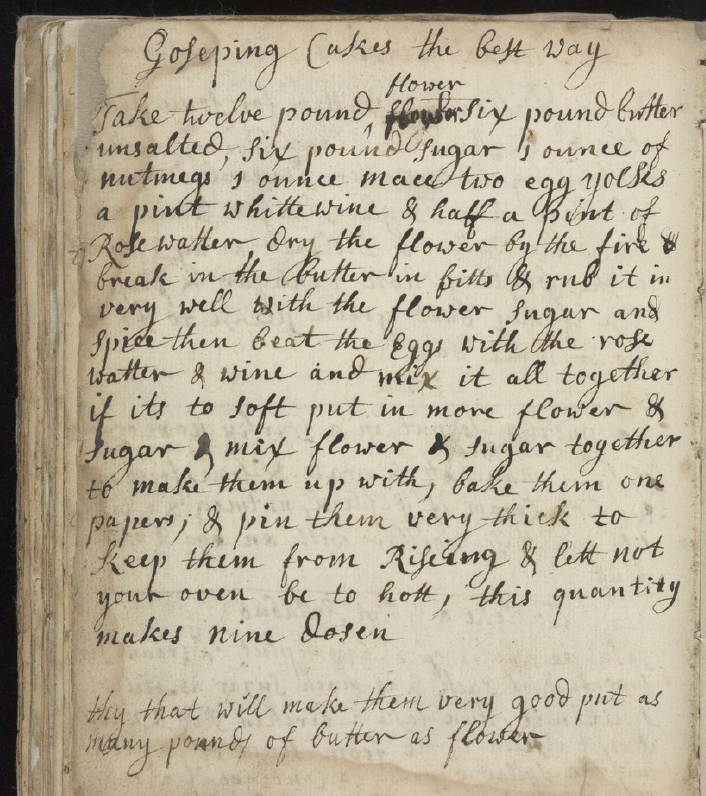
It appears to be a spiced variation of shortbread, and obviously one to make in quantity, because the yield of the recipe is over 100 biscuits. It’s demonstrating one of the many interpretations of the word ‘cake’, in this case meaning small, circular biscuits. The last line also caught my eye, because it recommends using equal quantities of butter and flour to make them “very good”.
Regular listeners will have read about my shortbread variation testing a few months ago, where the ratio of butter to flour can range from 1:3 to 1:2, so the assertion that 1:1 is the best, had me intrigued.
This recipe was very much on the back burner until I came across another recipe, similarly named, while indexing the digitised manuscripts at the National Library of Scotland.
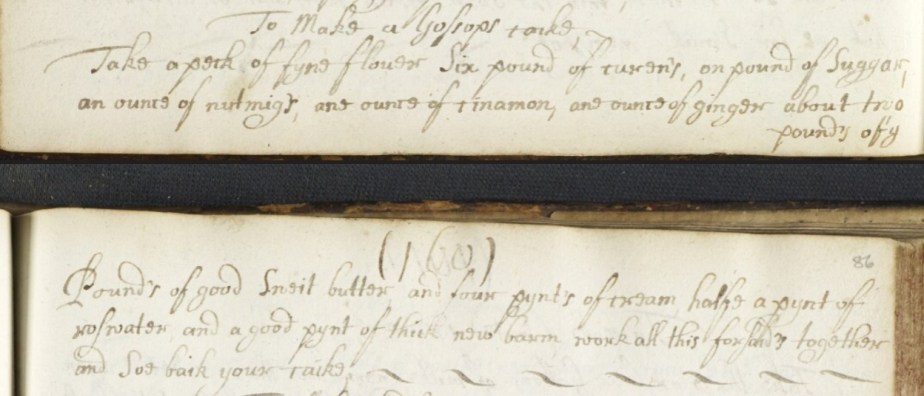
This recipe is in a manuscript older by almost a century (1660-1699), and differs in that it contains fruit, and is a large yeasted cake – exceedingly large, going by the peck/14lb/9kg of flour required – the term cake being used in this instance more akin to our modern usage.
To delve deeper into this mystery, I turned to the internet, and found the following passage:
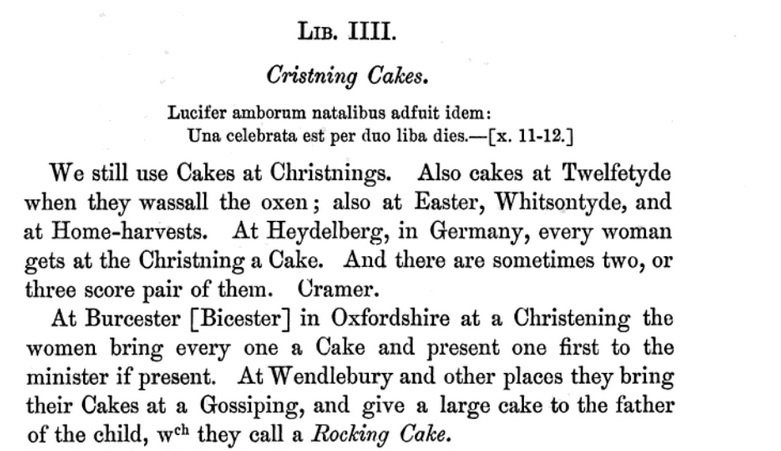
This threw up the question: What is a Gossiping? And so I went hunting in the Oxford English Dictionary which I learned that a Gossiping is a christening, or christening feast, derived and corrupted from “Godsibb”, which is an old English word for Godparent.
Not entirely relevant, but interesting nontheless, the oldest usage of Godshib I found was over a thousand years ago in Sermo Lupi ad Anglos, or the Sermon of the Wolf to the English, a sermon given by Wulfstan II, Bishop of Worcester and Archbishop of York (d. 1023) in 1014:
“And godsibbas and godbearn to fela man forspilde wide gynd þas þeode toeacan oðran ealles to manegan þe man unscyldgige forfor ealles to wide.”
Trans: And too many godparents and godchildren have been killed widely through-out this nation, in addition to entirely too many other innocent people who have been destroyed entirely too widely.”
Later usages of the word referred to a gathering of women/midwives when a woman was in labour, and hence to the modern usage.
So with a history stretching back many centuries, the account of christening traditions at Wendlebury would appear to neatly explain the differences between our two recipes: a large cake was presented to the father – presumably for all his hard work in the proceedings *eyeroll* – and the smaller cakes were shared with the guests.
So let’s get on with some gosseping!
A Gossop’s Cake
This is a fruited, lightly spiced and yeast-raised cake. If you’re British, it’s like an enriched teacake: delicious fresh, delicious toasted, and delicious either way with butter and a slab of cheese (but better with toasted). I’ve scaled the recipe down to make for a modest sized cake, but you can always double the recipe if it turns out to be a favourite.
315g plain flour
135g raisins
25g caster sugar
1tsp ground nutmeg
1tsp ground cinnamon
1tsp ground ginger
50g unsalted butter
150ml single cream
100ml water
1½tsp rosewater
1 sachet fast-acting yeast
single cream to glaze
- Plump the raisins: put the raisins in a saucepan and cover with water. Warm gently on a low heat for 10 minutes while the dough mixes. Strain and pat dry.
- Sift together the flour, yeast, sugar and spices.
- Put the butter, cream, water and rosewater into a small pan and warm gently over low heat just until the butter has melted.
- Put all ingredients except the raisins into the bowl of a stand mixer fitted with the dough hook and mix on slow until the dough comes together, then continue to knead for 10 minutes until smooth.
- Add in the plumped raisins and mix on slow to combine.
- Grease and line a tall, 20cm cake tin, preferably loose bottomed, with parchment.
- Form the dough into a smooth cake and place in the prepared tin.
- Set aside to rise until doubled in size. The enrichments to the dough (cream/sugar/fruit) will impact the rise, which is why there is only a single rise for this cake, thus taking advantage of the initial vigorousness of the yeast.
- Heat the oven to 190°C, 170°C Fan.
- When the cake has risen, gently brush the surface with single cream, and bake for 30-40 minutes until well risen and golden brown.
- Cool the cake for 10 minutes in the tin, then remove and set on a wire rack to cool completely.
- Store in an airtight container.
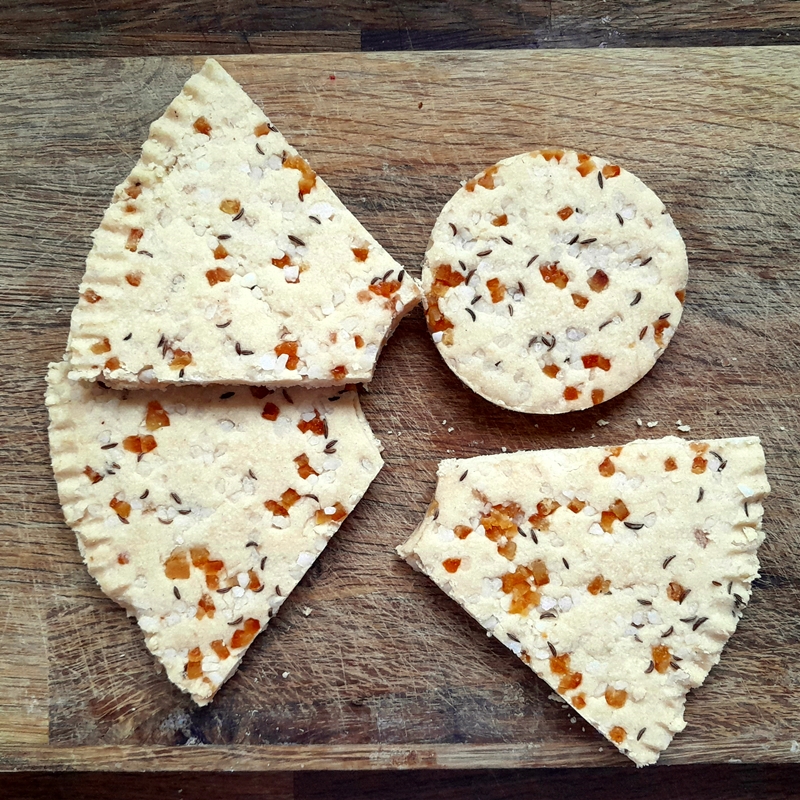
Goseping Cakes The Best Way
I’ve opted for the proportions where butter = flour because, contrary to my expectations, it really did taste much better that with just half the amount of butter.
250g plain flour
250g unsalted butter
125g caster sugar
1tsp ground nutmeg
1tsp ground mace
1.5tsp rosewater
1 large egg yolk
30ml white wine
1tbs caster sugar for sprinkling
- Put the dry ingredients into the bowl of a food processor.
- Cube the butter and add to the dry ingredients.
- Blitz the mixture a few times until it resembles breadcrumbs.
- Whisk together the yolk, wine and rosewater.
- Add the wet ingredients to the dry and blitz until the mixture comes together in a soft dough.
- Line a 20cm square tin with parchment paper.
- Turn the dough out onto parchment paper.
- Press the dough out evenly and smooth over.
- Chill in the freezer for 20 minutes.
- Heat the oven to 160°C, 140°C Fan.
- Poke holes all over the surface with a fork or using a cocktail stick, in the manner of shortbread.
- Bake for 30 minutes, turning the tin around after 15 minutes to ensure even baking.
- Remove from the oven and turn off the heat. Sprinkle the caster sugar over the hot shortbread.
- Cut the shortbread into pieces using a thin bladed knife or metal dough scraper.
- Return the tin to the cooling oven until cold, to ‘dry out’.
- When cold, store in an airtight container.


