
This recipe might be my finest creation since The Ploughman’s Loaf!
If the name of the blog weren’t already a huge clue, I am a big fan of leftovers, and the bigger the occasion, the greater my happiness.
Because however wonderful the celebratory meal, opening the fridge the next day to an array of already-cooked food requiring only a little reheating – or in the best cases, none at all – is a thing of beauty.
Boxing Day is arguably the Christmas Day of deja food, with the greatest selection of food possibilities. The simplest way to sample these delights is the humble sandwich: a little turkey or chicken, a little ham, a little cranberry, some stuffing…
But the problem with all these little bits here and there is that before long, you’re quickly headed towards a sandwich of Dagwood proportions.
In addition, I love some texture to my sandwiches – the popularity of adding crisps to sandwiches in the UK is well acknowledged. In traditional roast dinners, the stuffing is frequently the star on the plate: crunchy on top, soft underneath, and packed with savoury flavour. However, as a deja food, it loses much of its appeal, being rather bulky and in texture, veering towards the claggy.
The recipe I have here is the solution, and is so simple, I’m surprised it hasn’t occurred to me before: instead of breadcrumbs in the stuffing, put the stuffing flavourings into the bread. The bread can then be toasted for a sandwich and provide crunch and taste without the resulting sandwich requiring the unhinging of one’s jaw.
This recipe is based on my Traditional Stuffing recipe, although you can also use it as a basis for making a loaf from your own family stuffing recipes. To my lovely American readers, I hope you’ll enjoy saving money by making sandwiches at home with this bread on the day after Thanksgiving, instead of joining the wrestling matches at the Black Friday sales.
Stuffing Loaf
When cooked, this loaf will be a lot heavier than your regular white loaf – after all, it will have an additional half a kilo of onions in it – but provided you let it have sufficient rising times, the crumb will be open and moist (see top photo).
500g onions
60ml vegetable oil
salt and pepper
1 tbs each dried “Scarborough Fair” herbs, i.e. parsley, sage, rosemary, thyme
1 tbs chicken bouillon powder (optional)
2 sachets fast action yeast
600g strong white bread flour
500ml warm water
- Peel and chop the onions into 2cm squares.
- Add the oil to a pan and set over medium-low heat (4 on a 1-9 scale).
- Add the onions and toss in the oil to coat.
- Sprinkle with 1tsp of salt to help draw out the moisture.
- Cook gently until the onions are softened but not coloured, stirring occasionally – about 15-20 minutes.
- Season with pepper and sprinkle in the dried herbs and stir to mix in. Cook for another 2 minutes, then remove from the heat and set aside.
- Mix the bouillon (if using), yeast and flour together.
- In a large bowl – stand mixer or other – pour in the warm water and add the onion mixture.
- Add the flour mixture and knead into a dough – around 10 minutes.
- Cover the bowl with plastic and set in a warm place to rise for at least 1 hour, probably a little longer, until doubled in size.
- Tip the risen dough out onto a floured work surface and form into a loaf shape.
- Drop the dough into a large (1kg/2lb) greased loaf tin. Dust the top with flour and lightly cover with plastic. The dough will fill the tin to about 3/4 of its height.
- Set the loaf aside to rise for at least 30 minutes.
- Heat the oven to 220°C, 200°C Fan.
- Arrange the oven shelves so that there is a solid shelf below the rack shelf.
- Fill a cup with water.
- When the loaf has risen (and nicely rounded above the edge of the tin), move it into the oven and onto the rack shelf.
- Pour the cup of water onto the solid shelf and close the oven. The steam will help the formation of the crust.
- Bake for 30 minutes.
- Turn the loaf tin around and bake for another 20 minutes.
- Remove the loaf from the tin and return it to the oven on the rack shelf and bake without the tin for 10 minutes to crisp the crust.
- Remove the loaf from the oven and cool on a wire rack.

The Day After Sandwich
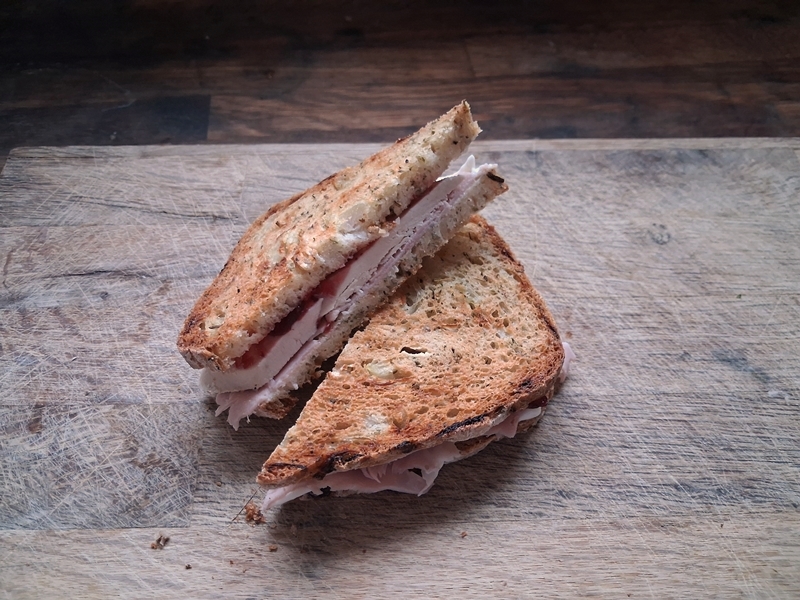
Whether it’s Thanksgiving, Christmas, Easter or just your regular Sunday roast, The Day After Sandwich made with Stuffing Loaf is a delicious treat. Obviously, you can make a sandwich any way you like, but I thought I’d offer a couple of suggestions with special reference to using your stuffing loaf.
- Toast the bread: You’ll get the best stuffing flavour from the bread if its toasted, but here’s my recommendation – ONLY TOAST ONE SIDE OF EACH SLICE. This will give a nice crunch to the outsides and a good contrast with the softness of the filling. Toast both sides by all means, but I found that a bit too crunchy (tho’ that’s probably because I cut the slices thin – approx 1cm).
Now my kitchen has a minuscule amount of counter space, so I don’t have room for a toaster. Consequently, when I want to make toast, I use the oven grill, so it’s easy for me to only toast one side (move rack to highest level, put in cold, turn on grill setting, 8 minutes). If you have a toaster with a nice wide opening, you can put two slices in together, and then only the outer sides will get toasted. - Preparing the inside of the bread/toast. Another of the great choices you can make is to have either a hot or cold filling. I recommend spreading the insides of your bread/toast slices with mayonnaise if planning a cold sandwich, and butter if going for a hot sandwich.
- For a hot sandwich, warm some slices of chicken/turkey in gravy and spoon generously into your sandwich.
- For a cold sandwich, arrange slices of turkey/chicken/ham or a combination, and add a teaspoon of cranberry sauce.


