Afghans

These biscuits are surprising. Surprisingly long-lived, surprisingly few ingredients readily available in your cupboards, and a surprisingly rich and addictive taste and texture. They’ve been around almost a century, and with that fact you immediately know they must have something special about them, because terrible recipes just don’t hang around. To illustrate this fact, allow me to introduce Ann Peckham’s Crimson Biscuits.
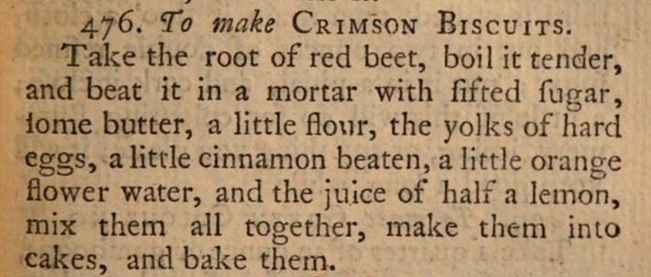
Crimson Biscuits from Ann Peckham’s The Complete English Cook (1767, p151)

Yes, these delightful beetroot confections were first printed in Ann Peckam’s The Complete English Cook, back in 1767, and, even the 18th century fervour for cookbook plagiarism couldn’t tempt anyone else to put it in with all the other stolen recipes. I know it’s a bad recipe because many years ago I made it. And even accounting for the differences in gastronomic tastes back then, I find it difficult to believe anyone ever found this appealing.

But back to Afghans.

I noted this recipe whilst flicking through one of my many Women’s Institute cookbooks, specifically Tea Time Treats (1980), published by the Yorkshire County Federation of Women’s Institutes. And it’s not the only book to have included this recipe, or at least a version of it. It can be found dotted through many recipe books, although, truth be told, not so much in recent years and I’m wondering if it has something to do with the name. I’ve pondered long and hard on whether there is something derogatory about the name and have come to the conclusion that, if there is, it is because you think there is. The Afghan biscuit originated in New Zealand in the 1930s and whilst there are a variety of theories on the origins of it’s name, I’m choosing to believe that the name comes from the appearance of the topping and biscuit together, which resembles to the traditional pakol hat worn by Afghani men and/or the biscuit alone symbolising the rugged Afghan landscape.

The two earliest recipes cited by Wikipedia, come from The Timaru Herald, in late 1933 and early 1934 (below).
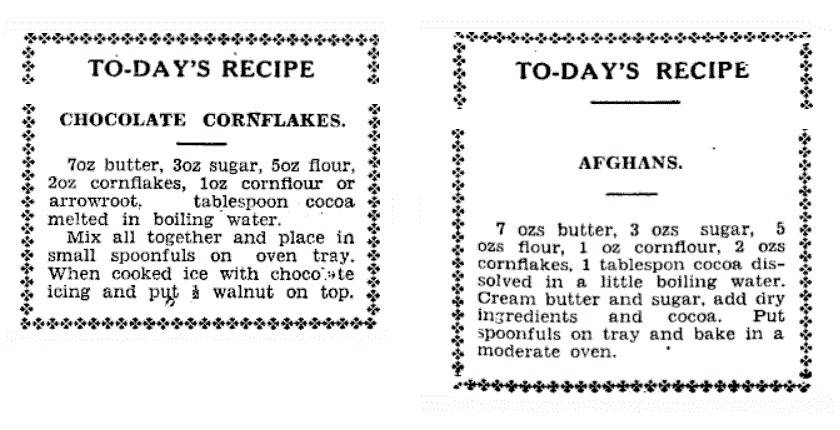
Earliest recipes for Afghans: Timaru Herald, Volume CXXXVII, Issue 19590, 9 September 1933, Page 3 (L) and Timaru Herald, Volume CXXXVIII, Issue 19883, 21 August 1934, Page 12 (R).

The earliest recipe I was able to find myself, and one which I am using in this post, appears in a 1941 edition of the New Zealand Journal of Agriculture (below).
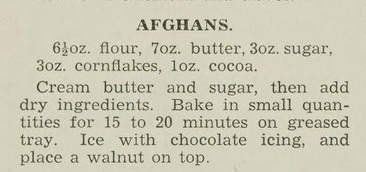
Recipe for Afghans from The New Zealand Journal of Agriculture Vol. 62, Issue 4, April 15th, 1941 p304.

A notable ingredient – and there are only five – is cornflakes, which not only give each biscuit the aforementioned rugged appearance but also an amazing crunchy texture – which persists even when storing the biscuits in an airtight container. The biscuit mixture is also unusual in that it contains a greater quantity of butter than flour. However, it also contains a generous quantity of cocoa powder, which is very dry, despite being composed of 20% fat (and in many baking instances can be used as a substitute for flour on a 1:1 basis).

The recipes in The Timaru Herals also include a small propprtion of cornflour, thereby technically bumping the number of ingredients to six. I tried this variation, as I love the texture it brings in, say, Melting Moments, but it didn’t seem to add anything to the texture in this instance. The flavour of the biscuits came across as powdery and the texture seemed a little off – perhaps it was fighting with/against the already dry cocoa. Anyways, it was not for me – I feel the texture is best with just the cornflakes. Try it yourself (by removing 30g plain flour and adding 30g cornflour) if you’re intrigued.
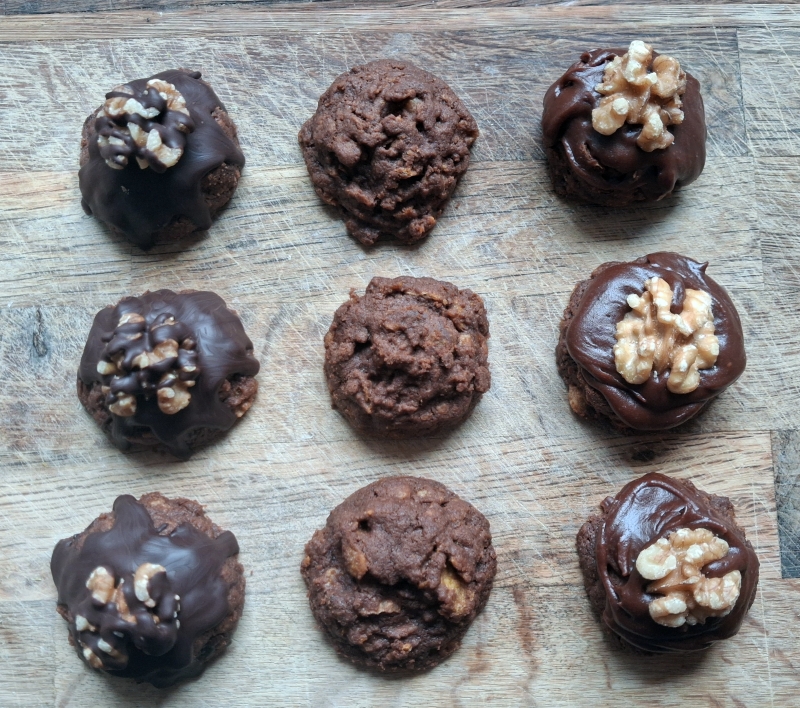
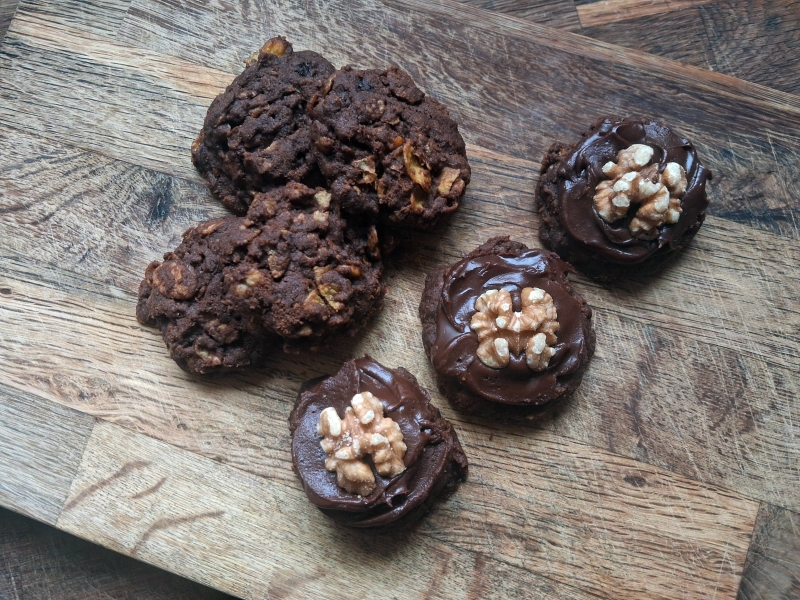
Afghan biscuits with alternative topping ideas: Melted dark chocolate (L) and chocolate icing (R), each topped with half a walnut. A line of plain, unadorned biscuits in the middle.

Toppings

As can be seen from the early recipes, the traditional adornment for Afghans is chocolate icing and half a walnut. Rather unhelpfully, the early recipes fail to provide a suitable icing recipe, so I have gone in search of answers.

The Edmonds Cookbook, the iconic New Zealand publication (akin in stature to the BeRo booklet in the UK and early publisher of an Afghan biscuit recipe), suggests a buttercream made by mixing a large quantity of icing sugar, cocoa, a generous amount of butter and vanilla flavouring, with a couple of tablespoons of hot water. I tried this version and it was very pale and gritty from the cocoa powder. Cocoa really needs both liquid and heat in order to mix in properly.

Several modern Afghan recipes recommend plain, melted chocolate. Afghans are not an overly sweet biscuit, so I thought this version might be more of a success – the richness and smoothness as contrast to the biscuit itself, but it was not to be. There was actually too much texture contrast between the biscuit and the chocolate and they fought, rather than complimented each other. In addition, it needed a significant amount of chocolate in order for the half walnut to adhere.

After some experimentation, the best icing version came from an adaptation of the original buttercream. By using less butter and also melting it as well as using boiling water, the cocoa combined into a much smoother mixture. Easily spreadable and glossy, it sets once cooled, but with no loss of shine. The walnut attaches easily into the soft icing and is held firmly in place when it cools.

All this being said, I’m not entirely convinced that the biscuit actually needs any gilding at all. The richness of the butter content, the depth of the chocolate flavour and the texture of the cornflakes make for a much more substantial and interesting biscuit than normal. My recommendation would be to enjoy these biscuits unadorned, but if making for a special occasion/gifting, then add some glamour with the icing/walnut.

Afghan Biscuits

As already mentioned, these biscuits require only five cupboard staples. They are easily adapted to gluten-free by switching out the plain flour for a gluten-free one, but be sure to remember to add xanthan gum (guess what prompted me to mention this), otherwise they will just spread and pool together into one huge sheet (ask me how I know this will happen?). If this happens, just crumble it up and enjoy with a spoon, or over cereal/yogurt. Still delicious. Ask me how I know this 😀

Easiest method is to use a stand mixer, but hand-held/by hand is also fine.

200g butter – softened
85g soft dark brown sugar
180g plain flour (or GF flour with ½ tsp xanthan gum)
30g cocoa powder
85g cornflakes

  • Heat the oven to 180°C, 160°C Fan.
  • Sift the flour and cocoa together into a bowl.
  • Cream together the butter and the sugar until light and fluffy.
  • Add the cocoa/flour and mix until combined and resembling large crumbs.
  • Add in the cornflakes and mix briefly. The flakes will be crushed a little by the mixer attachment, so only mix until they are combined with the rest of the ingredients, and no longer. You want to still be able to see them, so don’t mix/crush them into powder.
  • Prepare two baking sheets by covering them with baking parchment.
  • Spoon or scoop dollops of the mixture onto the baking sheets. I use my small 4cm-ish diameter ice-cream scoop, which gives 26-28 portions, but you could use 2 spoons/forks and really lean in to the whole rugged appearance vibe.
  • Bake for 20 minutes, turning the baking sheets around after 10 minutes to ensure even baking.
  • Cool the biscuits on the tins and store in an airtight container once cold.

Fudgy Chocolate Icing

If you prefer to use melted chocolate for your biscuits, you will need approximately 200g. Otherwise, use the icing below.

200g icing sugar
25g cocoa
50g unsalted butter
30ml boiling water

walnut halves

  • Sift together the icing sugar and cocoa
  • Melt the butter, add the boiling water, and pour both into the cocoa/sugar mixture.
  • Stir vigorously with a spoon until the mixture comes together into a glossy paste.
  • Top each biscuit with a spoonful of icing and press a walnut half into the top.
  • Store in an airtight container once cooled and set.
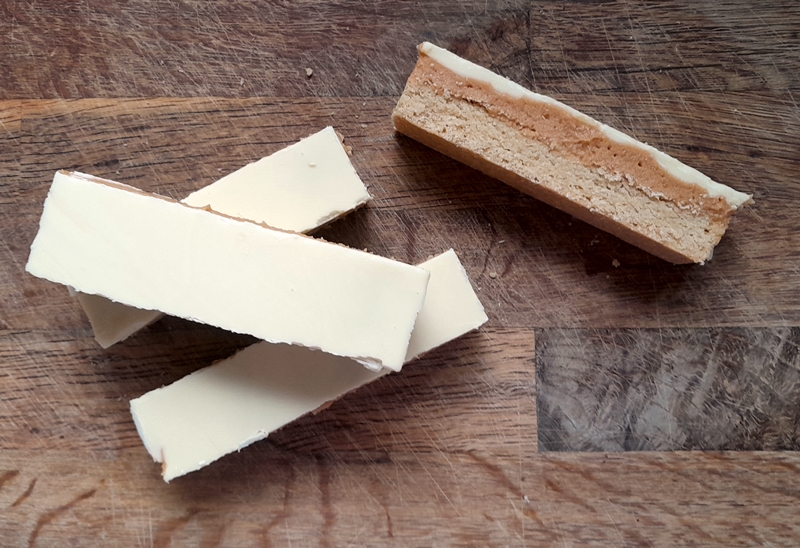
Butterscotch Shortbread

The deliciousness I have for you this week is something of a Legoâ„¢ recipe in that it started with A New Thing, which was exciting and delicious, but for which I had no use for at the time. However, if you then clip it together with two other things, Voila! A NEW New thing that VERY usable anytime, but especially as a delicious-mouth-filler-round-about-mid-morning-with-some-hot-strong-coffee-thankyousoverymuch.

OK, enough code-talking. The New Thing to which I refer is something that I found on the internet which is Whipped Caramel. A simple and straightforward combination of sugar, cream and butter which is whipped as it cools to incorporate air into the mixture, thus making it light and creamy. It holds it’s shape very well, making it an indulgent means of filling and topping cakes, large and small.

However, I must confess to taking issue with the name, because it’s not so much caramel as butterscotch. Because, and I don’t feel this is too much of an exaggeration, it has butter in it. I also think it has something to do with the incorporation of the air. It’s almost as if it tastes lighter. Anyway, I only mention this because if you’re expecting a caramel from a recipe and you end up with a butterscotch, it might throw a spanner in your recipe works. A delicious spanner, but a spanner nonetheless.

So there I was, with some delicious whipped butterscotch, and nothing to use it on, so I popped it in the fridge, reasoning that, if nothing else, I could determine how long it would last.

Well, as luck would have it, my daughter came home from school the very next day with news that the school’s Macmillan Coffee Morning was scheduled for the end of the week and she needed ALL the bakes. Also lucky was the fact that I’d just finished my mammoth shortbread testing session, so it was just a matter of thinking what to top it off with, found I had some white chocolate in the cupboard, and the Coffee Morning was saved!

I was pleased with the way that the white chocolate finished it all off, and the overall result is very similar to Millionaire’s Shortbread (Sidebar: the difference between Millionaire’s and Billionaire’s Shortbread is, apparently, Billionaire’s Shortbread has a little salt in the caramel – who knew!?) to look at. The butterscotch and white chocolate gives it a flavour combination which is both decidedly different, and rather moreish. Teamed with your favourite 1:2:4 shortbread, and you have a customised treat fit for bake sales, gifting or even just hiding away for your own special treat.

The only changes I’ve made to the Whipped Caramel are a couple of suggestions for the method, which, due to the somewhat Faffyâ„¢ approach, will markedly reduce your chances of failure.

I am suggesting making a large batch here, mainly due to the Faffâ„¢ Factor, because you don’t want to end up having to go through it all again because it has been inhaled by your nearest and dearest. That said, you could make a batch of the caramel and just a regular batch of shortbread, and keep the extra in the fridge for later (it will keep a week at least).

Butterscotch Shortbread

There are three elements to this recipe: the shortbread, the whipped butterscotch and the white chocolate topping. I recommend that they are made in that order, or if you want to spread out the tasks, make the whipped butterscotch the day before.

The Shortbread

  • Make a batch of 1:2:4 shortbread.
    • For a small batch, that uses only half the quantity of whipped caramel, use a tin of size 18cm x 25cm.
    • For the large amount of butterscotch shortbread, I used a double batch of shortbread and a tin of dimensions 30cm x 22cm and bake for a total of 40 minutes, turning the tin around halfway through.
  • Take the cooked shortbread out of the oven and cut it to the size pieces you wish to serve your butterscotch shortbread. I cut fingers of dimensions approximately 3cm by 10cm. NB The finished shortbread is very rich, so smaller is better – with hindsight, a more reasonable size would have been 5cm x 3cm. Remember, you can always go back for another piece, but a too-large piece… well, let’s just say it IS possible to have too much of a good thing.
  •   Set the shortbread aside to cool, either in the cooling oven or on the worktop.

The Whipped Butterscotch

375g caster sugar
100ml water
100g unsalted butter cut into cubes
300ml double cream[1]

  • Add the sugar and water to a pan. A broad (frying) pan will help with moisture evaporation more than a saucepan. A non-stick pan for preference.
  • Stir the sugar and water together over low heat until dissolved. It is possible to skip using the water and just melt the sugar, but you then run the risk of burning the sugar, and once burnt, there’s no disguising the bitterness. And I know this because I did it myself. I was melting the sugar without water, and I thought I’d smelled a touch of burn, but ploughed on regardless. After going through all the whipping and cooling and more whipping, it was very disappointing to be able to taste the burn in the finished butterscotch. So making a syrup and evaporating the water is worth it for peace of mind and guaranteed success, and doesn’t lengthen the process by much.
  • Simmer the syrup to evaporate the water, and allow it to bubble until it has reached a golden caramel colour. Once all the water has evaporated, it will caramelise quickly, so keep a beady eye on it.
  • When the caramel has darkened to your liking, add in the butter and whisk it as it melts.
  • Add the cream and continue whisking over heat until combined – about 2 minutes.
  • Pour the butterscotch into a bowl and cool in the fridge for 20 minutes. It won’t be cold, but it will be much cooler than it was, and quicker than waiting for it to cool on the side.
  • Using a hand whisk, or a stand mixer, whisk the butterscotch for 1-2 minutes. The aim is to incorporate as much air into the butterscotch as it cools. It will thicken as it cools and the colour will become lighter.
  • Put the butterscotch bowl into the freezer and chill for 10 minutes, then whisk again. Each time you whisk, the butterscotch will thicken and get lighter again.
  • You can now use your whipped butterscotch, or keep it in the fridge until required.

To Assemble

400g white chocolate

  • If you’ve stored your whipped butterscotch in the fridge, you might want to give it an extra whisk, to make it easier to spread.
  • Spread the butterscotch over your shortbread in as thick a layer as you wish. I recommend erring on the side of caution, as it is very rich. Smooth over the surface and chill in the fridge while the chocolate is prepared. If you don’t use all your whipped butterscotch, you can store it in the fridge in a covered container. When needed, just whisk it briefly to get it to a suitable softness.
  • Break the chocolate into squares and melt – either over hot water or in 30 second intervals in the microwave. Stir the chocolate until fully melted, and then for 1-2 more minutes in order to cool it down: too hot, and it will start to melt the butterscotch and you won’t get a clean finish. Then again, a few swirls of butterscotch in the chocolate isn’t the end of the world by any means.
  • Take the shortbread and butterscotch slab out of the fridge and pour over the melted chocolate. Smooth it to an even layer using an offset spatula.
  • Return the tin to the fridge to set completely.

To Divide

Regular listeners will be aware of how much I love a clean, sharp slice. Even the humblest of recipes can become eye-catching with the cunning wielding of a sharp blade.

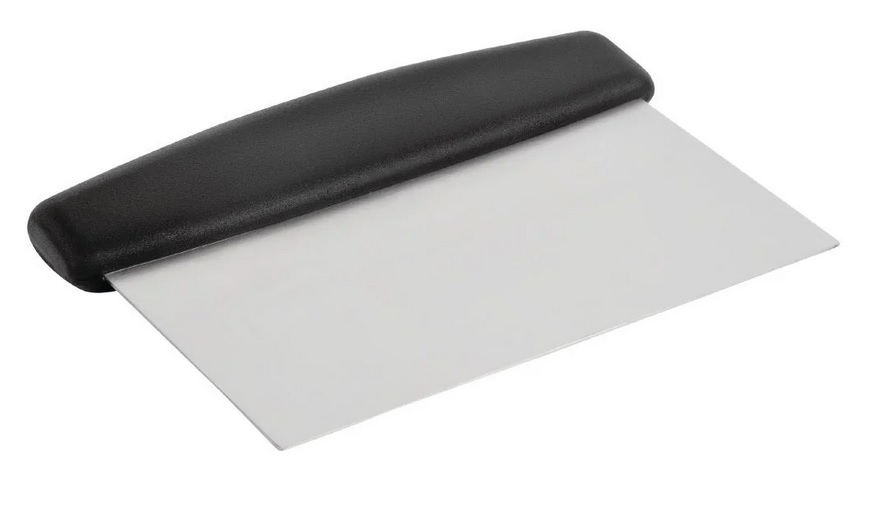
That said, I’ve found one of the best blades is one of these dough scrapers. The blade itself isn’t sharp, but it is super thin and can make an excellent and clean cut.

Here is how to ensure your slab of butterscotch shortbread emerges in sharp and clean slices.

  • Remove your slab of butterscotch shortbread from the fridge and set it on the countertop.
  • Take a clean cloth or a double layer of kitchen roll and lay it on top of the set chocolate.
  • Lay a cutting board on top of that, and carefully turn the whole slab over, so that once the baking parchment is removed, the shortbread is uppermost.
  • The lines from cutting the shortbread earlier after it was baked should be visible.
  • Slide your dough blade into the cuts in the shortbread, then press down sharply to cut through both the butterscotch and the chocolate in one clean movement.
  • Make sure you have cut – or rather re-cut – through all of the pieces before transferring your butterscotch shortbread to an airtight container. Use a piece of parchment between layers to keep crumbs off your pristine chocolate finish.
  • NB I recommend storing your butterscotch shortbread in an airtight container in the fridge, or failing that, somewhere cool, in order to preserve the clean, sharp edges of the butterscotch. Allow it to come to room temperature before serving.

[1] You can also use whipping cream, which will give a softer textured butterscotch, that might be more suitable for frosting/filling cakes/cupcakes.

Chocolate Cakes

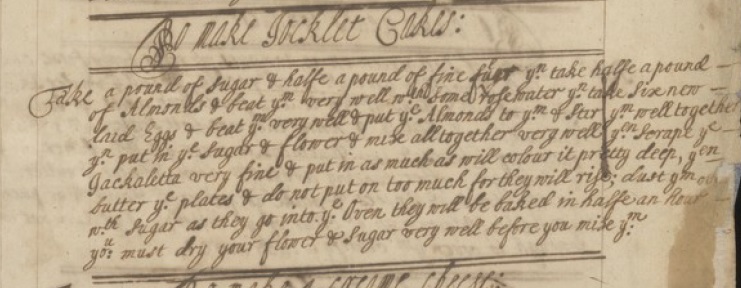
Whilst poring over old manuscripts, I love finding really early examples of recipes we would recognise today. And so I was delighted to come across this recipe for chocolate cakes. It appears near the front of a manuscript (MS1799, dated 1700-1775) digitised by the Wellcome Collection, and so, in my opinion, is closer in date to 1700 than the latter half of the century. The reason it caught my eye was because it reads as a ‘normal’ cake recipe, very unusual for the time.

18thC Chocolate Cakes
Chocolate Cakes, MS1799, (1700-1775), Wellcome Collection

Experience has led me to be cautious when it comes to the word ‘cake’ appearing in old recipes. In times past, this word was used for a broad range of ‘items that were circular’, rather than the baked confections of flour and eggs we associate with the word today. In the past I have been thrilled to find early recipes for lemon cakes and gooseberry cakes, only to find that they are for fruit paste and jellies, musk cakes that turn out to be incence, puff cakes that are meringues, rout cakes that are biscuits and spice cakes that are buns.

Even ‘chocolate cakes’ can catch the unwary, as many old recipes sporting such a title are actually instructions for making solid blocks of ‘chocolate’ ready to use in recipes. Unlike the cocoa powder we buy today, these ‘cakes’ were similar to the modern blocks of Mexican chocolate: solid, hard and requiring grating before use. The old recipes for ‘chocolate’ begin with the roasting of the cocoa beans, which are then pounded and ground extremely fine and mixed with sugar, vanilla and spices before drying in cakes which are then stored for use, which makes me incredibly grateful that we don’t have to go through such Faffâ„¢ today.

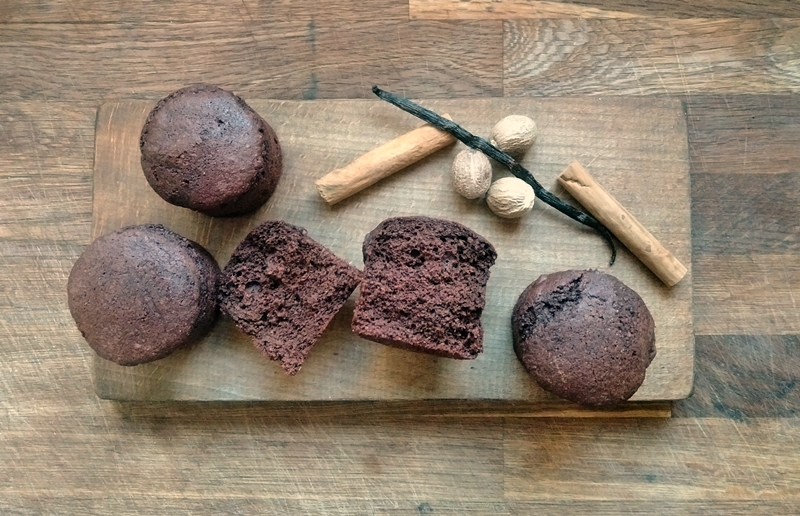
Happily, this recipe omits the time-consuming ‘make your chocolate’ part, but in adapting this recipe for modern use, if an authentic 18thC flavour is required, the spices that would be part of the original cakes of ‘chocolate’ need to be added in. The quantities below might seem a lot, but there’s also a lot of cocoa, so to make sure they can all sing, the quantities need to be generous. You can play around with the spices to your taste – other chocolate recipes I’ve read include one or more of the following: allspice, cloves, aniseed, cardamom, musk, ambergris, and either achiote or cochineal for a reddish colour.

So what are they like? Well, to be honest, it took several batches of tweaking before I was happy with the result. The taste is intensely chocolate-y, and the addition of the spices makes for an unusual and rich flavour. In the interests of full disclosure, as can be seen from the photo, these are dense cakes, and are most definitely not of a lightness of a Victoria sponge, or even a sturdy Madeira cake. But to be frank, that is part of their charm. Since they are made without butter, I would recommend serving/eating them with some lightly whipped cream, or ice-cream, for the mosture as well as the contrast in texture and temperature: the rich warmth and spiciness of the cake against the cold cream is deliciously satisfying.

These cakes include ground almonds, which help to enrich the texture, but also require a little time to work their magic. Consequently, if you’re not eating them straight from the oven, these cakes benefit from being kept 1-2 days in order for them to soften. Freshly-baked, but cooled, they are rather – ahem – ‘firm’, but stick them in a ziplock bag for a day or two and they soften and become glossy and a little sticky (in a good way).

If you’d like to make a less sturdy, more modern sponge version, all it takes is the addition of 1.5tsp baking powder, sifted with the flour.

I used a silicon cupcake mould with straight sides, which look great, but, even thoroughly buttered, proved challenging when it came to getting the cakes out in one piece. Other options might be ‘regular’ bun/cupcake moulds, or use paper liners.

Chocolate Cakes

Circa 1700. Makes 8-12, depending on your small cake tin size.

30g melted butter
150g sugar
3 large eggs
1tbs vanilla extract/paste/seeds of 1 vanilla pod
40g cocoa powder*
2tsp ground cinnamon
1tsp ground nutmeg
75g plain flour
1.5tsp baking powder (optional)
pinch salt
75g ground almonds

  • Heat the oven to 180°C, 160°C Fan.
  • Grease your moulds with the melted butter.
  • Whisk the eggs and sugar together until light and foamy (5 minutes or so).
  • Sift together the flour, cocoa, spices, salt and baking powder if using.
  • When the eggs are foamy, use the whisk attachment (or a balloon whisk) to gently fold in the flour mixture.
  • Stir in the almonds.
  • Portion the batter out into the greased moulds.
  • Bake for 18-20 minutes, turning the moulds around after 10 minutes to even the baking.
  • Remove from the oven and allow to stand for 10 minutes to firm up.
  • Run a thin blade around the edges of the cakes (if not using cupcake papers) and gently ease the cakes from the moulds and cool on a wire rack.
  • Enjoy warm with cream, or place in an airtight container for 1-2 days to mellow.

* Modern cocoa is very drying, so if you’d like to use more than this amount, reduce the quantity of flour by that same amount. i.e for 50g cocoa, use just 65g flour.