Soda Bread

I was surprised to read recently that Soda Bread is considered to have migrated from the US, based on a notion that the early settlers used potash to improve their baking. Amelia Simmons (1796) uses potash in some of her gingerbread recipes and Mary Randolph includes a recipe for Soda Cake in her 1824 book The Virginia Housewife.

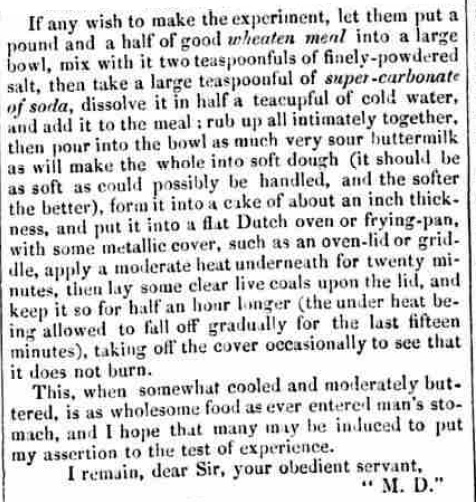
These notwithstanding, the earliest Soda Bread recipe that I have been able to find in print is a letter published in the Newry Telegraph, dated September 2nd 1836. The correspondant, who signs him/herself “M.D.” gives the following recipe:

Soda Bread recipe

Having tried a fair few soda bread recipes over the years, I was struck by how minimalistic this recipe is – literally four ingredients: flour, salt, baking soda, buttermilk. Over the years, modern recipes have managed to sneak in  a myriad of embellishments – white flour, sugar, honey, egg, butter, cream of tartar…. but this, this appears to be soda bread in its earliest and purest form. I had to try it. And I was not disappointed.

I followed MD’s recipe as written as closely as possible, and the first batch was fine, but not, in my opinion, the best it could be. The mixing of the soda in water was, for the time, an acceptable way to remove lumps, but it meant for an uneven distribution of soda throughout the flour, which resulted in blotches of yellow crumb amongst the wholemeal. Sieving the soda into the flour with the salt was a much better approach. In addition, buttermilk is not as freely available nowadays as it once was, so my solution was to mix equal quantities of whole milk and low-fat, plain yogurt. Lastly, as the recipe stated that the buttermilk should be very sour (which is what reacts with the soda to give the rise), I stirred in two teaspoons of vinegar.

Halving the batch made two mini loaves of dimensions 14cm x 8cm, which took, rather surprisingly, almost an hour to bake. If you wish to make the full batch, or bake in larger tins, you will need to increase the baking time accordingly.

The result is delicious. The crust bakes to a browned, knobbly crispness and the crumb inside is close-textured, but not claggy. Just warm from the oven and lightly spread with, as MD suggests, some fresh, salted butter, it is delicious with no further adornment. If, like me, you have occasionally read accounts of 19th century afternoon teas where guests are served ‘brown bread and butter’ and been rather puzzled at the plainness of the fare, having tasted this bread with butter, it all makes sense now.

If you’re a fan of modern soda bread recipes, this might not be to your tastes, but I would urge you to try it just once to enjoy the simple pleasure of this diamond in the rough, craggy crust.

Soda Bread

These litte loaves will almost double their size during baking, but only if you get them into the oven promptly. The soda will start reacting as soon as the liquids are added, so be sure the oven is at temperature before mixing wet and dry together.

340g stoneground wholemeal flour
1 level teaspoon of salt
1 level teaspoon of bicarbonate of soda
150ml whole milk
150ml low-fat, plain yogurt
2tsp white wine vinegar

a little milk (maybe)

  • Preheat the oven to 200°C, 180°C Fan.
  • Grease and line two mini loaf tins (14cm x 8cm) with baking parchment. Grease the parchment.
  • Sieve the flour, salt and soda together twice (to spread the soda evenly).
  • Mix the milk, yogurt and vinegar until smooth.
  • When the oven is hot, add the liquids to the flour mixture and mix into a soft dough. You may need a little extra milk.
  • Put half of the dough into each prepared loaf tin and smooth over.
  • Using a sharp knife, cut a deep slit down the centre of each loaf.
  • Place in the oven and bake for 30 minutes.
  • Turn the tins around and bake for another 15 minutes.
  • Remove the loaves from the tins and place them back in the oven on a rack to crisp up the crust – a final 5-10 minutes.
  • Set to cool on a wire rack.
  • Enjoy just warm on the day of baking, or toast the following day for breakfast.
Advertisement

Brown Bread Drops

Brown Bread Drops, circa 1900, Harris & Borella, All About Biscuits

A large part of my interest in old recipes is driven by always being on the lookout for something a little bit different. People tend to be a little wary of old recipes, in part due to the “Ew!” factor of TV programs on historic food tending to choose the most unappetising-sounding recipes to show – Yes,  Stefan Gates, I’m looking at you and your Calf’s Head Surprise.

In my first book (shameless plug: Great British Bakes, available at all good bookshops, or indeed Amazon) I made a real effort to walk the line between the old and the new, and chose recipes that were both recognisable and appetising to someone in the 21st century, but also a little different in terms of ingredients and flavours, in order to provide both interest and reassurance that a good recipe is a good recipe no matter its age. I’m a firm believer that a delicious recipe shouldn’t be dismissed merely for being three or four hundred years old.

Which brings me to this recipe, which isn’t three or four hundred years old, merely about 120 years – a positive youngster. It’s a sandwich biscuit of to crisp ‘drops’ joined together with buttercream; not exactly custard cream or bourbon, but in the same ball park. So that’s the reassuring bit, now for the interesting bit: the biscuits are light and crisp and made (mostly) from wholemeal breadcrumbs, and the buttercream is flavoured with green (as in unroasted, as opposed to colour) coffee beans. All of which sounded pretty intriguing to me, and I hope it does to you too.

The method of making the biscuits is similar to sponge fingers – essentially a fatless sponge where wholemeal breadcrumbs are used in place of most of the flour, although a little flour is still required to provide cohesiveness. The buttercream is what we today call French buttercream, where yolks are tempered with a hot sugar syrup and then butter is beaten into them. In this recipe, the sugar syrup is infused with the flavour of green coffee beans.

If you can get your hands on a small quantity of green, unroasted coffee beans locally, from a local coffee bar that roasts their own, then great. Otherwise, like me, you’ll have to order online. You’ll also probably have to order far more than this recipe calls for, but I feel confident that the delicate and unusual flavour they provide will mean you’ll want to make this again and again, as well as infusing them into milk for desserts and puddings.

You can also leave the biscuits unadorned. They are crisp and airy, like almond ratafias or macaroons, which makes them perfect if, like me, you like the crunch of ratafias, but aren’t a fan of their intense almond flavouring. Enjoy plain, or use them to add texture to trifles and puddings.

Brown Bread Drops

75g dry, wholemeal breadcrumbs for the biscuits¹
40g dry wholemeal breadcrumbs for sprinkling²
2 large eggs
75g caster sugar
40g plain flour

  • Line a baking sheet with parchment.
  • Heat the oven to 205°C, 185°C Fan.
  • Put the eggs and sugar into a metal bowl and whisk over simmering water until warmed to 38°C.
  • Remove from the heat and continue to whisk until the mixture is cooled and light.
  • Mix the flour with the 75g breadcrumbs and fold into the mixture (use a balloon whisk or the whisk attachment of your mixer).  Spoon into a piping bag fitted with a 1.5cm plain nozzle.
  • Pipe oval shapes onto the parchment. They will rise and spread a little in baking, so approx. 2cm x 3cm is my suggested size.
  • Sprinkle with the reserved breadcrumbs and bake until crisped and browned (8-12 minutes).
  • Allow the biscuits to cool on the tin.

Green Coffee Buttercream
I’ve scaled down the biscuit recipe to 1/6 of the original, but the buttercream is just half of the original, because even though it makes more than enough to fill the above batch of biscuits, it can also be used for cakes and desserts, or even frozen for later use. Working with even smaller quantities would be impractical.

30g unroasted coffee beans
15g unsalted butter

150ml water
170g sugar
2 large yolks
210g unsalted butter in small dice

  • Melt the 15g butter in a pan and add the coffee beans.
  • Stir over medium-low heat until the beans turn a rich, golden colour.
  • Drain the beans from the butter and crush to small pieces in a mortar or with a wooden rolling pin.
  • Add the crushed beans to the water and bring to the boil.
  • Simmer for 5 minutes, then cover, remove from the heat and allow to infuse for  30 minutes.
  • Strain the beans from the water and discard. Add the sugar to the water and heat gently until dissolved. Bring to the boil and simmer until the temperature reaches 116-120°C.
  • While the sugar syrup is heating, whisk the yolks until light and frothy.
  • When the syrup reaches temperature, remove from the heat and while whisking, pour in a steady stream into the eggs down the side of the bowl. Try and avoid getting the syrup onto the whisk.
  • Continue whisking until the mixture has cooled.
  • Switch the attachment from whisk to beater and slowly beat in the butter, one cube at a time until smooth.
  • To serve: Spread or pipe the buttercream onto the base of a cooled biscuit and sandwich together with a second biscuit.


¹ You can make your breadcrumbs as follows. Tear 5 or 6 slices of fresh wholemeal bread into pieces and blitz to breadcrumbs in a food processor. Spread the breadcrumbs onto parchment-lined baking sheet and dry in a low oven (100C/80C Fan) until crisp. You will need to stir them every 5 minutes or so to ensure they dry evenly. Allow to cool, then blitz in the food processor again until fine.

² The breadcrumbs you reserve for sprinkling can be as fine as those in the biscuits themselves, but you could also set some aside after drying in the oven and before blitzing them a second time, in order to give a more textured appearance.


Wholemeal Oat Bread

For a number of years, my favourite brown bread has been the Grant Loaf, partly due to the almost ridiculously easy method of preparation, and partly due to its deliciousness, especially when either freshly baked, or lightly toasted.

However, even the most ardent of fans will admit that it is not a light loaf. It has certain brick-like qualities not limited solely to its shape. So the discovery of this loaf, which not only uses wholemeal flour, but adds oatmeal to it as well, and which results in a light and airy loaf, is a bit of a revelation. You’d think that mixing heavy, stoneground wholemeal with heavy oatmeal would be a recipe for a loaf of leaden qualities, but no – it’s almost as if these two ‘wrongs’ make a ‘right’. Fickle as I am, this is now my new favourite wholemeal loaf.

Like the Grant Loaf, it also takes advantage of the initial vigorousness of the yeast by being proofed only for two short intervals, making it much quicker than traditional bread.

The second difference is the shape in which it is baked. The recipe’s author, Sir Henry Thompson, was most famous for his expertise in the fields of medicine and surgery. However, as a recognised polymath, he was also knowledgeable in a number of other areas, including nutrition, exemplified by his book “Food and Feeding” (1879) in which he noted (on the subject of wholemeal flour)

it does not readily produce light agreeable bread when made in the form of ordinary loaves : a solid mass of this meal being a bad conductor of heat, will have a hard flinty crust if baked sufficiently to cook the interior ; or it will have a soft dough-like interior, if the baking is checked when the crust is properly done. Consequently the form of a flat cake, resembling that of the ordinary tea-cake, is preferable, since it admits of the right amount of heat operating equally throughout the mass.

4th Edition, p40.

The first edition of Sir Henry’s book suggested a mixture of wholemeal flour and fine flour. Later editions changed this to a recommendation of oatmeal – fine if using baking powder and medium if using yeast. I’ve tried both combinations and much refer the yeast version, as the baking powder version seemed to develop a sour taste quite quickly, although that might have been due to me using Sir Henry’s own version of baking powder which reversed the proportions we use nowadays, i.e. 1 part cream of tartar to 2 parts bicarbonate of soda.

This recipe can be baked in two Victoria Sandwich tins and produces deliciously airy bread, ideal for sandwiches. You can cut slices across the loaf, as in the photo, or cut it into quarters for a simpler, but less elegant, wedge.

You can make this bread with ordinary wholemeal flour, but bread flour gives the better result. If you’d like to try the baking powder version, the quantity recommended for this recipe is 15g.

You can download a free copy of Sir Henry’s book, “Food and Feeding” (4th edition) here.

Wholemeal Oat Bread

450g stoneground wholemeal bread flour
115g medium oatmeal
20g fresh yeast or 1 sachet fast action yeast
5g salt
30g unsalted butter
400ml-ish half milk, half water, warmed

  • Put all the ingredients into a bowl and knead together for 10 minutes on slow using a dough hook, or by hand.
  • If using a dough hook, at the end of the 10 minutes, switch the speed to High for 2 minutes to bring the dough into a ball.
  • Allow to rise for 20 minutes.
  • Divide the dough in half, and mould each piece into a ball.
  • Press the dough into two greased, Victoria sandwich tins (20cm diameter).
  • Set to rise for another 20 minutes.
  • Preheat the oven to 220°C, 200°C Fan. Depending on how quickly your oven heats, you might want to do this as you set the bread for its second rise, or after it has been rising 10 minutes.
  • Bake for 15 minutes, then turn the heat down by 20 degrees and bake for a further 15 minutes.
  • To crisp up the bottom crust, tip the bread out of the tins and return the loaves to the oven to bake for a final 5 minutes.
  • Cool on a wire rack.

Grant Loaf

If you’re going to bake your own bread, you could do worse than start with this one – it doesn’t require kneading, it only needs a very short, single rise, and you can have a batch of three loaves cooling on a rack in an hour and a half! The recipe has been around for almost 70 years – read on to find out more about it and its creator!

Heroines of Cooking: Doris Grant (1905-2003)

Tireless campaigner for healthy eating and the promotion of unadulterated foods, Doris Grant was a champion of fresh, natural ingredients and the minimal processing of food, and she maintained a running battle with major food companies in the UK for more than 60 years.

Almost crippled with arthritis in her youth, Doris found relief from her symptoms by following the food-combining diet of Dr. William Hay. With her health restored, Dr. Hay encouraged Doris to write her own book for the UK market, and thus began her publishing career. Alongside her many best-selling books, she is immortalised as the creator of The Grant Loaf.

Originally, The Grant Loaf was a mistake. While teaching herself to bake in the 1930s, it was several months before Doris realised she had not been kneading her bread dough.  It didn’t seem to have made much of a difference to the loaves, and was a great deal easier and quicker than the traditional method, so she included her ‘mistake’ in her 1944 book Your Daily Bread. Here, with only a few adjustments, is that original recipe.

The dough ends up a lot wetter than traditional dough – so wet in fact, that kneading would be impossible if it weren’t already unnecessary. The bread itself is firm without being brick-like, and has a wonderfully nutty flavour as well as making great toast. I bake it in our house as our everyday bread, including sandwiches and packed lunches.

This recipe makes three loaves for two reasons:

  • It uses a whole bag of flour at once – no messy half-bags to clutter up your cupboards and spill over everything.
  • It makes sense, as well as efficient use of the oven, to cook more than one loaf at a time and the additional loaves can easily be frozen for use later.

The Grant Loaf

1.5 kg (1 bag) stone-ground wholemeal bread flour
2 sachets rapid-rise yeast
1 litre + 300ml warm water
25g salt
25g muscovado sugar (or any brown sugar, or honey)

  • Put the flour into a large bowl and place in a gentle oven to warm. It doesn’t much matter if you don’t warm it, but it does speed up the rising.
  • Put the sugar and salt into a large jug and add half the water. Stir to dissolve.
  • Grease the bread tins using cooking spray or oil.
  • Mix the yeast into the warmed flour and pour in the sugar/salt mixture, then add the rest of the water.
  • Stir until the flour is fully mixed in. This is probably easiest to do using your hands, but using a utensil works well, also. Personally, I use a large two-pronged wooden fork from an otherwise unused set of salad servers, because the prongs move easily through the wet mix. I regularly manage to whip up a batch of this bread without touching the mix with my hands at all! Remember: you’re only mixing, not kneading – so as soon as all the flour is incorporated, stop. The dough will be much more moist than traditional bread dough – more like a fruit cake mix or thick, badly-made porridge.
  • Spoon the dough into the bread tins, making sure it’s evenly divided – each tin should be approximately ¾ full. If you want to measure by weight, it’s approximately 950g per tin.
  • Set the tins on a baking sheet somewhere warm to rise by about 1/3, until the dough is just above the top of the tins and nicely rounded. It should take no more than 30 minutes. If, like me, you’re lucky enough to have a double oven, then put the baking sheet onto the shelf in the top oven while the main oven heats up. NB Don’t put the tins onto the floor of the top oven – even if they’re on a baking sheet – it will get too hot. Otherwise, anywhere warm and draft-free will do.
  • Preheat the oven to 200C, 180C Fan.
  • Bake for 30 minutes, then turn the baking sheet 180° and bake for a further 20 minutes for a total of 50 minutes.
  • Remove the tins from the oven and tip out the bread. Arrange the loaves on a wire rack.
  • Put the loaves back into the oven for 5 minutes to crisp up the crust.
  • Cool on the wire rack.

Variations: This method can also be used with brown bread flour, for a slightly lighter loaf.