Traditional
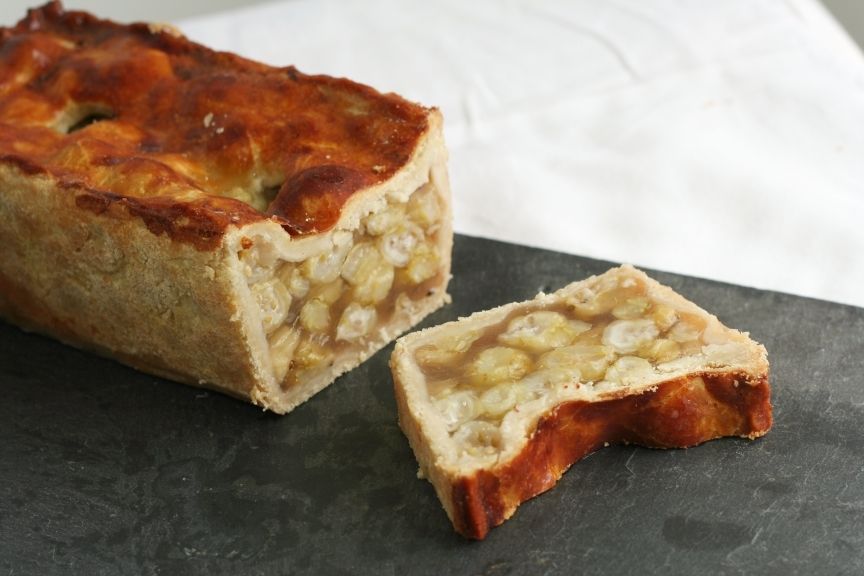
There’s a 200-year-old tradition in Oldbury-on-Severn of making gooseberry pies with a sweetened hot water crust pastry as part of the Whitsun celebrations. Jane Grigson mentions them in several of her writings on English food. Due to the age of the recipe, it was some time before I managed to find a picture of these iconic tarts, and for a long time had to rely solely on my imagination. Consequently, what I pictured in my mind was the pie you see above, and was just a little disappointed to eventually learn that the pies were small, hand-sized, shallow, round pies with a single layer of gooseberries and a lot of sweet/sharp juice.
The use of a hot water crust for a fruit pie is unusual, and can be tricky to work with. Some recipes even recommend that once the tart shell has been formed, the pastry is chilled overnight in order to make a firm casing for the gooseberries, but this then makes it difficult to attach the lid firmly once the paste is cold.
In my searching, I also found accounts that seemed to agree on two things: everyone seemed to like these tarts, even if they didn’t like gooseberries, and that they were extremely juicy when bitten into. I decided to make a large, consumer-friendly variation of this classic dessert pie by setting the juice with gelatine, so that it could be sliced and each slice would hold its shape.
Elderflower is a classic flavour pairing with gooseberries, and this pie combines a jelly made from the gooseberry juice syrup and elderflower cordial with fresh gooseberries and a sweetened hot water crust. The jelly is sweet and delicately flavoured and the gooseberries are so sharp, the contrast between the two is both delicious and refreshing. To make everything much easier, it is baked in a loaf tin.
Sweet Hot Water Crust
600g plain white flour
400ml water
100g butter
100g lard
60g caster sugar
Put the fats, sugar and water into a pan and warm over a low heat just until the fat has melted.- Put the flour into a bowl and pour on the warmed liquid. Stir well.
- The paste will be very soft when it comes together, and you can roll it out if you like, but it can also just be flattened and pressed into the tin by hand.
1kg fresh gooseberries
1kg caster sugar
2-3 tablespoons of elderflower cordial
beaten egg to glaze.
3-4 sheets of leaf gelatine
- Use a sharp knife to top-and-tail the gooseberries, removing the stalk and the calyx.
- Generously grease a large loaf tin. You can, of course, make this in any shaped tin, but a rectangular loaf tin does produce pretty and regular slices. In order to decide what size of tin to use just tip in your prepared gooseberries. The best fit will be from the tin the gooseberries only just fill.
- If liked, line the tin with baking parchment in order to help with the removal of the pie once it has cooled.
- Make the pastry and divide into two. Roll out one piece and cut a lid for your pie. Use the empty tin to mark out its size, then cut the pastry 3cm larger all the way round. Set aside.
- Gather the trimmings and the rest of the pastry together and roll out to about 1cm. Line your greased loaf tin and allow the excess pastry to drape over the sides for now. Make sure any cracks are well patched, so that the juice stays inside the pie.
- Layer the gooseberries in the lined tin with the sugar.
- Moisten the edges of the pastry with water and place the pastry lid on top of the pie. Press the edges together and trim the excess. Crimp the edges in a decorative manner.
- Cut three circular vent holes in the lid at least 2cm in diameter.
- Use the pastry trimmings to make additional decorations if liked.
- Cover lightly with cling film and chill in the fridge for 1 hour to firm up.
- Preheat the oven to 200°C/180°C fan/gas 6.
- Brush the lid of the pie with beaten egg and bake for 45 minutes to 1 hour, until the top is crisp and golden and the sides are well-baked. It is better to cook the pie a little longer than for the pie to be under-baked, so if the top is becoming too dark, cover with some foil.
- When you’re happy with the done-ness of the pastry, remove the pie from the oven and set aside to cool for 10 minutes.
- Tricky Part: You need to drain the juice from the pie in order to mix in the elderflower cordial and the gelatine that will make it set. After much experimentation, I recommend the following method:
- Put your pie onto a wire cooling rack.
- Put a second rack upside-down on top of your pie.
- Place a large bowl on your work surface. If you think it necessary, place a damp teatowel underneath to prevent slippage.
- With your thumbs uppermost, pick up your pie tin, sandwiched between the wire racks.
- Holding the pie tin over the bowl, flip it towards you and let all of the juice drain out of the pie through the vent holes. Once the juice has topped dripping, turn your pie the right way up and set aside.
- Taste the syrup and add sufficient elderflower cordial to flavour. Since the pie will be eaten cold, you can make the flavouring slightly stronger than usual, since the flavours will be somewhat muted when served.
- When you’re happy with the taste, measure the volume of syrup. For every 150ml, you need to bloom (soak in water) 1 leaf (sheet) of gelatine. Once bloomed, drain and add the gelatine to the syrup and warm gently until melted.
- Pour the syrup/gelatine mixture back into the pie. You want enough syrup in the pie to make the cooked gooseberries float.
- Leave your pie to cool. Cover with plastic wrap and chill overnight in the fridge.
- Allow to come to room temperature before removing from the tin and cutting in slices to serve.