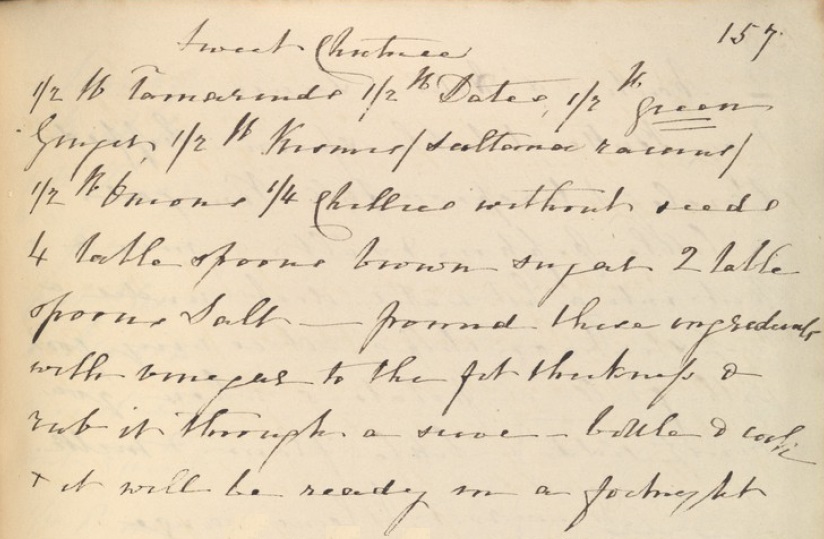
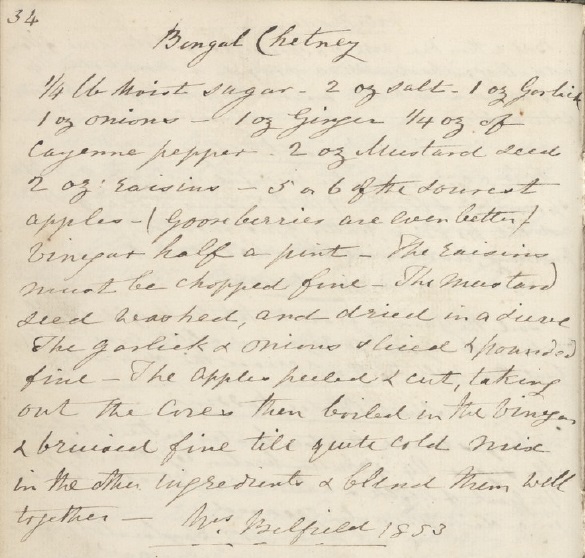
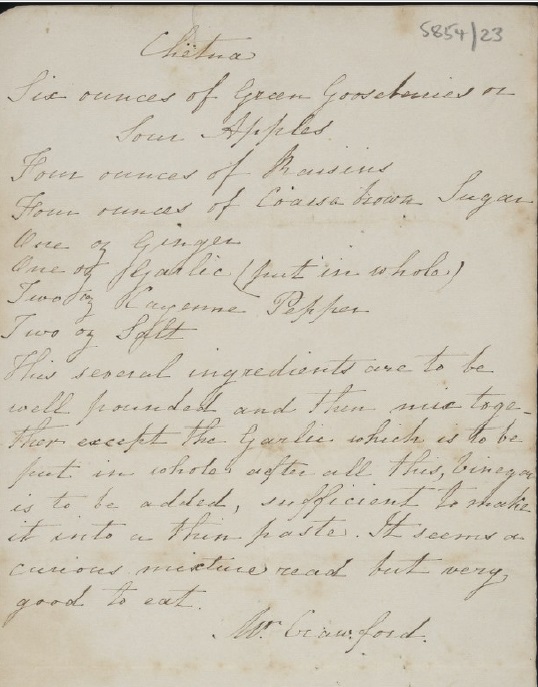
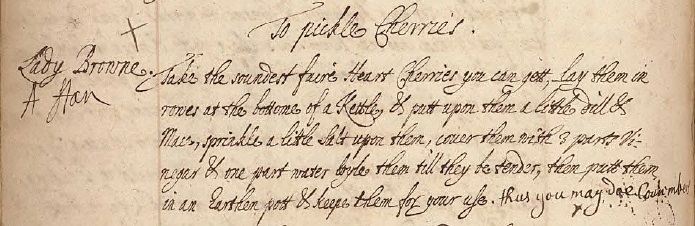
With only a month to go, I recently realised it’s high time I got my act into gear vis-à-vis some festive recipes.
I have for you here something that I’ve been making for the past few years and, with spectacular timing, only remembering about it come the 24th or so, which is far too late to go about suggesting people add to their military campaign-esque festive ToDo list.
I initially got the idea a few years ago whilst making a batch of Niter Kibbeh, the very aromatic Ethiopian spiced butter used in making the red lentil stew Misir Wat.
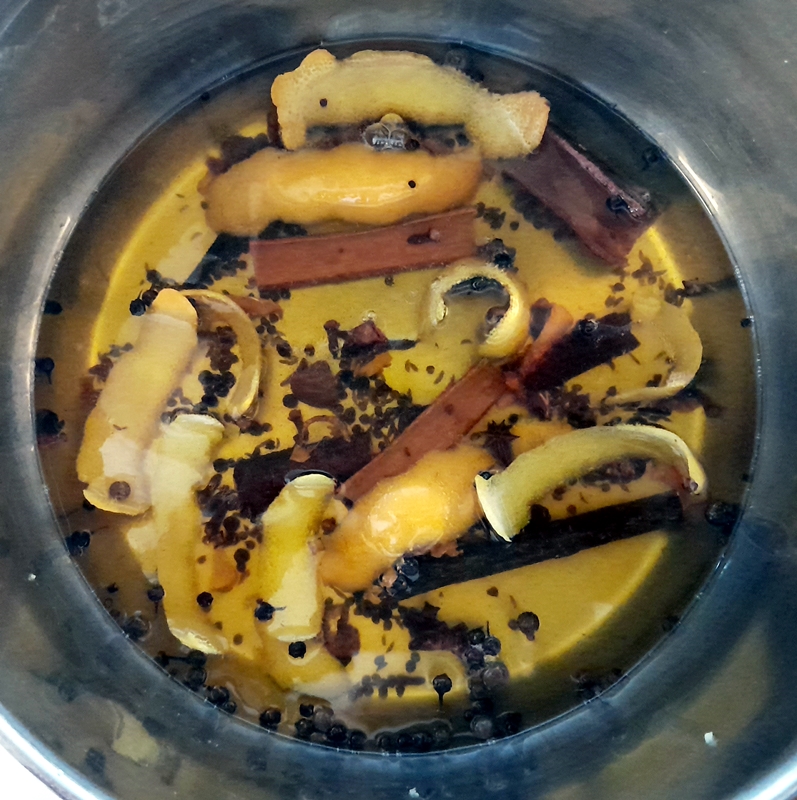
It is butter that is flavoured with seasonal spices, and is a doddle to make. I use clarified butter in the form of a tin of ghee, because delicious though browned butter is, the milk solids are easily burned. I simmer – although that is rather too strong a word for sitting on heat 1 of the hob, so perhaps ‘infuse’ is more fitting – whole spices and citrus peels and then allow the flavours to infuse overnight as the butter cools. The use of whole spices keeps the spicing soft – although I have opted to add in ground spices if the whole ones are unavailable. The only downside of using ground spices is that they will speckle the butter, being too small to strain out. Depending on your use of the finished butter, this may not be an issue. Next day, I slowly warm the mixture and, when melted, strain out the solids and pour the beautifully aromatic and flavourful butter back into the tin in arrived in, for ease of storage.
You are then free to use it wherever you see fit in your festive baking.
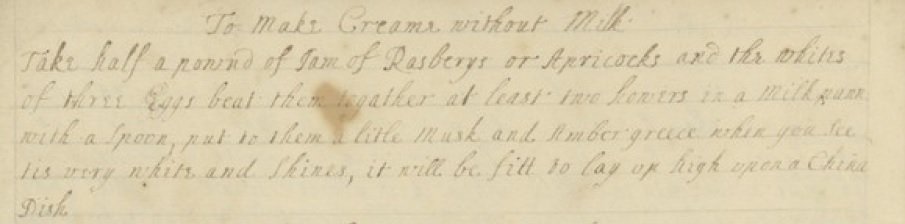
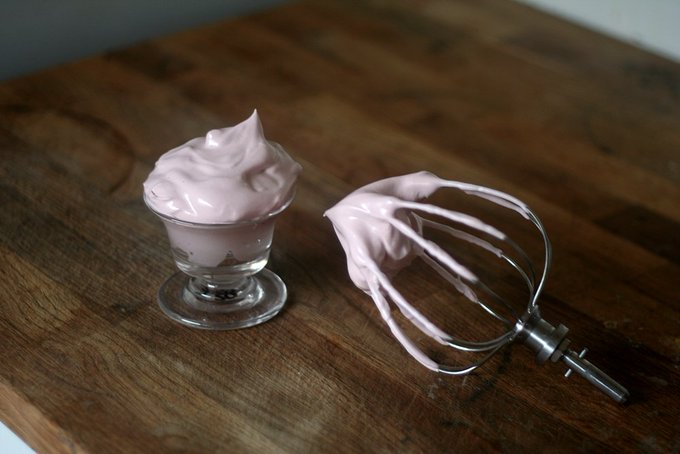
Brandy Butter and Spiced Hard Sauce: These are rich and delicious accompaniments to both mice pies and Christmas pudding. Equal quantities of icing sugar and butter are whisked with brandy, or indeed any alcohol of your choice, and/or vanilla to produce a light and frothy mixture that you can spoon onto your bakes where it will gently melt and turn into a sauce.
Mincemeat: In case you haven’t seen the recipe, my guilt-free Mincemeat (based on Hannah Glasse’s 1747 recipe) offers all the delights of traditional mincemeat, but without suet, fat or any added sugar and is both vegetarian and vegan. Delicious as it is, you can elevate it to luxury levels by adding a little Spiced Christmas Butter for added richness.
Pastry: Using Spiced Christmas Butter in pastry adds a whole new dimension to your mince pies and other Christmas fare such as this Welsh cranberry tart.
Shortbread: Why not try your favourite shortbread variation using festive spiced butter?
What Spices Do I Need?
Basically, anything you like. Whilst this might not seem very helpful, I say it to illustrate just how much free reign you can have with this. Either stick to a more traditional mix (see below) or spice it up a little (excuse the pun) with some unusual bits and bobs. You can’t really go wrong, as using whole spices means there’s only ever a gentle flavouring.
A traditional mix might include:
- cinnamon sticks
- allspice berries
- blades of mace
- whole nutmegs (sliced)
- cloves
- orange peel
- lemon peel
- sliced ginger (fresh or dried)
Other items you may want to use include:
- cardamom pods – both green and black
- star anise
- aniseeds
- black pepper
- cubeb pepper
- long pepper
- grains of paradise
- vanilla
- saffron
- licorice sticks
- caraway seeds
- coriander seeds
- cumin seeds
- rosepetals
All of the spices should be whole, wherever possible. Use anything from 1tsp to 1tbs to your taste.
Dietary Guidelines
As ghee has had all the milk solids removed, I would venture to suggest that it might even be suitable for the lactose intolerant.
If you are vegan, you can make your own version using solid coconut oil. If you’re not a fan of the accompanying coconut aroma, this odourless brand is available to order online.
Christmas Spiced Butter
I rarely recommend any particular brand, but in this instance I strongly urge you to seek out (it’s not that hard to find – most supermarkets carry this distinctive green and gold tin) East End ghee. It has a heady, perfumed aroma in its natural state, which greatly enhances the end product.
1 x 600g tin of East End ghee.
3-4 cinnamon sticks
1tbs whole cloves
1tbs allspice berries
4 blades of mace
2 whole nutmegs – sliced
thinly peeled skin of 1 orange
thinly peeled skin of 1 lemon
5 slices of fresh/dried ginger
5 star anise
- Put everything into a small saucepan.
- Cover and set on the lowest heat possible on your stove/hob.
- Leave to infuse for 1-2 hours.
- Switch off the heat and leave overnight.
- Next day, warm slowly over very low heat until melted, then strain the solids out by pouring through a sieve.
- When the butter has completely drained, pour it back into the tin.
- Label and store in the cupboard for use.