Dairy-Free Cream

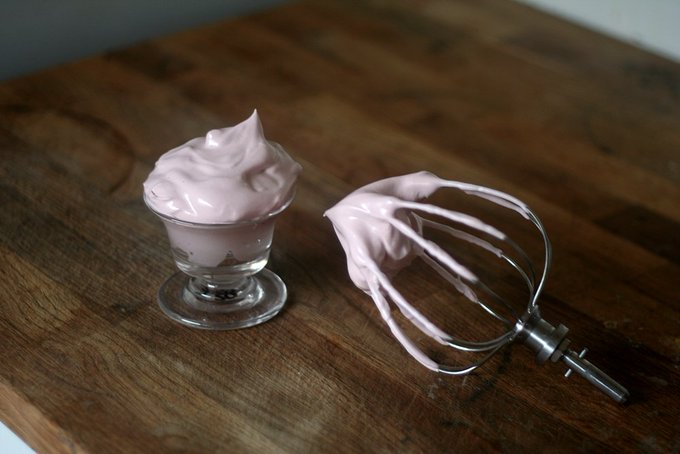
Here is very useful recipe for those looking to avoid dairy products or even to just reduce the amount of fat in their diet. By whisking together some smooth jam and a couple of egg-whites, a deliciously light and frothy ‘cream’ can be created, for use as a finishing touch to trifles, puddings and pastries, or to enjoy by itself. The cream will be influenced by whatever flavour of jam you choose to use, but it doesn’t dominate at all. The above was made using seedless raspberry jam, and the subtlty of colour reflects the subtlty of flavour – a mere whisper on the palate. For an almost white ‘cream’ with a very faint flavour (if that suits your needs best), I can recommend making and using Christine Ferber’s Green Apple Jelly.

It is a surprisingly elegant solution for anyone with dietary restrictions, and dates from the cusp of the 17th and 18th centuries (circa 1700).

This particular recipe I found in a manuscript held by the Wellcome Collection in London, but I have also read variations in other manuscripts and locations. I am surprised tht it has fallen out of favour, for it is one of the simplest and easiest recipes I have adapted.

Well, I say adapted. In fact I have changed very little from the original instructions.

To Make Cream Without Milk, MS1804, dated circa 1700, Wellcome Collection.

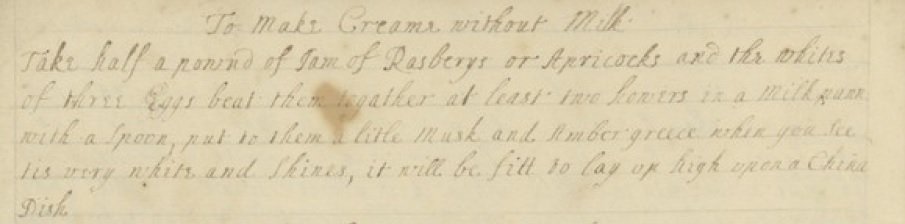
The one detail I did change was to reduce the number of egg-whites from three to two, reasoning that the eggs we have nowadays are much larger than those of three hundred years ago.

Thanks to modern technology, we are also spared the two hours of hand whisking (with a spoon of all things!) required in order to achieve the light and fluffy outcome pictured above, and can achieve the same result with about 10 minutes of whisking with your kitchen gadget of choice.

The potential worry regarding the consumption of raw egg whites is eliminated by the convenience of being able to purchase pasteurised egg whites in a carton.

The finished whip will hold its shape for several hours, should the need arise, allowing you to prepare this well in advance of your entertaining needs. I decided to leave the whipped ‘cream’ out, to test it’s durability, and can confirm that after 5 hours, it was still (mostly) holding its shape, as can be seen below.

Dairy Free Cream after five hours

Furthermore, this recipe is customisable in that you can vary the flavour of the whip by using different jams/jellies. For the smoothest result, they should be clear and set. Alternately, you could make your own by gently warming and sieving the jam to remove the fruit pieces in the conserve or jam flavour that you require. Apple, apricot, redcurrant, cranberry, blueberry, blackcurrant, plum, damson, marmalade…the possibilities are endless!

Dairy-Free Cream

You can easily halve the recipe at first, to make a trial batch to see if you like it. However, this might be too small an amount for a stand mixer to get to grips with, so use a hand-held whisk instead.

2 large egg whites (80ml)
225g seedless raspberry jam (or smooth jam/jelly of choice)

  • Put both ingredients into a bowl and whisk using a mixer, for about 10 minutes, until the mixture is thick and glossy and holds its shape.
Advertisement

Steamed Sponge

This recipe is for a traditional steamed sponge, the type many of us remember from our childhoods. So comforting in the winter months, with a blanket of hot custard draped over. They are a breeze to mix, but in these days when most people have a gas or electric stove-top, rather than an always-on range, the three-hour steaming time makes the cooking something of a marathon.

To make things easier for everyone, I’ve scaled this recipe down to make four individual puddings which can be cooked in a steamer pan over simmering water. Not only are mini puddings delightfully small and perfectly formed, they take a mere 30 minutes to steam. This means that they can be put on to cook as everyone sits down to the meal, and be ready by the time the main course is done and cleared away.

As if this weren’t cause enough to rejoice, this recipe can also be easily and infinitely adapted with different ingredients and flavours, even to the point of producing four differently-flavoured puddings from the one mixture. A few suggestions are included below, but do please experiment with your own creations too!

Steamed Sponge

Serves 4

The base instructions are for a plain sponge.

170g plain flour
1 tsp baking powder
70g butter
pinch of salt
85g caster sugar
1 large egg
½ tsp vanilla extract
120-150ml milk
softened butter for greasing the pudding bowls

  • Bring a pan of water to a simmer.
  • Put the butter, flour, salt, sugar and baking powder into the bowl of a food processor and blitz until the mixture resembles breadcrumbs.
  • Tip out into a bowl.
  • Whisk the egg and vanilla with the milk and stir into the dry ingredients until smooth.
  • Generously butter four individual pudding bowls and divide the mixture evenly amongst the prepared bowls.
  • Cut four squares of foil for the lids and make a single pleat in the middle. This will allow the sponge mixture to expand during cooking without forcing the foil cover off. Butter the inside surface of the foil, then fold over and around the pudding bowls.
  • Arrange the four bowls in the steamer pan, cover with a lid and place over the simmering water.
  • Steam for 30 minutes.
  • Peel off the foil and run a knife around the side of the puddings to loosen them.
  • Turn out the puddings and serve with cream, custard or pudding sauce of your choice.

Variations

These tweaks can be made to the basic vanilla sponge.

  • Jam Sponge – put a tablespoon of your favourite jam into the bottom of the pudding bowls before adding the sponge mixture. Have some of the jam warmed for serving.
  • Fruit Sponge – put 2 tablespoons of cooked fruit into the bottom of the pudding bowls before adding the sponge mixture. Again, have extra fruit to hand when serving.
  • Raisin decoration – dot large colourful raisins onto the sides of the buttered moulds before adding the plain sponge mixture.
  • Raisin sponge – Add 60g raisins to the plain mixture. You can also ornament the sides of the bowls as above.
  • Coconut sponge – add 60g dessicated coconut to the sponge mixture. Stick more coconut to the butter in the moulds before adding the sponge mixture.
  • Citrus sponge – omit the vanilla flavouring, add the grated zest of a lemon/orange/lime to the sponge mixture, together with the juice. Use a little less milk to mix. Add 60g of diced, candied peel of the same flavour if liked.
  • Candied fruit sponge – use 60g of candied fruit such as cherries, cranberries, pineapple, either on their own or mixed.

The following tweaks should be done by altering the method slightly and using the creaming method for the sponge (creaming butter and sugar, then eggs then dry ingredients), as the darker colour of the sponge sometimes highlights butter pieces that have not fully combined with the other ingredients.

  • Dried fruit pudding with toffee top. Use brown sugar to mix the sponge and add 60g of chopped figs, dates or prunes to the sponge mixture. Mix 30g of softened butter and 30g of soft, dark brown sugar and divide amongst the bowls before adding the sponge mixture.
  • Double jam sponge – Omit the vanilla, before adding the milk and egg, stir 3 tablespoons of jam into the sponge mixture. Add 1 tablespoon of jam to the bottom of each of the pudding bowls.
  • Chocolate sponge – Add 2 tablespoons of cocoa to the mixture and use a little more milk to mix. Add 60g chocolate chips to the mixture, or put them in the bottom of each pudding mould to form a chocolate ‘cap’. Alternately, half fill the moulds then add the chocolate chips in a well, and cover with more sponge mixture. This will make for a molten centre once cooked.
  • Coffee and Walnut sponge – Omit the vanilla, add a tablespoon of espresso powder or coffee essence to the sponge mixture and stir through 60g chopped walnuts. Put a half-walnut upside down in the bottom of each basin before adding the sponge mixture.

Oyster Tarts

A great little recipe from that classic baking institution: Be-Ro.

Thomas Bell founded his grocery company in Newcastle-upon-Tyne in 1875. Amongst other items, he manufactured and sold baking powder and the world’s first self-raising flour under the brand name Bell’s Royal.

After the death of King Edward VII the use of the word ‘Royal’ in business was prohibited, so Thomas shortened each word to just two letters, and the Be-Ro brand was born.

To encourage the use of self-raising flour, the company staged exhibitions where visitors could taste freshly-baked scones, pastries and cakes. This proved so popular, and requests for the recipes so numerous, the Be-Ro Home Recipes book was created. Now in it’s 40th edition, the company claims that, at over 38 million copies, its recipe booklet “is arguably one of the best-selling cookery books ever.”

I’m not sure which edition my Be-Ro booklet is, as it’s undated, but from the appearance of the smiling lady on the front it definitely has a 1930s feeling; it’s pictured on the Be-Ro website, with a deep red cover.

These little tarts are a beautiful example of how the simplest ingredients can be given a subtle twist and appeal by both their appearance and the ease with which they are whipped up. In essence, these are a Bakewell Tart with cream, but a little tweak turns them into sweet ‘oysters’.

I’m not a fan of almond flavouring, so I’ve used lemon zest to brighten the almond sponge and used a seedless blackcurrant jam inside. Adding the jam after baking (unlike the method for Bakewell Tarts) circumvents cooking the jam for a second time, and so it retains its brightness of flavour as well as colour. The pastry is crisp and dry and a perfect contrast against the moist filling. I’ve opted for an unsweetened pastry, but feel free to use a sweetened one if you prefer.

You could customise these tarts by swapping the ground almonds for almost any other nut, and matching the jam accordingly. Here are a few that occurred to me.

  • Almond with orange zest, and orange curd as the filling.
  • Coconut and lime curd, with a little lime zest in the filling.
  • Hazelnuts or pecans, with a praline paste or Nutella in the filling.
  • Walnut and a little coffee icing.

Have fun with them!

Oyster Tarts

Pastry
60g cornflour
225g plain flour
140g butter
ice-cold water

Filling
70g unsalted butter, softened
70g caster sugar
1 large egg
zest of 1 small lemon
85g ground almonds

To serve
200g cream cheese
200ml whipping cream
1tsp vanilla extract
1-2tbs icing sugar, plus more to sprinkle
120g sharp jam

  • Put all the pastry ingredients except for the water into the bowl of a food processor and blitz until the mixture resembles breadcrumbs.
  • Gradually add the water, one tablespoon at a time, until the mixture comes together in a ball.
  • Knead smooth, then roll out thinly. Cover with cling film and chill in the fridge to relax.
  • Preheat the oven to 170°C, 150°C Fan.
  • Beat the butter and sugar for the filling until light and fluffy. This will take about 5 minutes to get as much air into the mix as possible.
  • Add the egg and whisk in thoroughly.
  • Fold in the lemon zest and ground almonds.
  • Grease a 12-hole shallow tart tin.
  • Remove the pastry from the fridge and cut out 12 circles. Line the prepared tin with the pastry.Add about a tablespoon of filling to each tart. I use a small ice-cream scoop but 2 spoons will also work.
  • Bake for 18-20 minutes, turning the tin around after 10 minutes to ensure even cooking.
  • Transfer the cooked tarts onto a wire rack and allow to cool.
  • Whisk the cream cheese, vanilla and cream together until firm. Gently stir through a little icing sugar to slightly sweeten.
  • When the tarts have cooled, slice off the top of the filling with a sharp knife and set aside.
  • Add a teaspoon of jam and either spoon or pipe a little of the cream mixture into each tart.
  • Set the ‘lids’ back on the tarts at a jaunty angle, so as to appear like a half-opened oyster.
  • Dust with icing sugar and serve.

Apricot Jam

I’m a big fan of the sharp-sweet tang of apricots, and with a respectable amount of pectin, there’s no need to Faff About™ adding any extra. The small quantity lemon juice helps anyway, both in the set and in sharpening the flavour of the apricots.

This method, gleaned from several hand-written 17th century manuscripts, is slightly longer than your regular jam-making session might be, but it is seriously low on effort. Start-to-finish, it’s about 24 hours, but of that, there’s maybe only 1 hour of actually doing anything – bonus!

The result is so vibrant, so delicious, you’ll wish you’d made more – however many jars you make. I bought 6 x 350g punnets – and made six jars. One jar of finished jam for every 350g of raw fruit is also a handy way to work out how many jars your going to need. As a precaution, I always have one jar extra, all cleaned, heated and ready to go, in case of an overabundance. I’ve scaled the quantities down to use just 1 kg of fresh, pitted fruits (so 3 punnets from the shop), so it’s a little easier to scale up/down.

This method involves first macerating (or soaking) the fruit in sugar for several hours (or even overnight). The sugar draws out the juice from the fruit, and in turn a little of the sugar is absorbed. This absorption of sugar will help to firm up the fruit and keep it from disintegrating during the necessary boiling later on.

That being said, this is not a solid jam that has to be crowbar’d out of the jar (a particular dislike of mine). It’s definitely leaning more towards the conserve, although having sliced the fruit to manageable bite-sizes, I think that disqualifies it from the traditional definition of conserve (i.e. whole fruit in syrup).

ANYHOO….

Here’s how it goes:

Apricot Jam

3 x 350g punnets of Bergeron (for preference, but not compulsory) apricots, to give 1kg of prepared fruit
800g granulated sugar
Juice of 2-3 lemons
Day 1

  • Rinse the apricots and cut into halves, top to bottom, and remove the stone.
  • Layer the apricot halves, sugar and the juice of 2 of the lemons in a large bowl ensuring the cut surfaces of the apricots are covered with sugar.
  • Cover the bowl with cling film and set aside for 8-10 hours, or overnight.
  • Mop brow and declare loudly to any interested parties “This jam-making is EXHAUSTING! I must have a REST and watch a FILM”.
  • Put feet up.

8 hours later, or next morning if you started at night

  • Gently slide the apricot mixture (which will probably be quite runny by now) into a preserving pan and warm gently, until all the sugar is melted.
  • Try and avoid stirring, as the fruit will still be very fragile and might begin to break apart with too much spoon action.
  • When all the sugar is melted, bring the mixture to a boil.
  • As soon as it boils, remove the pan from the heat and gently pour the fruit mixture back into the bowl.
  • Re-cover with cling film and set aside overnight.
  • Mop brow and put feet up as above.

12-14 hours later

Here’s where things might get a little too Faffy™ for your liking, feel free to skip the next part if you prefer a slightly more rustic jam.

  • Removing the skins
    • Strain the fruit from the syrup. I prefer to lift the aricot gently with a skimmer, to avoid squishingthem too much, but you can pour it through a sieve if you like.
    • By this time, after their overnight soaking, the skins should be wrinkled and easy to separate from the flesh of the apricots. I usually start by picking up an apricot half by the skin in my left hand and then using a small, sharp knife to ease the flesh away. Sometimes the cut edge of the apricot next to the skin has hardened and needs a little encouragement to come free. If your apricots have a slightly thicker skin, this may not be as easy as described. In this case, give up.. Persevering will only mash the apricots to mush.
    • Discard skins.
  • Using some sharp scissors, cut the now skin-free apricots into strips about 0.5-1cm wide. Again, feel free to skip this if so inclined. It just makes the jam easier to spread. Set fruit aside for now.
  • Once the fruit is prepared, it’s time to boil the syrup to setting point.
  • But before you start heating it, taste. I like a particularly sharp jam, so I tend to add the juice of another lemon at this stage if necessary. Taste the syrup and make your own decision.
  • Also, put 2 saucers in the freezer. These will be used later to test whether your jam has reached setting point.
  • Pour all the syrup into the preserving pan and bring to a simmering boil. Keep an eye on it, as too high a heat may cause it to boil over.
  • Skim the froth from the top of the simmering syrup – removing this will help give your finished jam that jewel-like clarity. Don’t throw the foam away, it’s still delicious, just bubbly. Enjoy on toast with some salty feta or goats cheese – NOM!
  • Setting point is reached at 105°C, when the excess water has evaporated – there will be a distinct lack of steam coming from the pan, but use a thermometer to double-check.
  • Add the apricots, sliding them gently into the syrup. It will immediately go off the boil, and as there will be quite a lot of syrup clinging to the apricots themselves, it will take several minutes to come back to setting point.
  • Use this time to wash your jam jars, rinse and arrange onto a baking sheet, together with their lids.
  • Put the jars into a cold oven, and turn the heat to 100°C, 80°C Fan.
  • When the jam has reached setting point for the second time, draw the pan to one side away from the heat and test the jam by putting a teaspoon onto one of the cold saucers from the freezer. Return the plate to the freezer for a minute or two then remove and slowly push a finger through the cooled jam. If the surface wrinkles, then the jam is done. If not, return to the heat for a few more minutes and test again.
  • Once the jam is set to your satisfaction, turn off the heat and leave it to cool a little. You want it to be cool enough to begin to form a thin skin on the surface. This means that it is starting to set, and you should put it in jars. Depending on how big a batch you’re making, this could be as long as 20 minutes. Have a cuppa while waiting!
  • Stir the jam gently, to distribute the fruit throughout the syrup. Now that the jam has cooled a little, the fruit will stay suspended evenly. Stirring when the jam is too hot will do nothing, and pouring too-hot jam into jars will just make all the fruit float to the top.
  • Remove the hot and now dry jars from the oven and, using a jam funnel, pour your jam into the jars. You might want to use oven gloves to hold the jar steady. Fill the jars as close as possible to the top – to within 5mm at least (bacteria love air gaps, so you want to keep them as small as possible).
  • Screw the lids on tightly and then wipe off any spillage from the outside of the jars. Leave to cool completely before labelling.