Flatfish Fricassee

Oh, I do love a bit of alliteration! Straight away I’m going to own up to changing this title from the original (Sole Fricassee) in order to stress the ease with which it can be used with a number of different fish, including sole, plaice and halibut.

Original receipt
Source: MS3009, Wellcome Library Collection

I also chose this recipe for the way it brazenly ignores all the conventions of fish cooking that we in the 21st century have become so wrapped up in, and suggests a mixture of beef stock and red wine for the cooking liquid. I can picture the cognoscenti of gastronomy clutching their chests and gasping in horror at this unorthodox approach, but, as I have found in so many of these old recipes, this rule-breaking works. The contrast between the strong braise and the delicate fish is a delight.

Flatfish Fricassee

Serves 4

8 sole fillets
50g unsalted butter
250ml strong beef stock – use a stock cube and just half the quantiy of water
250ml red wine,
4 anchovy fillets, rinsed and chopped fine
2 shallots – chopped fine
4 lemon slices
2 whole blades of mace
10 cloves
20g butter for the trimmings
parsley & lemon to garnish

  • Trim the edges from the fillets.
  • Cut the fillets into pieces about 10cm long.
  • Roll the trimmings into coils and secure with a wooden cocktail stick.
  • Put the stock, red wine, anchovies, shallots, lemon and spices in a pan and simmer for 10 minutes.
  • Melt the butter in a frying pan and quickly fry the fillet pieces for 15-20 seconds each side.
  • Add the stock mixture to the fish and simmer for 5 minutes.
  • Melt the remaining butter in a pan and quickly fry the coils of trimmings for garnishing.
  • Transfer the fish to a warmed serving dish and keep warm.
  • Strain the sauce, return to the pan and taste. Add salt and pepper as liked.
  • Pour the sauce over the fish and garnish with the coiled trimmings, freshly sliced lemon and parsley sprigs.
  • Serve at once.

Steamed Sponge

This recipe is for a traditional steamed sponge, the type many of us remember from our childhoods. So comforting in the winter months, with a blanket of hot custard draped over. They are a breeze to mix, but in these days when most people have a gas or electric stove-top, rather than an always-on range, the three-hour steaming time makes the cooking something of a marathon.

To make things easier for everyone, I’ve scaled this recipe down to make four individual puddings which can be cooked in a steamer pan over simmering water. Not only are mini puddings delightfully small and perfectly formed, they take a mere 30 minutes to steam. This means that they can be put on to cook as everyone sits down to the meal, and be ready by the time the main course is done and cleared away.

As if this weren’t cause enough to rejoice, this recipe can also be easily and infinitely adapted with different ingredients and flavours, even to the point of producing four differently-flavoured puddings from the one mixture. A few suggestions are included below, but do please experiment with your own creations too!

Steamed Sponge

Serves 4

The base instructions are for a plain sponge.

170g plain flour
1 tsp baking powder
70g butter
pinch of salt
85g caster sugar
1 large egg
½ tsp vanilla extract
120-150ml milk
softened butter for greasing the pudding bowls

  • Bring a pan of water to a simmer.
  • Put the butter, flour, salt, sugar and baking powder into the bowl of a food processor and blitz until the mixture resembles breadcrumbs.
  • Tip out into a bowl.
  • Whisk the egg and vanilla with the milk and stir into the dry ingredients until smooth.
  • Generously butter four individual pudding bowls and divide the mixture evenly amongst the prepared bowls.
  • Cut four squares of foil for the lids and make a single pleat in the middle. This will allow the sponge mixture to expand during cooking without forcing the foil cover off. Butter the inside surface of the foil, then fold over and around the pudding bowls.
  • Arrange the four bowls in the steamer pan, cover with a lid and place over the simmering water.
  • Steam for 30 minutes.
  • Peel off the foil and run a knife around the side of the puddings to loosen them.
  • Turn out the puddings and serve with cream, custard or pudding sauce of your choice.

Variations

These tweaks can be made to the basic vanilla sponge.

  • Jam Sponge – put a tablespoon of your favourite jam into the bottom of the pudding bowls before adding the sponge mixture. Have some of the jam warmed for serving.
  • Fruit Sponge – put 2 tablespoons of cooked fruit into the bottom of the pudding bowls before adding the sponge mixture. Again, have extra fruit to hand when serving.
  • Raisin decoration – dot large colourful raisins onto the sides of the buttered moulds before adding the plain sponge mixture.
  • Raisin sponge – Add 60g raisins to the plain mixture. You can also ornament the sides of the bowls as above.
  • Coconut sponge – add 60g dessicated coconut to the sponge mixture. Stick more coconut to the butter in the moulds before adding the sponge mixture.
  • Citrus sponge – omit the vanilla flavouring, add the grated zest of a lemon/orange/lime to the sponge mixture, together with the juice. Use a little less milk to mix. Add 60g of diced, candied peel of the same flavour if liked.
  • Candied fruit sponge – use 60g of candied fruit such as cherries, cranberries, pineapple, either on their own or mixed.

The following tweaks should be done by altering the method slightly and using the creaming method for the sponge (creaming butter and sugar, then eggs then dry ingredients), as the darker colour of the sponge sometimes highlights butter pieces that have not fully combined with the other ingredients.

  • Dried fruit pudding with toffee top. Use brown sugar to mix the sponge and add 60g of chopped figs, dates or prunes to the sponge mixture. Mix 30g of softened butter and 30g of soft, dark brown sugar and divide amongst the bowls before adding the sponge mixture.
  • Double jam sponge – Omit the vanilla, before adding the milk and egg, stir 3 tablespoons of jam into the sponge mixture. Add 1 tablespoon of jam to the bottom of each of the pudding bowls.
  • Chocolate sponge – Add 2 tablespoons of cocoa to the mixture and use a little more milk to mix. Add 60g chocolate chips to the mixture, or put them in the bottom of each pudding mould to form a chocolate ‘cap’. Alternately, half fill the moulds then add the chocolate chips in a well, and cover with more sponge mixture. This will make for a molten centre once cooked.
  • Coffee and Walnut sponge – Omit the vanilla, add a tablespoon of espresso powder or coffee essence to the sponge mixture and stir through 60g chopped walnuts. Put a half-walnut upside down in the bottom of each basin before adding the sponge mixture.

Black Broth

I have no idea who Mr Sparks was, but he obviously made an impression on at least one of the many ladies through whose hands one particular manuscript¹ passed, for there are no fewer than nine of his recipes included over the course of ten pages.

I have been unable to find any printed cookery book with a Mr Sparks as author, so must assume that these recipes were copied from one handwritten source into another as a result of having tasted the dishes in question. I almost have more confidence in a handwritten recipe with a name attached that is otherwise untraceable, because it hints at genuine originality: someone created it, someone ate it, that someone liked it so much, they asked for the recipe.

Original Black Broth recipe
Source: MS7851, Wellcome Library Collection

This black broth is made with venison. Venison is beautifully lean meat, which also means that it can be prone to toughness on the less prime cuts such as shoulder, or the ‘helpfully’ diced meat (that gives no hint as to which part of the animal it came from) available in packs in the supermarket.

Long, slow poaching in a flavoursome broth makes for fall-apart tender meat, perfect for a warming winter soup. This recipe uses a method gleaned from old manuscripts that is the opposite of what we do today, namely frying the meat after it has been cooked. I’ve used it with ragoos and fricassees and have been delighted with the added richness it gives both to the flavour of the meat and to the dish as a whole. The butter might seem extravagant, but it is a sumptuous
complement to the leanness of the venison.

A slow-cooker is ideal for this largely set-it-and-forget-it hearty soup, but you can also cook it on the stove top on a very low heat, or covered in the oven at 140°C/120°C fan/gas 1.

Black Broth

1kg venison shoulder, in one piece if possible, otherwise cut into large cubes.
3 slices wholemeal bread
3 onions
9 cloves
1 bunch parsley
1 bunch mixed herbs
1tbs peppercorns
1tsp salt
1.5 litres beef stock
50g unsalted butter
3-4tbs chopped, mixed herbs
gravy browning (optional)

2-3 slices of white bread, crusts removed, cut into 1cm cubes

marigold petals to garnish

  • Toast the bread as dark as possible without turning black.
  • Peel the onions and stick 3 cloves into each one.
  • Add all of the ingredients down to the stock to the slow cooker and cook on low for 8 hours.
  • Remove the meat from the cooking liquid and trim all fat, skin and connective tissue. Cut into suitably-sized pieces if not already cubed.
  • Strain the cooking liquid and discard the solids. Remove all fat from the broth, either with a separator jug or by chilling the liquid in the fridge and allowing the fat to solidify on top, then lifting off. Taste and decide if the broth requires any embellishment. You can improve the flavour of the broth, if necessary, with various flavouring sauces such as, but not limited to, mushroom ketchup, walnut ketchup, anchovy essence, Henderson’s Relish, Worcestershire Sauce, Marmite, Bovril, soy sauce.
  • Melt the butter in a large pan and add the pieces of cooked venison.
  • Braise the meat over a medium-low heat, turning often but carefully, to avoid breaking it apart further, until the meat is richly browned.
  • Return the meat to the broth and heat through. Add the chopped herbs and taste to check the seasoning. Add pepper, salt and more of the flavourings as required. If you’d like your broth darker, use a drop or two of gravy browning.
  • Add the cubed bread to the remaining butter and toss over medium heat until crisped and browned.
  • Serve sippets (for that is what you have just made) and marigold petals (if available) sprinkled into the broth.


¹ MS7851, Wellcome Library Collection. Various marks of ownership are written in the book, in a number of hands. ‘Elizabeth Browne 1697’, ‘Penelope Humphreys’, ‘Sarah Studman’, ‘D Milward’ and ‘Mary Dawes Jan 18 1791’.

Venison Pie

This is a great Deja Food way to transform the cooked venison from a joint into another meal. Since the filling has already been cooked, there is little shrinkage during baking, thus making it a fabulously sturdy picnic pie once cold.

Whichever way you choose to enjoy it, remember to serve with redcurrant jelly.

Venison Pie

500g cooked venison
salt and pepper
300g cooked potatoes
venison, beef or lamb stock, thickened with a little cornflour
beef or lamb dripping pastry, made with stock instead of water.
1 large egg to glaze

A 24cm spring-form tin.

  • Divide the chilled pastry into two pieces, one large than the other.
  • Cut off about 1/3 of the pastry and roll out for the lid of the pie. Cut it to size with 2cm extra all round. Cover with cling film and set aside.
  • Gather the trimmings together with the rest of the pastry and roll out for lining your greased pie tin. Be sure not to have your pastry too thin, as it will have to support a lot of filling – no less than 1cm on the sides and a little thicker over the bottom half of the pie. Let any excess pastry lie over the edges of the tin.
  • Chill the tin in the fridge until required.
  • Preheat the oven to 200°C/180°C fan/gas 6.
  • Cut the meat into cubes, discarding any fat or connective tissue.
  • Season well with salt and pepper.
  • Cut the potatoes into cubes roughly the same size as the meat.
  • Add the cubed potatoes to the seasoned venison, together with enough gravy to coat.
  • Add the filling to the pie and press down firmly. Spoon over a little extra gravy.
  • Moisten the top edges of the pastry with water and cover with the pre-cut lid. Press firmly to seal, then crimp the edges either by hand or with the tines of a fork. Use the offcuts of pastry to form decorations and secure to the lid using a little water.
Venison and Potato Pie decoration
Pie decoration example
  • Cut a vent hole for steam, then whisk the egg and brush over the top of the pie.
    Bake for 30-40 minutes until the pastry is crisp and brown and the filling hot.
  • Allow to cool for 10 minutes in the tin, then remove and serve, or if eating cold, allow to cool fully in the tin.

Christmas Pie

Charles Elmé Francatelli, 1863

This is a version of the traditional raised pie that graced the sideboards of many a rich household going back centuries. With much time being devoted to celebrating the festive season, the amount of time spent waiting on the kitchen could be drastically reduced with a sideboard groaning under selection of cold cuts and pies to slice throughout the twelve days of Christmas.

The most famous Christmas pies were undoubtedly from Yorkshire, whose frequently gargantuan sizes inspired both awe and wonder, not to mention expense.

“The host of the Angel Hotel, at Whitby, last week, set before his friends a Yorkshire Christmas Pie, seven feet in circumference and containing four stones of flour, 12lbs butter and suet, a brace of pheasants, a brace of partridges, two geese, two rabbits, ten chickens, six ducks, two tongues, one turkey, and six pounds of ham.” ¹

The traditional format of these pies consisted of the birds being boned, seasoned, rolled and then stuffed one inside the other, in the manner of Russian babushka dolls, quite putting the modern ‘turducken’ to shame for its amateurishness. Hannah Glasse’s recipe of 1747 called for a turkey, a goose, a fowl, a partridge and a pigeon. In addition, to fill up the gaps around the main bird, on one side was laid a jointed hare, on the other side woodcock, and “more Game, and what Sort of wild Fowl you can get.”

These large pies were frequently packaged up and sent to London as gifts, or merely as provisions for the festive season. Unfortunately, their size and sturdiness wasn’t always a guarantee of safe travel. In 1832, The Age newspaper carried the following morsel of information in it’s roundup of news snippets column, the Georgian newspaper equivalent of an “And finally…” news item:

“The Lord Chancellor’s Christmas Pie upset, broken and devoured by dogs.”

Adapted from his book The Cook’s Guide and Housekeeper’s & Butler’s Assistant, Francatelli’s recipe simplifies the difficulty of baking so many different types of game and poultry from raw, by pre-cooking the birds to medium rare, filling the pie with the meat, and then finishing the cooking when the pie is baked. The baking time is also considerably reduced.

Christmas Pie cut

This recipe has a lot of steps, none of which are particularly difficult, but you can spread them out over a couple of days rather than feel obliged to have one mammoth kitchen session.

Christmas Pie

Seasoning
1/2 tsp nutmeg
1/4 tsp mace
1/4 tsp cloves
1 tsp peppercorns
2 crushed dried bay leaves
1.5tsp dried basil
1.5 tsp marjoram
1.5 tsp winter savoury
1.5 tsp thyme
0.25tsp chilli pepper
0.5tsp sumac dried mango powder
1tsp garlic powder

Forcemeat
150g butter
1 clove of garlic, chopped fine
1tsp salt
500g rindless streaky bacon, chopped
500g chicken livers, rinsed
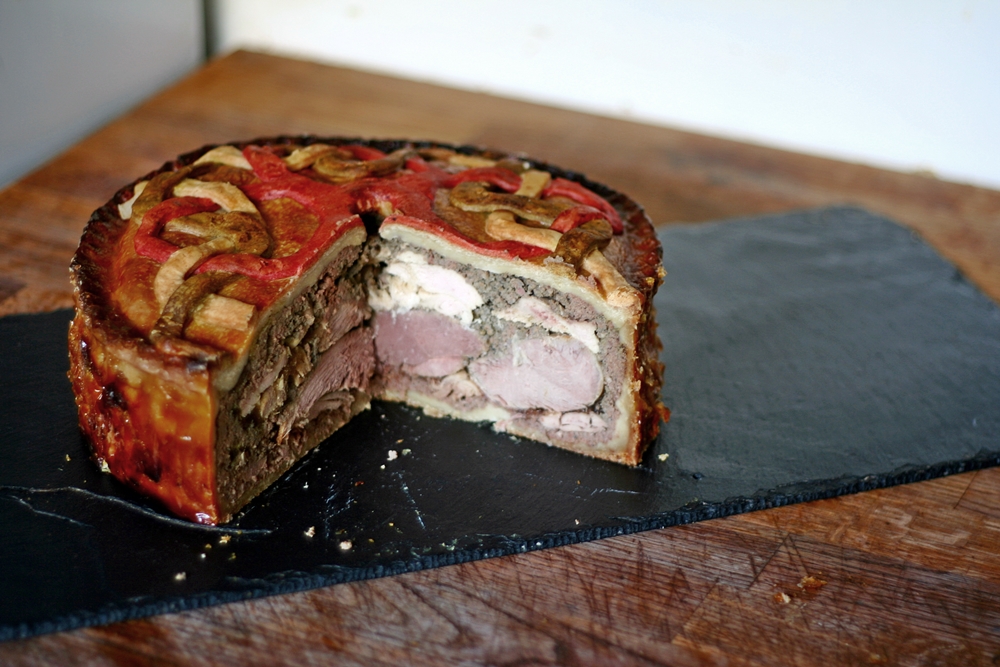
Filling
1 whole turkey leg, slow-cooked overnight on a raft of celery, carrot and onion
An assortment of game birds, preferably with carcass, such as:
1 duck crown
1 goose crown
1 pheasant
2 woodcock

Savoury jelly
1 litre of beef stock
turkey stock from cooking the turkey leg
Any trimmings/bones from cooking the game birds
1 onion
2 carrots
3 sticks celery
2 bay leaves
1tbs black peppercorns
3 sprigs thyme
1 blade mace
1 batch game pie pastry (see page xx)
1 large egg for glazing.

  • Preparing The Pie Components
  • Set aside 1 tablespoon of the seasoning mixture for use on the filling.
  • Melt the butter for the forcemeat in a large pan with the chopped garlic.
  • Add the chopped bacon and cook for 5-10 minutes.
  • Add the chicken livers and sprinkle with the seasoning mixture.
  • Cook until just pink in the middle.
  • Remove from the heat and tip into a food processor fitting with a chopping blade.
  • Blitz until smooth, pour into a bowl, cover and set aside until required.
  • Preheat the oven to 180°C/160°C fan/gas 4.
  • Season the game birds with salt, pepper, and the tablespoon of the seasoning mix.
  • Spread with a thin layer of the forcemeat.
  • Arrange in a baking tray and brush over with melted clarified butter.
  • Bake until just cooked through (internal temperature of 74°C).
  • Remove from the oven and allow to cool for 15 minutes.
  • If using crowns or whole birds remove the breasts, as whole as possible, from the carcass and strip the rest of the meat from the bones. Allow to cool completely then cover and chill in the fridge until needed.
  • Put the remnants of the carcasses into a large pan, together with the stocks, seasonings and vegetables for the savoury jelly.
  • Bring to a boil, then cover, turn down the heat and simmer for 2-3
    hours to allow the flavours to develop.
  • Strain the stock twice: once through a fine sieve and then again through dampened muslin to remove all the unwanted solids.
  • Allow the stock to cool, then chill in the fridge. Remove the fat from the surface of the chilled stock and decant the stock into suitable containers.
  • Make a note of how solid, or not, the stock is when cold, and when the time comes to mix the gelatine, adjust accordingly: if the stock is fairly stiff,
    then little or no gelatine will be required, if it is a soft-set, then just half the regular quantity of gelatine may be all that is required.
  • Constructing The Pie
  • Cut off about 1/3 of the pastry and roll out for the lid of the pie. Cut it to size with 2cm extra all round. Cover with cling film and set aside.
  • Gather the trimmings together with the rest of the pastry and roll out for lining your greased pie tin. Be sure not to have your pastry too thin, as it will have
    to support a lot of filling – no less than 1cm on the sides and a little thicker over the bottom half of the pie. Let any excess pastry lie over the edges of the tin.
  • Spread a 1cm layer of forcemeat all over the inside of the pie. Arrange a layer of the meat and cover with a layer of forcemeat to fill in any gaps. Continue layering until all the filling and forcemeat has been used up.
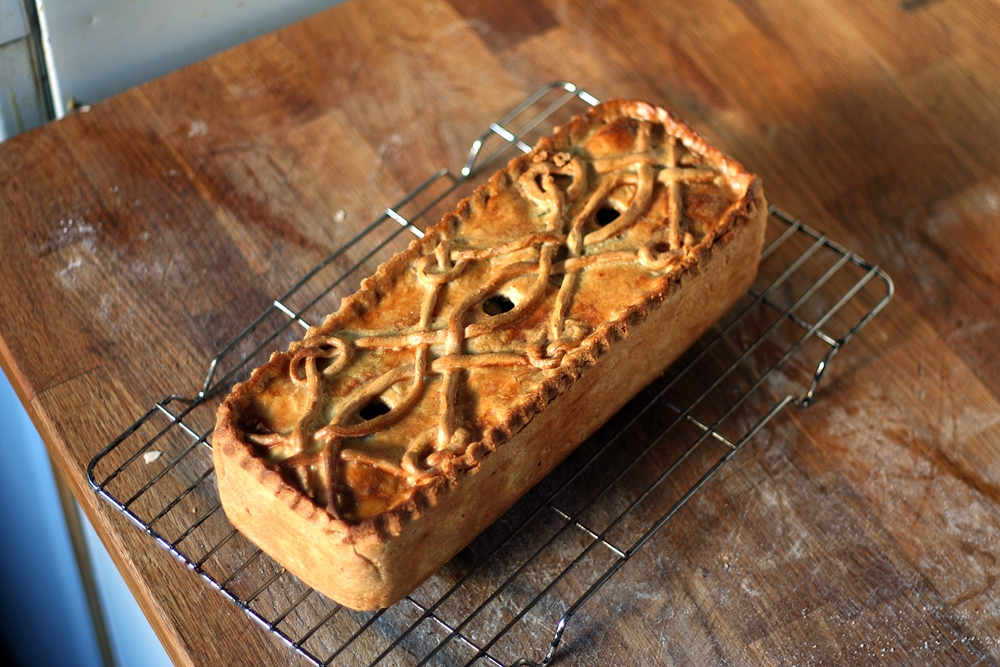
  • Brush the top edges of the pastry with water. Lay the pie lid over the top of the pie. Press firmly around the edges to seal. Trim any excess pastry using the back of a knife, then crimp the edges of the pie to decorate. Use the trimmings to make decorations for the top of the pie.
  • Cut a 1-2cm steam vent in the top of the pie, large enough for the savoury jelly to be poured through once the pie is baked.
  • Preheat the oven to 200°C/180°C fan/gas 6.
  • Brush the lid of the pie with beaten egg and bake for 1 hour and 15 minutes, or until the internal temperature reaches 70°C. If the top starts browning too much, cover loosely with a sheet of baking parchment or foil.
  • Remove from the oven and set aside to cool for several hours. When almost cold, measure out 600ml of the savoury jelly and warm in a pan. If using gelatine, soak as many leaves as required in cold water before draining and adding to the stock.
  • Stir until the gelatine has melted.
  • Before you start pouring the savoury jelly into the pie, you might want to check whether there are any holes in your pastry. Carefully remove the pie from the tin and inspect closely. You can either mix up a flower and water paste to fill any cracks, or wrap the sides and bottom of the pie tightly in cling film: this won’t stop the leaks, but it will keep everything contained until the jelly has set.
  • Return the wrapped pie to the tin before adding the jelly.
  • Pour the jelly a little at a time through the hole in the top of the pie. Use a jug and/or a fine funnel.
  • Allow time between pourings for the liquid to permeate the pie filling – it has to find and fill all the air pockets between the meat.
  • Leave to set in a cool place, or, if you have room, in the fridge overnight. The jelly will seal off any air pockets and thus prolong the shelf-life of the pie.
  • Properly stored, it can adorn a sideboard buffet all the way from Christmas almost to the New Year.

1 “Local and General Intelligence”, The Northern Star and Leeds General Advertiser (Leeds, England), Saturday, January 7, 1843; Issue 269. p3.

Seafood Pottage

This recipe is an attempt to recreate a dish served at the legendary Pontack’s Head tavern in Abchurch Lane, which reigned supreme as London’s foremost eatery at the close of the seventeenth century.

It is listed in the Johnson Family Receipts manuscript as Crayfish Pottage, but the instructions give so much leeway in terms of ingredients, it’s more appropriate to call it a seafood pottage. It would appear that the Johnson Family, or whomever composed the recipes in the manuscript, was a great admirer of the fare at Pontack’s, as there are no fewer than four entries ascribed to that establishment. Whether they were frequent visitors or merely collected the receipts from others, it gives a glimpse into the  type of food served and enjoyed there by Pepys, Swift, Defoe and London’s society elite.

Although luxurious, with ready-prepared seafood and good quality fish stock, it is ready in mere moments.

Original Recipe
Source: MS3082, Wellcome Library Collection

Seafood Pottage

Serves 4

1 litre fish stock
250g soft white breadcrumbs
4 spring onions, finely chopped
½ tsp ground mace
½ tsp ground allspice
400g prepared crayfish tails, prawns, lobster, cockles, mussels, shrimp
1 handful fresh parsley
8 sprigs dill
2 large yolks
150ml double cream
salt and pepper to taste
Put the fish stock, breadcrumbs, onion, mace and allspice into a pan and simmer for 10 minutes
until slightly reduced.
Whisk the yolks with the cream and mix into the soup, stirring as the mixture thickens.
Add the prepared seafood and allow to warm through.
Strip the fresh herbs from the stalks, chop finely and stir into the soup.
Taste, and season with salt and pepper.
Serve with crusty bread and toast sippets.

Saffron Trout

Trout has a glorious, rich, coral-orange colour when raw, and a delicate poaching for a few minutes is all that is required to cook it to perfection. Alas, even this gentle treatment causes some of that fantastic colour to fade to a rather less interesting pastel pink.

Jane Newton’s recipe, taken from her colourfully laid out manuscript book (MS1325, Wellcome Library) suggests introducing a touch of saffron to the poaching liquid which, she assures us, “will add to the seasonal colour beyond expectation.”

Original Recipe
Source: MS1325, Wellcome Library Collection

Saffron Trout

Serves 4

600g boneless trout fillets

Poaching liquid
4 spring onions, sliced
1tbs black peppercorns
2 bay leaves
12 stalks of parsley
a few sprigs of fresh herbs
4 slices lemon
1tsp horseradish
1tsp salt
pinch of saffron

English Butter Sauce
Standard Butter Sauce – see recipe here – made with 60ml freshly squeezed orange juice instead of water, and the following additions stirred in:
1tsp grated horseradish
½ nutmeg, grated
2-4 anchovy fillets, rinsed and chopped fine

4 slices white bread, crusts removed, toasted

  • Put all of the ingredients for the poaching liquid into a wide pan and add 500ml water.
  • Bring to the boil, turn the heat down, cover and simmer for 30 minutes.
  • Prepare the butter sauce.
  • When the poaching liquid has simmered for 30 minutes, slide the fish in and allow to gently poach for 5-6 minutes, depending on the thickness of your fillets.
  • Lay the trimmed toast into a serving dish and place the trout fillets on top.
  • Spoon over a little of the butter sauce and serve the rest on the side.

Potted Prawn, Shrimp or Crayfish

This recipe was chosen for it’s multi-purposeness , because you can use this method for any of the above-mentioned seafood, or perhaps even a mixture of two or three.

Potting used to be a means of preserving, the clarified butter being used to make the contents impervious to air-borne microbes, etc. Properly potted food could last days, if not weeks, without the need for refrigeration. When required, the butter was removed and the potted food used for whatever purpose the cook had in mind.

Nowadays, potted food is consumed in much the same way as a pate, spread on crisp toast or crackers. In this adaptation, the butter used to bind the seafood is delicately infused with spices before being combined with the fish and seasoning.

Potted Shrimp, Prawn or Crayfish

100g clarified, unsalted butter
1 blade mace
2 cloves
1 slice nutmeg
270g cooked brown shrimp, prawns or crayfish
black pepper
salt
Extra clarified butter to seal

  • Put the clarified butter and spices into a small pan and heat over a very low flame for 10 minutes.
  • Remove from the heat and allow to infuse for a further 20 minutes.
  • Remove the spices and combined with the seafood. NB British brown shrimp are tiny and perfect for spooning onto a finger of toast, so you might prefer to omit the next stage, and just season and pot them directly. Prawns and crayfish are larger and thus require chopping to make them easier to
    pot as well as easier to spread when served.
  • If you opt for chopping up the seafood, pour the mixture int a food processor and blitz intermittently until combined.
  • Taste and add salt and pepper as required.
  • Spoon into small pots or ramekins.
  • Pour over a thin layer of clarified butter to seal.
  • Chill in the fridge until required.
  • Serve with hot buttered toast

Broiled Mackerel with Butter Sauce

Mackerel is an oily fish, rich in omega-3 fatty acids. They have been an important food source for thousands of years, and are especially important to the fishing communities of coastal Scotland.

Once in danger from overfishing, mackerel are now available through thoughtful and sustainable farming methods. They are beautiful to behold, with their dark blue tiger stripes over a pale blue, sometimes green, background and dazzlingly white undersides.

This recipe, with it’s simple stuffing and garnish allows both the beauty and flavour of the mackerel to shine, in addition to being speedy to both prepare and cook.

Original Recipe
Source: MS3009, Wellcome Library Collection

Broiled Mackerel with Butter Sauce

4 fresh mackerel, gutted
2 bulbs of fennel, cut into thin slices

For the stuffing
2 slices of fresh wholemeal bread made into breadcrumbs
2tbs each of chopped fresh dill, parsley, fennel, thyme, rosemary
¼ tsp pepper
¼ tsp salt

Butter Sauce – see recipe here
To Add
2-3tbs capers
a little caper pickle liquid

  • Make the butter sauce:
  • Add the capers and a little of the pickle liquid to taste.
  • Wash and dry the fish.
  • Scotch the outside of the mackerel in diamond shapes with a sharp knife.
  • Mix the stuffing ingredients together and fill the insides of the mackerel. Don’t worry if there’s stuffing left over.
  • Sprinkle the fish with salt and lay thin slices of butter over them.
  • Lay slices of fennel on an oiled rack over a grillpan.
  • Lay on some flakes of butter.
  • Add the fish and cover with more butter.
  • Lay over more fennel. Dot a little butter over the fennel, or brush lightly with oil, to prevent it burning.
  • Grill under high heat for 5-6 minutes then turn the fish and grill the other side.
  • To turn the fish, lay a wire rack over the top and hold the grill and the wire rack like the bread of a sandwich. Turn the whole over, so the underside of the fish is now uppermost, with the fennel on top.
  • Grill for a further 5-6 minutes.
  • While the fish is cooking, melt a little butter in a an and quickly stir fry any excess herb stuffing, until the breadcrumbs crisp up.
  • Serve the fish on a bed of the fennel, sprinkled with the toasted crumbs, and butter sauce with capers on the side.

Mussel Pottage

A pottage is a thickened, substantial cross between a soup and a stew. I was drawn to this recipe by the lazy cook in me that is always looking for a simpler, easier way to achieve tasty food.

When this recipe was jotted down three hundred years ago, it would have been quite hard work to prepare: collecting the mussels, cleaning them, steaming them, straining the sand from the broth, etc.

Luckily for us, we have the luxury of buying what someone else has collected and cleaned, and also cooked. Whilst you can certainly buy fresh mussels in their shells and prepare them yourself, cooked mussels and prepared fish stock can bring this dish together in just minutes. I’ve been rather specific with the number of mussels, however you should feel free to increase this quantity with abandon, if so inclined.

Mussel Pottage

Serves 4

500ml fish stock
250ml water
4 slices of white bread, crusts removed
2 blades mace
½ tsp ground allspice
150ml cream
3 large yolks
1tbs anchovy sauce
32 cooked mussels
30g butter
2tbs chopped parsley to serve

  • Put the stock, water, bread, spices and anchovy sauce into a pan and bring to a boil.
  • Turn the heat down and allow to simmer for 10 minutes.
  • Remove from the heat, fish out the mace and purée with a stick blender.
  • Mix the cream, anchovy sauce and the yolks together and whisk into the soup.
  • Set aside 12 mussels for garnish and add the remainder to the soup. Warm gently.
  • When ready to serve, melt the butter in a pan and when hot, quickly toss the mussels set aside for garnish in the hot butter for about a minute, to heat through .
  • Serve garnished with the fried mussels and a sprinkle of chopped parsley.