Fruit Charlotte

This is a deliciously simple, autumnal dessert that, although it can be assembled from very few, ordinary ingredients, ends up tasting so much better than the sum of its parts – the crisp, golden outside, hot and sharp insides and cool cream or hot, rich custard make this a dish of delicious contrasts. It is one of the many British desserts that evolved to use up stale bread and cooked fruit. Whilst the filling can be almost any fruit purée you have to hand, the construction needs to observe a few rules if it is going to look as impressive when served as it tastes.

Firstly, the fruit purée needs to be relatively firm and ‘dry’, with little or no visible liquid. If your cooked fruit is especially moist, then just set it in a sieve to drain – the resultant liquid can be sweetened and served as a pouring syrup or saved for use in/on other desserts. Alternatively, set it over a low heat in a wide pan, to help evaporate the excess liquid. If you think your fruit is still too soft, you could consider whisking in an egg yolk or two to help thicken it during cooking, making it more of a fruit custard.

The bread should not be plastic-wrapped and pre-sliced. The best charlottes are made when the bread can absorb some moisture from the filling in much the same way as it does in Summer Pudding, and sliced bread just doesn’t have a suitable surface for this. Not that having your bread sliced by a machine is bad – it can make it wonderfully thin and regular – just buy a whole loaf and get the bakery to cut it for you on their machine. If it’s not stale, just leave the slices you intend to use out on the counter for an hour, they’ll dry just enough. During baking, the dry outside will, thanks to the coating of butter, crisp up and turn wonderfully golden, and the inside will draw moisture from the filling and pull everything together, so that you have a firm pudding to turn out.

The final important consideration is the shape of the bowl in which you construct your charlotte. It needs to be both oven-proof and domed/tapering. Straight-sided charlottes are usually cold desserts such as the Charlotte Russe, which uses sponge fingers and a firmly set cream and is also thoroughly chilled before being served, which helps greatly with presentation. A traditional, domed pudding bowl, or individual pudding bowls, are ideal. Their tapering form is most conducive to maintaining an impressive shape of your hot charlotte. The fluted tins commonly marketed as brioche tins are also the ideal shape, with the added detail of fluting giving the turned-out dish a very elegant appearance.

This is an adaptation of Mrs Rundell’s recipe from 1808. Her version calls for raw apples, sugar and butter and is baked slowly for 3 hours with a weight on top to help compress the apples as they shrink during cooking. This recipe is much shorter, just over one hour, but this length of time is necessary for the bread to crisp, turn golden and be sturdy enough to support the fruit filling until serving time. Higher heat and baking for a shorter time means that, when turned out, the pudding slowly sags and collapses, like a Victorian matron with her corset removed. The use of an already-cooked puree makes preparation that much quicker and the cooked pudding less prone to loss of volume.

Fruit Charlotte cut

Fruit Charlotte

I used some apples from a friend’s garden for this recipe, and added no sugar – the sharpness was a great contrast against the rich, buttery crust. I highly recommend this approach. If your fruit is especially sharp, consider using a sweet custard as an accompaniment.

750g fruit pulp
stale white bread slices
softened butter

pouring cream or custard to serve

  • Preheat the oven to 200°C/180°C fan.
  • Butter the inside of your bowl(s) generously with softened butter.
  • Cut the crusts from the bread. Cut a circle or flower shape for the bottom of your bowl and put it in first. It will make for a neat top once you turn out the pudding, and also hide the ends of all the side pieces of bread.
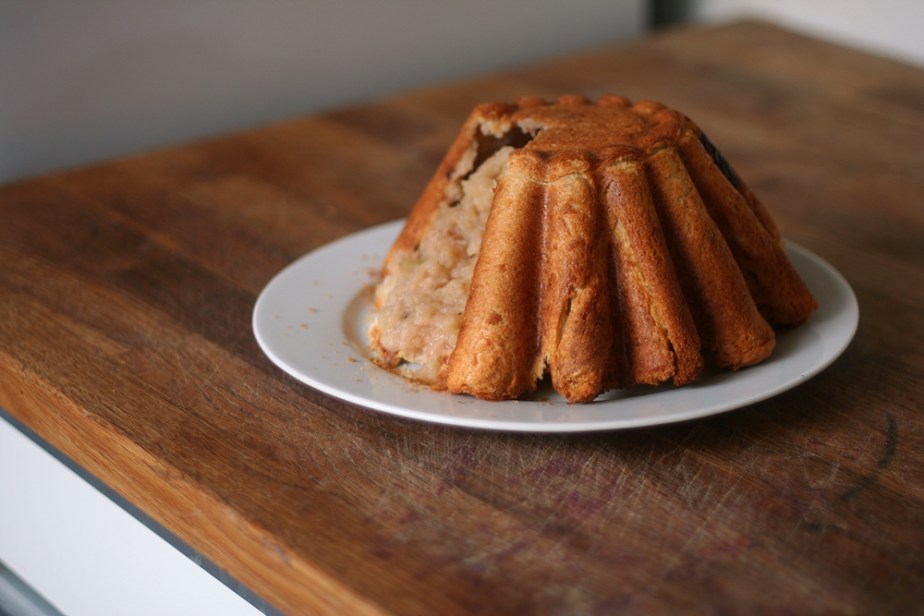
  • Line your bowl(s) with the crustless bread. How you choose to do this is up to you. Personally, I keep the pieced of bread whole and patch where necessary. If your bread is fresh and springy, you can make things easier for yourself by using a rolling pin to flatten them slightly. If you are using individual pudding bowls, you might want to reduce this to a width of 1.5cm, as the smaller form will need thinner slices if it is still to look dainty when turned out.  Place the slices inside the pudding at a slight angle and press into the butter. Leave the excess sticking out of the top of the bowl for now. Make sure  there are no spaces or holes for fruit to leak through. You can see on the above photo that a little apple juice has squeezed out and been caramelised by the heat of the oven. Delicious, but a flaw if you’re after an unblemished exterior to your charlotte.
  • Fill the lined mould with the fruit puree.
  • Butter slices of crustless bread for the top of the mould. Fold the ends of the bread at the sides inward and place the final pieces of bread butter-side upward over the top.
  • Spread a little butter onto a sheet of parchment and place this butter-side down over your filled bowl.
  • Add a cake tin on top together with an oven-safe weight, such as a foil-wrapped metal weight or quarry tile.
  • Bake for about an hour until the outside of the buttered bread is crisp and golden brown and the filling piping hot. For individual puddings, bake for 30-40minutes.
  • Remove the weight/tin/parchment and bake for a further 10 minutes, to allow the lid to crisp up.
  • Remove from the oven and turn out onto your serving dish.

Cockle and Mussel Puffs

Jane Parker, 1651 adapted from A New Booke of Cookerie, 1615

The availability of British seafood has increased dramatically with the introduction by the major supermarkets of dedicated fish counters staffed by professional fish mongers. No longer do we have to live close to our coastline in order to enjoy fresh seafood. Ideally, you would create this dish from scratch, and if you have the time and the inclination, it will no-doubt be superb. However, for those with limited time, by taking full advantage of pre-prepared seafood and ready-rolled puff pastry, this can come together in less than 30 minutes.

I first came across this recipe in the household manuscript book of Jane Parker (MS3769 at the Welcome Library). I subsequently discovered that she had copied it from John Murrell’s 1615 A New Booke of Cookerie, rephrasing it slightly and adding a little note to herself about changing the shape if frying them instead of baking. As noted elsewhere, Mistress Parker was not reticent about embellishing and improving the recipes she cherry-picked from the scant number of cookbooks of the day to suit her own style and preferences.

A Made dish of Cocokles and Mussels
From John Murrell’s A New Booke of Cookerie, 1615, p20
cocklepierecipe
From the manuscript book of Jane Parker, MS3769 at the Welcome Library

I have refrained from chopping the seafood as finely as suggested, much preferring to allow the constituent parts to be both distinguishable and identifiable omce the crisp pastry reveals it’s contents. I have added only pastry decoration to the original recipe.

Cockle and Mussel Puffs

200g cooked cockles
200g cooked mussels
4 large yolks
¼ tsp pepper
pinch of salt
a little grated nutmeg
60ml white wine
60ml orange juice
2 sheets puff pastry
1 large egg for glazing

  • Preheat the oven to 220°C/200°C fan/gas 7.
  • Mix the cockles and mussels in a bowl.
  • Season with salt, pepper and nutmeg.
  • Mix 2 tablespoons of the orange juice with the yolks and stir to combine.
  • Pour over the cockles and mussels and toss gently.
  • Taste and add more orange juice if liked, but beware of making the mixture too wet.
  • Roll the pastry sheets lightly to smooth, then cut four strips of 1cm width across the shorter side of each pastry sheet. Leave one sheet for the bases, and roll the second sheet thinner (tops), to fit overthe filling easily without stretching.
  • Moisten the edges of the bases and use the strips to build up a border around the edges.
  • Divide the solid part mixture evenly between the four bases and spread out. Don’t worry about adding the liquid at this stage, wait until the pies are sealed.
  • Moisten the pastry strips with a little water and lay over the lids.
  • Brush the border with water, then lay over the lids, pressing around the filling firmly to seal.
  • Trim the edges to neaten. Use a pastry or pizza wheel, or a neat, vertical cut with a sharp, unserrated knife. The cleaner the cut, the better and more puffed the edges will become.
  • With the back of a knife, press down all around the pie, 5mm from the edge, to seal.
  • Brush the tops of the pies with beaten egg, making sure none drips down the sides, as this will stick the pastry layers together and stop them from puffing up. Cut a vent hole to let out steam during cooking.
  • Divide any leftover liquid between the pies, pouring it through the vent hole.
  • Use pastry offcuts to shape some decorations. Leaving these pieces unglazed will make them stand out more against the glazed pastry.
  • Transfer the pies to a baking sheet lined with parchment.
  • Bake for 12 minutes, turning the baking sheet around 180 degrees after 6 minutes to ensure even colouring.
  • Serve immediately.

Batalia Fish Pie

Battalia Pie is a classic, double-crust pie from times past, the filling for which filling could be made from any of a number of ingredients. It’s origins are thought to come from the French béatilles, meaning titbits, and originally comprised of all the little odds and ends that are too small to use by themselves: cockscombs, lamb stones, sweetbreads, ox palates, etc.

By the 18th century, the spelling had settled onto Battalia, but in the 16th and 17th centuries it was a much more ad hoc affair (beatille, beatilla, beatilia), although the French origin can still be seen. To the ear, however, it sounded closer to ‘battle’ and William Rabisha embraced this interpretation with gusto, styling his fish pie in a pastry castle, complete with crenellated battlements, which I think is a fabulous concept as well as being visually stunning for a special occasion or centrepiece.

This design works especially well with the mixture of ingredients called for in his filling, as he suggests that each tower hold a different kind of fish and sauce. Then again, he also suggests that the decapitated heads of the various fish and seafood creatures be stuffed and propped on the battlements like some macabre seafood re-enactment of the siege in Beau Geste, thus illustrating the importance of being selective when choosing which aspects of historical recipes to revive.

bataliafishpie
From The Whole Body of Cookery Dissected (1661) William Rabisha

Another presentation idea is to utilize the castle and battlement elements for a cold, seafood buffet, as in the picture above. Each tower is filled with a different seafood, and the main body of the ‘castle’ can incorporate garnishes, salads and seafood items better suited to being laid out, such as smoked salmon and/or trout and oysters on the half shell.

Instructions are given below for how to construct and bake your crenellated pastry castle. Do not be constrained by the picture – only by the dimensions of the tin that will fit inside your oven: a large roasting tin will give you ample space in which to lay out your centrpiece.

Neither should you think only in terms of rectangular shapes for your ‘castle’. Use whatever baking tins you have to hand and create your own fortified masterpiece. A variety of heights will add interest as well as flexibility to your display.

Happy castling!

Batalia Fish Pie

William Rabisha, 1661

Game Pie Pastry made with wholemeal flour instead of white
2 large eggs for glazing.

To make the castle pie shell

  • Select a pie tin suitable for serving; round of rectangular, either is fine. It should be at least 10cm deep in order to form the walls and crenellations.
  • Select tins to shape your towers. These can be ordinary tins from soup or vegetables; remove the labels by soaking, and cut off both ends, leaving a tube. Cover all of the tins with foil or baking parchment, leaving one end open on each of the smaller ‘tower’ tins. The pastry will be baked on the outsides of the tins, to ensure a neat appearance.
  • Turn all of your tins upside down. Grease well.
  • Preheat your oven to 200°C/180°C fan/gas 6.
  • Roll out the pastry to about 1cm and use to cover all of the tins with a smooth layer. Trim any excess pastry.
  • Re-roll the scraps of pastry and cut into 3cm strips. Brush the top edges – which are currently the bases of the tins – with beaten egg and attach the strips of pastry. Press firmly.
  • Using a sharp knife, cut out the crenellations on the towers and the castle. Make them 1.5cm deep and 1.5cm wide.
  • Brush the pastry with the beaten egg.
  • Using the tip of a sharp knife, lightly score the pastry into a brickwork pattern.
  • Set your tins, still upside-down, onto a baking sheet and bake for 15-20 minutes until browned and firm.
  • Remove from the oven and CAREFULLY turn the tins the right way up.
  • Ease the foil/parchment away from the tins and lift out. Remove the foil/parchment, leaving the pastry shell. Brush the insides of the pastry with beaten egg and return to the oven for 5-10 minutes until fully cooked.
  • Cool on a wire rack.

New Potato Pie

Pies are frequently seen as the star of a meal, but this new potato pie is a delightful accompaniment to numerous meals. Tender new potatoes are baked beneath a rich buttery crust with a creamy sauce flavoured with parsley.

Not only does the crisp and golden pastry lid keep in all the flavours, it allows the potatoes to finish cooking without fear of them falling to pieces.

Simple and delicious with a gratin of leeks, sprinkled with cheese, or fresh, farmhouse ham and salad.

New Potato Pie

500g new potatoes, scrubbed
2tbs plain flour
1/2tsp salt
1/4tsp ground white pepper
3-4tbs chopped, fresh parsley
80ml double cream or creme fraiche
1 sheet puff pastry
beaten egg to glaze

  • Preheat the oven to 200°C/180°C fan/gas 5.
  • Bring a pan of water to the boil.
  • Boil the potatoes for 5 minutes, then drain.
  • When cool enough to handle, cut the potatoes into slices, 2cm thick.
  • Mix the flour, salt and pepper, sprinkle over the potatoes.
  • Add the parsley and toss to coat.
  • Put potatoes into an oven-proof dish and pour over the cream.
  • Cut some strips of pastry and line the edge of the dish.
  • Dampen the pastry rim and cover with the sheet of pastry, pressing the edges down firmly.
  • Brush wih beaten egg and cut a vent in the middle to let out steam.
  • Bake for 20-30 minutes, depending on the size and shape of your dish until the pastry is crisp and brown and the potatoes cooked through.

Onion Charlotte

In the great pantheon of cookery ingredients, onions tend to get a bit of a raw deal, in my opinion.

Although they are fundamental to the development of flavour in a multitude of savoury casseroles, stews, soups, pies and salads, they are rarely celebrated with starring roles and are usually relegated to the sidelines: always the bridesmaid, never the bride.

This recipe puts onions front and centre – or rather quite the opposite – as a creamy, onion filling is wrapped in a golden, bread casing.

Normally viewed as a pudding dish, there’s no reason why the distinctive features of a fruit charlotte, namely the hot flavourful filling and crisp, buttery bread shell can’t be applied to a savoury dish.

It is a fine accompaniment, or with the addition of some cubes of cheese, mushrooms or bacon, can even become the main attraction.

Random Onion Tip: Include the papery, brown skins in your stock pot. They make for a wonderful colour.

Onion Charlotte

Farmhouse Cookery, 1930s

400g onions
400ml milk
200ml water
¼ tsp cinnamon
½ tsp ground nutmeg or ½ whole nutmeg, grated
2tbs cornflour mixed with a little cold water.
15g butter
30g softened butter
6-8 slices of stale white bread. If you have none, then cut some bread into slices and arrange on a wire rack to dry a little.
1 x 1.2 litre pudding basin

  • Peel the onions and put into a saucepan
  • Add cold water to cover and bring to the boil.
  • Turn the heat down and allow to simmer for 20 minutes.
  • Strain the liquid off and set aside to use for soup.
  • Chop the cooked onions neatly and return to the pan.
  • Add the milk and water and simmer until the onions are cooked through.
  • Season with salt and pepper and the spices.
  • Add the cornflour mix and heat gently, stirring, until thickened.
  • Add the butter and stir gently until melted.
  • Remove from the heat and set aside to cool.
  • Generously grease the pudding basin with the butter. A pastry brush will make this very easy.
  • Cut a circle of bread to fit into the bottom of the basin and place it there.
    Set one slice of bread aside to make the cover.
  • With the remaining bread, cut it lengthwise into strips about 5cm wide.
  • Line the sides of the bowl with the bread strips, overlapping each one slightly so that there are no gaps for the filling to leak through. Err on the side of caution and use extra bread if necessary to be sure the bowl is fully lined. The pieces of bread will stick out above the bowl rim, and this is fine.
  • Fill the bread-lined bowl with the onion mixture.
  • Butter the remaining bread and lay it, butter side upwards, on top of the onion filling.
  • Wrap the bowl in cling film, gently folding over the pieces of bread sticking up around the edges.
  • Place a saucer with a weight on top and chill in the fridge for at least an hour, or until required.
  • Preheat the oven to 180°C/160°C fan/gas 4.
  • Remove the cling film from the pudding bowl, replace the saucer and weight with oven-proof equivalents.
  • Put the bowl on a baking sheet and bake for 1 hour, until the bread is golden brown and crisp.
  • Remove from the oven and allow to rest in the bowl for five minutes, then run a knife around the bowl to loosen it and turn out onto your serving dish.

Pudding Cake

May Byron, 1915

The pudding cake is, to my perception, a genre of puddings that has all but disappeared from our tables, despite being popular since the 18th century. It describes something that, when cold, would be recognisable as a cake, but here it is served, warm and comforting, straight from the oven. As with the Fruit Sponge, it’s the hugely enjoyable lure of warm sponge with cream or custard that is the main draw.

The flavourings for this recipe are only limited by your imagination – you can use any combination of fruit/nuts/candied peel that takes your fancy. For this base recipe I have opted for the unjustly unglamorous prune for the wonderfully rich dark, almost toffee flavour the fruit develops during cooking.

Pudding Cake

250g prunes, stones removed
250ml apple juice
100g chopped nuts or flaked almonds
3 large eggs
200ml milk, plus extra if needed
100g butter, melted
200g sugar
2tsp baking powder
350g plain flour

Double cream or custard to serve.

  • Quarter the prunes and put them in a small pan. Pour over the fruit juice and put over medium heat.
  • When the mixture boils, cover and turn off the heat and leave to stew for 30 minutes.
  • Preheat the oven to 180°C/160°C fan/gas 4.
  • Grease and line a 24cm, springform tin with parchment paper.
  • Drain the prunes.
  • Put the eggs, milk, butter, sugar baking powder and flour into a bowl and mix thoroughly until it comes together into a smooth cake batter. If it seems a little heavy, mix in some additional milk until it achieves a dropping consistency and falls easily from the spoon.
  • Spoon a quarter of the batter into the prepared tin and scatter half of the soaked prunes over.
  • Add another layer of cake batter and sprinkle over the nuts.
  • Spoon in half the remaining batter and sprinkle the rest of the prunes.
  • Pour the rest of the batter into the tin and smooth over.
  • Bake for 40-50 minutes, until the cake is risen and golden.
  • Allow to cool in the tin for ten minutes before removing and transferring to a warmed serving dish or plate.
  • Serve in wedges with double cream or custard poured over.

English Butter Sauce

This is the classic and multi-purpose Butter Sauce much complained-of as being, for many years, the only sauce we British had.

It is perfect for spooning over new potatoes as well as a whole range of freshly-cooked vegetables, and can also be adapted to enhance numerous other dishes merely by changing the liquid and selecting a variety of ingredients as flavourings.

Butter Sauce
5g cornflour
30ml milk
60g salted butter
60ml cold water
salt and pepper to taste

  • Put the cornflour and milk into a small saucepan and whisk to combine.
  • Add the diced butter and stir briskly over a medium heat until the butter has melted.
  • Add the water and continue whisking until the sauce comes to a boil and thickens.
  • Taste and add salt and pepper to your liking. This is plain Butter Sauce

Fruit Pudding Pies

Mary Rooke, 1770

Pudding pies used to be immensely popular in the 18th century, and describe a particular style of dish where a pastry case is filled with a thick, flavoured and sweetened porridge and the two baked together. Obviously, you’re now saying to yourself, ‘Hang on a second, that’s a tart, not a pie’, and you’d be quite right, of course, but only by 21st century semantics. In addition, the ‘pudding’ of the title is to our modern eyes, rather vague, but to those of an 18th century cook, it was curiously specific, and not for the reason you might think.

Look up the word ‘pudding’ in the Oxford English dictionary, and the very first definition is: A stuffed entrail or sausage, and related senses. Yes, no mention of warm, comforting delicacies served at the conclusion of a meal, but innards and stuff in ’em! In the 17th and 18th centuries, pudding could be sweet or savoury. Echoes of these savoury puddings are still visible today in the black and white puddings sold in butchers shops. Sweet puddings included dense mixtures of dried fruits, peel, suet and spices, either stuffed into entrails or wrapped in floured cloths and simmered in water, as the traditional Clootie Dumplings of Scotland are today.

A more accurate description of pudding from these times would be that of a foodstuff of a certain texture, and so it is with pudding pies. The texture is more akin to a baked cheesecake, smooth and dense, but with just a fraction of the richness, they’re practically health food! In this instance, the filling is flavoured with the sharpness of gooseberries. I like the way it cuts through the denseness and really lifts and brightens the filling, but any smooth fruit puree will work well, the best results coming from sharply acidic fruit.

Original Recipe
Source: D/DU 818/1, Essex Record Office

Fruit Pudding Pies

112g ground rice
112g butter
225ml milk
112g sugar
100ml gooseberry pulp
4 large eggs
zest of a lemon
½ tsp freshly grated nutmeg
4 individual pudding, or deep tart, dishes lined with shortcrust pastry

  • Preheat the oven to 180°C/160°C fan/gas 4.
  • Stir the ground rice, butter and milk over heat until quite thick, then pour into a basin.
  • Add the sugar and stir together until cold.
  • Add the gooseberry pulp, well-beaten eggs, lemon and nutmeg.
  • Mix thoroughly.
  • Spoon the mixture into the pastry-lined dishes and smooth over.
  • Put the tarts onto a baking sheet and cover lightly with a sheet of foil, to prevent the filling darkening too much.
  • Bake for 20-30 minutes, depending on the size and shape of your pie dishes. Remove the foil after 15 minutes and turn the pie dishes around if they seem to be colouring unevenly.
  • Cool on a wire rack.
  • Serve warm or cold with cream or custard.

Gooseberry and Elderflower Raised Pie

Traditional

There’s a 200-year-old tradition in Oldbury-on-Severn of making gooseberry pies with a sweetened hot water crust pastry as part of the Whitsun celebrations. Jane Grigson mentions them in several of her writings on English food. Due to the age of the recipe, it was some time before I managed to find a picture of these iconic tarts, and for a long time had to rely solely on my imagination. Consequently, what I pictured in my mind was the pie you see above, and was just a little disappointed to eventually learn that the pies were small, hand-sized, shallow, round pies with a single layer of gooseberries and a lot of sweet/sharp juice.

The use of a hot water crust for a fruit pie is unusual, and can be tricky to work with. Some recipes even recommend that once the tart shell has been formed, the pastry is chilled overnight in order to make a firm casing for the gooseberries, but this then makes it difficult to attach the lid firmly once the paste is cold.

In my searching, I also found accounts that seemed to agree on two things: everyone seemed to like these tarts, even if they didn’t like gooseberries, and that they were extremely juicy when bitten into. I decided to make a large, consumer-friendly variation of this classic dessert pie by setting the juice with gelatine, so that it could be sliced and each slice would hold its shape.

Elderflower is a classic flavour pairing with gooseberries, and this pie combines a jelly made from the gooseberry juice syrup and elderflower cordial with fresh gooseberries and a sweetened hot water crust. The jelly is sweet and delicately flavoured and the gooseberries are so sharp, the contrast between the two is both delicious and refreshing. To make everything much easier, it is baked in a loaf tin.

Sweet Hot Water Crust
600g plain white flour
400ml water
100g butter
100g lard
60g caster sugar

  • Put the fats, sugar and water into a pan and warm over a low heat just until the fat has melted.
  • Put the flour into a bowl and pour on the warmed liquid. Stir well.
  • The paste will be very soft when it comes together, and you can roll it out if you like, but it can also just be flattened and pressed into the tin by hand.

1kg fresh gooseberries
1kg caster sugar
2-3 tablespoons of elderflower cordial

beaten egg to glaze.

3-4 sheets of leaf gelatine

  • Use a sharp knife to top-and-tail the gooseberries, removing the stalk and the calyx.
  • Generously grease a large loaf tin. You can, of course, make this in any shaped tin, but a rectangular loaf tin does produce pretty and regular slices. In order to decide what size of tin to use just tip in your prepared gooseberries. The best fit will be from the tin the gooseberries only just fill.
  • If liked, line the tin with baking parchment in order to help with the removal of the pie once it has cooled.
  • Make the pastry and divide into two. Roll out one piece and cut a lid for your pie. Use the empty tin to mark out its size, then cut the pastry 3cm larger all the way round. Set aside.
  • Gather the trimmings and the rest of the pastry together and roll out to about 1cm. Line your greased loaf tin and allow the excess pastry to drape over the sides for now. Make sure any cracks are well patched, so that the juice stays inside the pie.
  • Layer the gooseberries in the lined tin with the sugar.
  • Moisten the edges of the pastry with water and place the pastry lid on top of the pie. Press the edges together and trim the excess. Crimp the edges in a decorative manner.
  • Cut three circular vent holes in the lid at least 2cm in diameter.
  • Use the pastry trimmings to make additional decorations if liked.
  • Cover lightly with cling film and chill in the fridge for 1 hour to firm up.
  • Preheat the oven to 200°C/180°C fan/gas 6.
  • Brush the lid of the pie with beaten egg and bake for 45 minutes to 1 hour, until the top is crisp and golden and the sides are well-baked. It is better to cook the pie a little longer than for the pie to be under-baked, so if the top is becoming too dark, cover with some foil.
  • When you’re happy with the done-ness of the pastry, remove the pie from the oven and set aside to cool for 10 minutes.
  • Tricky Part: You need to drain the juice from the pie in order to mix in the elderflower cordial and the gelatine that will make it set. After much experimentation, I recommend the following method:
    • Put your pie onto a wire cooling rack.
    • Put a second rack upside-down on top of your pie.
    • Place a large bowl on your work surface. If you think it necessary, place a damp teatowel underneath to prevent slippage.
    • With your thumbs uppermost, pick up your pie tin, sandwiched between the wire racks.
    • Holding the pie tin over the bowl, flip it towards you and let all of the juice drain out of the pie through the vent holes. Once the juice has topped dripping, turn your pie the right way up and set aside.
  • Taste the syrup and add sufficient elderflower cordial to flavour. Since the pie will be eaten cold, you can make the flavouring slightly stronger than usual, since the flavours will be somewhat muted when served.
  • When you’re happy with the taste, measure the volume of syrup. For every 150ml, you need to bloom (soak in water) 1 leaf (sheet) of gelatine. Once bloomed, drain and add the gelatine to the syrup and warm gently until melted.
  • Pour the syrup/gelatine mixture back into the pie. You want enough syrup in the pie to make the cooked gooseberries float.
  • Leave your pie to cool. Cover with plastic wrap and chill overnight in the fridge.
  • Allow to come to room temperature before removing from the tin and cutting in slices to serve.

Oyster Tarts

A great little recipe from that classic baking institution: Be-Ro.

Thomas Bell founded his grocery company in Newcastle-upon-Tyne in 1875. Amongst other items, he manufactured and sold baking powder and the world’s first self-raising flour under the brand name Bell’s Royal.

After the death of King Edward VII the use of the word ‘Royal’ in business was prohibited, so Thomas shortened each word to just two letters, and the Be-Ro brand was born.

To encourage the use of self-raising flour, the company staged exhibitions where visitors could taste freshly-baked scones, pastries and cakes. This proved so popular, and requests for the recipes so numerous, the Be-Ro Home Recipes book was created. Now in it’s 40th edition, the company claims that, at over 38 million copies, its recipe booklet “is arguably one of the best-selling cookery books ever.”

I’m not sure which edition my Be-Ro booklet is, as it’s undated, but from the appearance of the smiling lady on the front it definitely has a 1930s feeling; it’s pictured on the Be-Ro website, with a deep red cover.

These little tarts are a beautiful example of how the simplest ingredients can be given a subtle twist and appeal by both their appearance and the ease with which they are whipped up. In essence, these are a Bakewell Tart with cream, but a little tweak turns them into sweet ‘oysters’.

I’m not a fan of almond flavouring, so I’ve used lemon zest to brighten the almond sponge and used a seedless blackcurrant jam inside. Adding the jam after baking (unlike the method for Bakewell Tarts) circumvents cooking the jam for a second time, and so it retains its brightness of flavour as well as colour. The pastry is crisp and dry and a perfect contrast against the moist filling. I’ve opted for an unsweetened pastry, but feel free to use a sweetened one if you prefer.

You could customise these tarts by swapping the ground almonds for almost any other nut, and matching the jam accordingly. Here are a few that occurred to me.

  • Almond with orange zest, and orange curd as the filling.
  • Coconut and lime curd, with a little lime zest in the filling.
  • Hazelnuts or pecans, with a praline paste or Nutella in the filling.
  • Walnut and a little coffee icing.

Have fun with them!

Oyster Tarts

Pastry
60g cornflour
225g plain flour
140g butter
ice-cold water

Filling
70g unsalted butter, softened
70g caster sugar
1 large egg
zest of 1 small lemon
85g ground almonds

To serve
200g cream cheese
200ml whipping cream
1tsp vanilla extract
1-2tbs icing sugar, plus more to sprinkle
120g sharp jam

  • Put all the pastry ingredients except for the water into the bowl of a food processor and blitz until the mixture resembles breadcrumbs.
  • Gradually add the water, one tablespoon at a time, until the mixture comes together in a ball.
  • Knead smooth, then roll out thinly. Cover with cling film and chill in the fridge to relax.
  • Preheat the oven to 170°C, 150°C Fan.
  • Beat the butter and sugar for the filling until light and fluffy. This will take about 5 minutes to get as much air into the mix as possible.
  • Add the egg and whisk in thoroughly.
  • Fold in the lemon zest and ground almonds.
  • Grease a 12-hole shallow tart tin.
  • Remove the pastry from the fridge and cut out 12 circles. Line the prepared tin with the pastry.Add about a tablespoon of filling to each tart. I use a small ice-cream scoop but 2 spoons will also work.
  • Bake for 18-20 minutes, turning the tin around after 10 minutes to ensure even cooking.
  • Transfer the cooked tarts onto a wire rack and allow to cool.
  • Whisk the cream cheese, vanilla and cream together until firm. Gently stir through a little icing sugar to slightly sweeten.
  • When the tarts have cooled, slice off the top of the filling with a sharp knife and set aside.
  • Add a teaspoon of jam and either spoon or pipe a little of the cream mixture into each tart.
  • Set the ‘lids’ back on the tarts at a jaunty angle, so as to appear like a half-opened oyster.
  • Dust with icing sugar and serve.