Here’s a recipe you might want to try when fresh cranberries are back in the shops.
After discovering the joys of home-candied peel a few years ago, I have since tried my hand at several different fruits. With it being the season for mincemeat and fruit cake decorating, when I spotted some punnets of fresh cranberries on sale, I thought I’d give them a try.
Hunting around on the internet, it seems many people’s idea of candied cranberries is to dip them in egg-white and roll them in caster sugar. Beautiful and festive and twinkly-frosty, but not really candied in the traditional sense.
I also found no recipes on the traditional method of candying for these particular berries, so I thought I’d make up my own, based on the many examples of preserving recipes I’ve found in various manuscript books.
My method is a combination of the old-fashioned method of making conserves with delicate fruit, and how to make sloe gin *hic!*
This recipe takes about a week, but your active involvement is little more than an hour. Over the week, the delicate berries will gradually exchange their juice for sugar, making the cranberries more robust the more sugar they absorb, and as a bonus you’ll get a beautifully-coloured cranberry syrup.
For ease, select a pan you can get by without using for a week.
Candied Cranberries
1kg fresh cranberries
1kg caster sugar
Poke holes in each cranberry with a cocktail stick in order to let the juice out (and the sugar in). You don’t have to be too fastidious – I made about 5 or 6 holes around the middle.
Layer the cranberries and the caster sugar in a pan – a wide pan is better than tall saucepan, for ease of gently moving the berries around later. Leave for 24 hours. The sugar will draw out some of the juice.
Next day, heat the pan very gently to melt the sugar. You’ll probably have to add a little water to get it started – about 1/2 a cup. Shake, don’t stir – or if you absolutely have to, stir very gently. Vigorous stirring and/or heating will cause the berries to burst. Some will burst anyway, but try and keep that at a minimum by being gentle.
Once the sugar is melted, turn off the heat, cover, and leave 24 hours. As the sugar is absorbed by the cranberries, they will gradually become more robust, but for the first day or two, you’ll need to be careful.
Repeat the heating gently for 5 minutes then leaving overnight for 5 days. Gradually the syrup will become redder and the cranberries more jewel-like.
After 5 days, warm the syrup (to make it easier to drain) and pour through a sieve to separate the cranberries from the syrup.
To finish, the cranberries need to dry a little, so line 2 large baking sheets with parchment and scatter the candied cranberries over. Try and get them separated, to facilitate drying, but there will be some squished ones you can’t do much about at this stage.
Last thing at night, put the trays in the oven and turn the heat to 170°C/150°C Fan for 5 minutes, then turn off and leave to dry overnight.
Repeat the drying next day – 170°C/150°C Fan for 5 minutes then turn off and leave to dry. If extremely sticky, they might need another overnight drying (I did Friday night/Saturday day/Saturday night).
Once only slightly tacky to the touch, they’re ready to use. I sorted mine into 3 groups: Perfect ones went back into the syrup (to keep moist) to use as decorations. I dipped a few of the not-so-perfect ones in dark chocolate, and rolled the rest in caster sugar and stored in a ziplock bag. The exploded ones I chopped and put in a jar for mincemeat.
It is the original fudge recipe that used to be posted on the Carnation website and for some reason was taken down a few years ago.
Luckily for me – and you – I have it ingrained on my brain as it is the best, no-fail recipe I have ever used, and I am posting it here so I can be lazy and just point everyone who asks for the recipe here, instead of writing it out again and again.
It makes the kind of fudge that has texture: when cooled, it is hard to bite into – yet it melts in the mouth. Very similar to the confection known in Scotland as Tablet.
The secret is two-fold: boiling the mixture to the correct temperature, and beating it as it cools to ‘grain’ the sugar.
You CAN make this the Old School way, testing for the Firm Ball stage by doing the drop test in water, and by beating the cooling mixture hard with a wooden spoon. However, I’m all for using gadgets wherever possible, so a thermapen or similar thermometer and an electric whisk or stand mixer are my recommendations.
Each batch makes a 1.2kg slab large enough to last over the festive season. Alternatively, you can make a batch and divide it up into small batches in clear plastic bags and use it for presents, or make two batches of contrasting flavours and make it go even further.
You can use the basic recipe to make a number of equally delicious variations, and I’ve thrown in an extra one by Nell Heaton – a favourite author of mine from the 1940s/1950s, who deserves greater recognition for her delicious, trustworthy recipes – which is a real explosion of flavour when made with home-made candied peel, fruit and nuts.
Fudge
1 x 397ml tin of sweetened, condensed milk
150ml milk
125g butter
450g Demerera sugar
Line a baking pan with parchment. The size of the pan doesn’t really matter, but I recommend a rectangular pan, for ease of cutting the fudge into cubes once cooled. The original recipe suggested a pan 18cm square, which will make for a small, very thick slab. Personally, I use a pan 30cm by 24cm
Put all of the ingredients into a pan and stir over a low heat until the sugar has dissolved.
Bring to the boil and stir continuously until it registers between 116°C and 120°C on a thermometer dipped into the centre of the pan. Make sure the tip of the thermometer doesn’t touch the bottom of the pan, as this will be much hotter and the thermometer will thus give a false reading.
When your fudge reaches temperature, remove from the heat and allow the bubbles to settle. Pour into your stand mixer and use the beating paddle (not the whisk) to beat slowly until the mixture thickens. Alternatively, use your electric hand mixer directly into the pan, also whisking until the mixture has thickened.
When it is thick and still just pour-able, tip it into your parchment-lined tin and smooth over. I tested the most recent batch I made and when sufficiently thickened and cooled, it registered 80°C.
Leave to cool completely.
When cold, cut into cubes with a sharp knife and store in an airtight box.
Variations
Rum and Raisin Fudge: Warm 115g raisins in 3-4tbs dark rum and leave to plump. Add just before beating.
Chocolate Fudge: Melt 170g dark, 60% chocolate and add just before beating.
Fruit and nut fudge: Stir in 85g mixed dried fruit and chopped nuts.
Nell Heaton’s Tutti Frutti Fudge (my favourite) Add 350g – yes, a whopping 12 ounces in old money – of mixed chopped nuts, dried fruit and candied peel sliced or diced small. I suggest about 90g mixed candied peel, 130g flaked or slivered almonds and chopped walnuts, and 130g mixed raisins, sultanas, cranberries and chopped apricots.
Some of you might know that there’s already a muffin recipe on the blog. Nevertheless, I decided to revisit muffins in part because it is now ridiculously easy to get hold of fresh yeast, but also because a lot of muffin recipes and videos Out There™ are just plain wrong when it comes to the method of shaping them. There, I said it. Oh yes, there’s no holding me back when my dander is up.
Because there’s no need to go faffing about with rolling out the dough and using *in her best Lady Bracknell voice of disapproval* a pastry cutter. Apart from anything else, it ruins the iconic shape of the muffin (a flattened top and bottom with a smooth, soft and pale crust around the middle) with an ugly seam where the dough has been compressed as it was cut.
This recipe is adapted from one listed in Florence White’s Good Things in England and dates from 1826, and without being overly dramatic, eating them is like biting into a cloud. To keep them as soft as possible, I’ve used ordinary plain flour and used the whey from some curd cheese I made earlier this week as part of the mixing liquid, as it gives a beautifully soft crumb. Don’t worry about having to use whey, you can just make the mixture equal parts whole milk and water.
Fresh Yeast Muffins
Makes 14
560g plain flour
20g fresh yeast
1 tsp granulated sugar
1tsp salt
300ml whey + 150ml whole milk OR 225ml water + 225ml milk
cornflour for dusting
semolina for cooking (optional)
Put the flour and salt into a bowl. I use my stand mixer fitted with a dough hook.
Crumble the yeast into a small bowl and add the sugar. Work the sugar into the yeast then set aside for five minutes until it becomes liquid.
Mix the whey and milk (or milk and water) in a small pan and warm gently to blood temperature.
Pour the yeast into the milk mixture and then pour the whole into the flour.
Mix thoroughly and knead for 10 minutes – five if using a dough hook.
Cover and leave to rise for 1.5-2 hours.
Deflate the dough, knead briefly, cover, and allow to rise for another 30 minutes.
Sprinkle the work surface with cornflour. The dough is rather loose and prone to stickiness. The cornflour doesn’t stick to itself, and will therefore act as a non-stick layer between the dough and the work surface.
Tip the dough out and divide it into 75g portions. This quantity of dough will, when risen and cooked, make the perfectly-sized muffin – 8-9cm across and 4cm thick. You can make them larger, but remember to adjust the cooking time accordingly.
For each piece of dough, fold the edges in towards the middle, then turn over so that the folds are underneath and the top is smooth. Cup your hand over the dough and roll it in small circles, shaping the dough into a smooth ball. Set the ball on a cornflour-dusted surface to rise. Don’t put the balls of dough too close together, or they might rise into each other.
Allow the dough to rise for 30 minutes from the moment the first ball of dough is shaped. They will take time to cook in batches, so with the staggered batch cooking, the last few will have risen just in time to be cooked.
Put a heavy-based pan onto a large ring on a low heat.
Cook the muffins in batches. Depending on the size of your pan, you can cook 4 or 5 at a time. Sprinkle the pan with semolina if you like, although if your pan is non-stick, this can be omitted.
Gently slide a thin spatula under one of the risen balls of dough and transfer it to the pan turning it upside down as you do so, so that the top of the muffin cooks first. This will help create the perfect muffin shape, because the base of the dough is already flat and the top is rounded. If you cook the base first, the top continues to rise and curve, and the drying effect of the radiated heat from the pan will dry the surface of the dough and will make it ‘reluctant’ to flatten into the traditional muffin shape. Cooking the top first, the weight of the dough allows it to settle like a gently deflating cushion, into the flattened shape, and a partial hardening of the already flat bottom (which is currently the top) is fine.
Cook for five minutes, then gently turn the muffins over and cook for another 5 minutes. When done, they should sound hollow when tapped.
Transfer to a wire rack to cool.
Wipe the pan free of semolina, then repeat until all the muffins are cooked.
To serve – very important
These instructions are adapted from Hannah Glasse, who insisted that no knife should touch muffins, as they would become heavy. Here is a guide to enjoying your fresh muffins.
You will need:
chilled butter cut into thin slices.
toppings such as jam, honey or sausage, egg and bacon, depending on degree of hunger.
Whilst perfectly delicious soft pillows when freshly cooked, unless you are able to eat them hot from the pan, muffins should be toasted on the outside before being served. The insides are best left un-toasted, so you can bite down through the softness to the crunchy outside. The contrast is sensational.
Grill for 2-3 minutes each side until the outsides have crisped, but not darkened.
While the muffin is still warm, take a serrated knife – yes, I know Hannah said no to knives, but a little help is needed in order to divide the muffin. Take your knife and gently draw it around the side of the muffin like an equator, if you will – just breaking the soft crust to a depth of 1-2mm.
Once the ‘skin’ (it really is too soft to be called a crust) has been scored all the way around, hold the muffin sideways and with the tips of your fingers, gently pull the muffin apart. The cutting will help it divide evenly into two halves.
Quickly lay a slice of cold butter between the two halves and put them together again.
Cover with a cloth to keep warm.
After about a minute, turn each buttered muffin upside down, so that the now melted butter can seep into the other half of the muffin.
Your muffin is now ready to be enjoyed as is, or to drizzle over the toppings of choice. Remember, do not spread your toppings, or the pressure will deflate your soft, billowy muffin.
I spend a lot of our holidays in southwest France prowling around patisseries and artisan boulangeries with eyes like saucers, admiring the delicate and stylish combinations of cream and fruit and chocolate and truffle and glaze and, and, and….
However, in order to get there, it is rather a mammoth road trip, so I generally make sure I’ve got a handful of recipe books with me in the car to while away the hours. With no other reading matter to hand, I find it’s a good way to make sure I actually READ some of the hundreds of books on my shelves and I invariably discover something I’ve overlooked before. Sure enough, this year, yet again, I have re-discovered a recipe in a dusty housewives’ pamphlet from umpty-plonk years ago that reveals itself to be a real gem and, despite my hopeless and complete admiration for the exotic and awe-inspiring patisserie creations of France, I am enchanted all over again by British simplicity.
The recipe for these cakes was so brief I almost passed it by, yet curiosity caused me to pause and read it over, wondering what ‘trick’ there was; surely the small paragraph didn’t contain making, baking AND decorating instructions for cream cakes?
Sure enough, it didn’t, because the recipe was for cakes MADE with cream. Specifically, substituting cream into the mix instead of butter.
So simple – flour, sugar, eggs, cream, baking powder. I just had to try them.
And they were delicious, and a complete breeze to make; no fretting over whether the butter is soft enough, or whether the sugar is dissolved sufficiently. They rose, magnificently domed, in the oven and are light and tender of crumb.
If I had just one niggle, it was that they were sweet. Tooth-achingly so. I couldn’t resist tweaking them a little. Even the sugar-pop posing as my daughter prefers this version. Of course she ate the sweet batch too, but she prefers these.
There’s no added flavouring – you could add some if you like, but I urge you to try the recipe just once, with farm-fresh eggs and rich double – or even clotted – cream.
The simplicity, lightness and flavour will be a delight.
Promise.
Cream Cakes
The cakes in the photo are made in mini layer tins I bought in my local The Range, 4 x 10cm diameter pans for £2.50 (also fab for Yorkshire Puddings – I bought 2 sets) and I put 100g of batter per pan and made six. If you’re using large cupcake/muffin tins, I suggest just 50g of batter per ‘hole’, and thus twelve cakes. Cooking time is the same for both sizes.
150g caster sugar
2 large eggs
125ml cream – double or clotted
150g plain flour
1.5 tsp baking powder
Preheat the oven to 180°C/160°C Fan.
Crack the eggs into a bowl and add the sugar. Beat with a balloon whisk (or by hand or stand mixer) until the eggs are frothy and the sugar dissolved – about 5 minutes.
Add the cream and whisk in.
Sift the flour and baking powder together and stir into the rest of the ingredients – the balloon whisk/attachment is best for this, less washing up too!
Grease and line your tins, or use cupcake cases.
Spoon your mixture into your tins. Spread the batter to the sides, leaving a hollow in the middle. They will still dome up during cooking, but this way it should be a little more controlled.
Bake for 15 minutes until risen and golden brown.
Cool on a wire rack.
I think these are delicious served warm, lightly dusted with icing sugar and with a drizzle of cold cream poured over and a few fresh berries on the side. You can also split them and fill with whipped cream and berries or jam, or indeed any way that takes your fancy!
Similar to, but also different from Soda Bread, this loaf actually works out to be a little bit slower to make than Soda Bread, but the extra time is worth the wait because it is also lighter.
As a bonus, it doesn’t require buttermilk, using instead a 30 minute ‘lactic ferment’ of ordinary milk and plain flour to mix the ingredients together. Allowing the mixture to stand for 30 minutes stimulates the enzymes that help produce the lift in the finished loaf. And it has to be 30 minutes – no longer. And definitely don’t try and make it less because the results are immediately visible – and not that fun to eat!
One final tweak was to bake it under a pan. In a tin, but also under a pan. Much like the Overnight Bread and Jim Lahey’s No-Knead Bread, an enclosed baking space keeps in the steam, helps the rise and protects the crust from becoming overly dark. The results can be seen below.
Side by side comparison of three different baking conditions. Left: Mixed without the 30 minute wait. Middle: 30 minute ferment, baked uncovered in a tin. Right: 30 minute ferment, baked in a tin covered by an inverted saucepan.
Here’s a closer look at the crumb of each loaf:
Loaf mixed without the 30 minute ferment The loaf hasn’t risen much at all and consequently has retained a great deal of cragginess on the top. The dough did not expand to fill the tin, causing rough and uneven sides. The crumb is very dense and noticeably yellow in colour.Loaf mixed with 30 minute ferment, baked uncovered in a tin. A dark crust, but well-risen and most of the cragginess has been smoothed by the rise. Crumb fairly open, but loaf noticeably flat across the top.The most impressive result. Baked with the 30 minute ferment, in a tin, covered by an inverted saucepan. The crust isn’t overly dark and the crumb nice and open. The rise has allowed the top of the loaf to be pleasantly crusty and for the dough to fill the tin, as demonstrated by the smooth sides of the loaf.
Baking Powder Bread
Recipe adapted from MANNA by Walter T. Banfield, 1938.
For the ferment:
285ml cold whole milk
225g plain white flour
For the rest of the loaf
150g plain white flour + 40g (maybe)
12g cream of tartar + 6g of bicarbonate of soda OR 24g baking powder[1]
25g lard or butter
1/2 tsp salt
10g golden syrup, agave nectar or mild-flavoured honey
Whisk the milk and flour together and cover the bowl with plastic. I use the bowl of my stand mixer, so that I can use the machine to mix in the rest of the ingredients later.
Set aside for 30 minutes.
Preheat the oven to 210°C, 190°C Fan.
Grease a deep, 20cm, loose-bottom cake tin or similar.
Put the remaining ingredients into the bowl of a food processor and blitz to combine. Make sure the sugar syrup mixes in thoroughly and isn’t left stuck to the side of the bowl.
When the milk mixture has sat for 30 minutes, add the rest of the ingredients and stir to combine. If the mixture seems a little too wet, add up to 40g more flour, until it is dry enough to handle.
Working quickly, knead the dough a few times to smooth it out, and shape it into a disk.
Drop the disk of dough into the prepared tin and put the tin onto a baking sheet.
Invert a large saucepan or casserole over the top of the tin to keep in the steam. Make sure the rim lies flat against the baking sheet.
Bake for 30 minutes.
Remove the pan covering the loaf and bake for a further 10-15 minutes, until crisped and brown and sounding hollow when tapped on the bottom.
Cool completely on a wire rack before using.
Variations
You can use this basic method to make any number of different flavoured loaves, merely by mixing up the types of flour you use in both the ferment and the remaining ingredients: barley flour, oat flour, wholemeal, brown, etc.
Also consider adding interesting texture in the form of flax seeds, pinhead oatmeal, bran, wheatgerm etc.
The sugar syrup can also be varied by using treacle, maple syrup, malt, and so on.
Whatever changes you decide on, just make sure the overall quantity of flour remains constant.
Here are a couple of combinations to get you started. These loaves are slightly denser, so they have the enrichment of a little beaten egg to help lift the texture. I know half an egg is a ridiculous amount – sorry about that – the quantities for a whole egg were huge, and would require a huge oven to bake in. Use a small egg if you can find them, or double the recipe and make 2 loaves (as long as you’ve got 2 large pots to cover them as they bake) or one giant loaf.
Wholemeal/Granary Bread
285ml cold milk
150g brown flour
75g plain white flour
——
150g wholemeal or granary flour
12g cream of tartar + 6g of bicarbonate of soda OR 24g baking powder
25g lard or butter
½ tsp salt
10g treacle or molasses
½ large egg – whisked
Oat Bread
285ml cold milk
150g brown flour
75g plain white flour
——
150g oat flour
12g cream of tartar + 6g of bicarbonate of soda OR 24g baking powder
25g lard or butter
½ tsp salt
10g treacle or molasses
½ large egg – whisked
[1] Commercial baking powder is usually 25% rice flour or cornflour, to keep the active ingredients from clumping. The cream of tartar and bicarbonate of soda are the actual active ingredients, and therefore all you need to add. If, however, you’re using commerical baking powder, you’ll need to add 24g in order to get the above quantities of active ingredients.
This recipe is fabulous – and this recommendation is coming from an until-recently Dundee-Cake-Disliker. The crust is crisp but delicately thin, the insides delicately moist and buttery, rich with the sweetness of sultanas and the tang of candied orange peel.
The modern Dundee Cake has an iconic appearance: the carefully laid-out pattern of whole, blanched almonds immediately distinguishes it from other fruit cakes. For many years I’ve not been a fan, based on the Dundee Cakes I’d been served as a child: dry, crumbly, tasteless, overly-fruited masses with burnt nuts on the top and, horror of horrors, glacé cherries studding their depths.
After a bit of digging around in the cake history books, it turns out that the Dundee Cake known today is quite a few steps removed from the original. So I had high hopes that with a little experimentation I could, as with other recipes I’ve managed to rehabilitate from childhood dislikes, bring Dundee Cake back to its former glory and once again make it a teatime favourite.
Dundee Cake was first made by the Dundee-based Keiller company, as an off-season sideline to their marmalade business, as a way of using up excess peel generated by the marmalade manufacturing process. By gentleman’s agreement, no other bakers in the city made the cake. Keiller’s were also responsible for popularising their creation under the name Dundee Cake, described by Alan Davidson in the Oxford Companion to Food as light, buttery delicacy stuffed with sultanas, almonds and candied orange peel.
Quite when the cake was first made is a bit of a mystery, but it is mentioned in stories and novels of the mid-nineteenth century. An 1853 edition of The Lancet carries an advertisement for a Regent Street caterer, which includes Dundee Cake in its list of available cakes. This recipe is based on Madam Marie de Joncourt’s 1882 recipe, but tweaked to conform to the description of the original delicate and rich cake: more butter, almonds, sultanas and peel, no currants, no almonds on top. I’ve left off the distinguishing almonds, because they’re not mentioned in the original recipe, but you can make your own decision on that.
Grease a 20cm, deep (at least 10cm) loose-bottomed cake tin.
Line the base with a circle of parchment.
Tear off a long strip of parchment, long enough to wrap around the whole tin.
Fold the strip of parchment in half lengthwise.
Unfold, then fold in each long edge towards the centre fold.
Fold both halves together, making for four layers of parchment.
Line the tin with this 4-ply strip of parchment. Any fruit-filled cake needs protecting from the high temperatures that baking in a tin will generate.
Grease the parchment on the sides and base of the tin.
Put the softened butter into a bowl and whisk until light and creamy.
Add the sugar and whisk until pale and fluffy.
Whisk in the eggs one at a time. Whisk for a good 3-4 minutes before adding the next egg.
Stir in the vanilla.
Gently stir the remaining ingredients together, then fold into the wet ingredients. Don’t over-mix, or you run the risk of deflating all the air you’ve just whisked into it.
Spread the mixture into the tin and level the top.
Bake for one hour, gently turning the tin around 180 degrees after 40 minutes.
Check for done-ness by inserting a wooden toothpick deep into the centre of the cake. If no liquid batter is clinging to it when removed, the cake is done.
Cool for 10 minutes in the tin, then remove to a wire rack to cool completely.
Some time ago *waves hand vaguely* I introduced you to an all-butter pastry which I had adapted from an old Victorian commercial baker’s book. The crust for my Cheese and Potato Pies has about 25% cornflour, which makes it fantastically silky-smooth to handle and which also bakes beautifully crisp and dry.
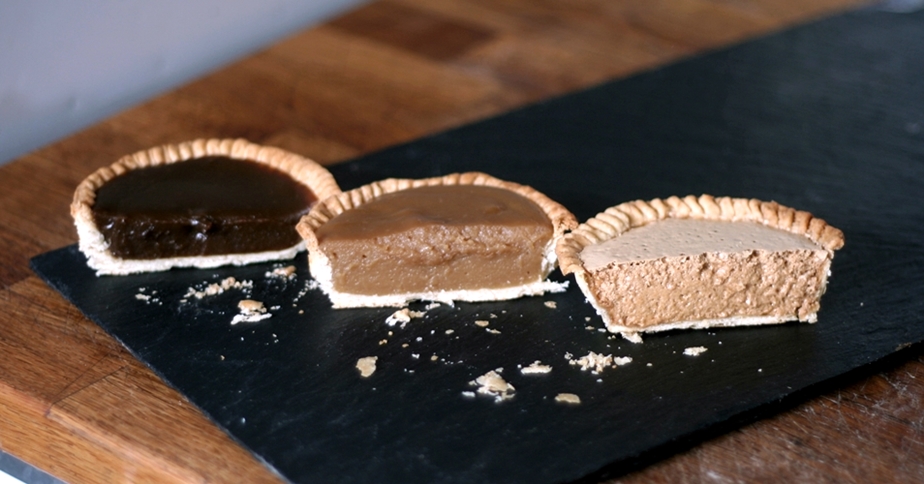
The recipe this week is for a sweet version, also from the same baking handbook: slightly different flour/butter proportions and enriched with the yolk of an egg, it is both more crisp and more delicate than the savoury version and a perfect foil for the three sweet fillings I’ve lined up for you, because I thought it rather a cheek to give you just a pastry recipe this week and let you get on with it. Plus I couldn’t get a lump of pastry to look tempting all by itself, so here we are.
The fillings are very much variations on a theme of dark muscovado sugar and I’m really pleased with the three differing flavours that resulted. The Butterscotch is really dark and very much a ‘grown-up’ flavour – you could even add a slosh of real scotch to ramp it up to dinner-party level. The Toffee is very child-friendly in flavour – almost mild – and a real comfort food. The Gypsy Tart is a 2-ingredient classic that harks back to memories of school dinners. There are many recipes for the filling ‘out there’, most of which generally have too high a proportion of sugar and too much milk, resulting in gigantic pies of tooth-aching sweetness. This version makes for a light and frothy filling with just the right balance of flavour and sweetness. It is the only one of the three that needs any further cooking once poured into the pre-baked pastry shell, but at just 20 minutes in a cool oven, these too are ready in a flash.
I’ve left all three unadorned, but you could add embellishment if you like – unsweetened whipped cream or creme fraiche rather than more sweetness in a chantilly or buttercream, is my recommendation. A smattering of chocolate sprinkles for the toffee tart, perhaps? Your call.
Cut Retro Tarts Dark Butterscotch (left), Toffee (middle), Gypsy Tart (right)
Sweet Shortcrust Pastry
This quantity makes enough for one large tart or 4-8 individual tarts.
Put the flours, butter, sugar and yolk into the bowl of a food processor and blitz until the mixture resembles breadcrumbs.
With the machine running, gradually add the cold water a tablespoon at a time until the mixture comes together in a ball.
Tip the mixture onto a floured surface, knead smooth then wrap in clingfilm and chill for at least 30 minutes.
Roll out thinly and line your greased tart tin. If making smaller tarts, cut the pastry into 4 and roll out individually.
Leave the excess pastry hanging over the side of the tin/s and chill in the fridge for another 30 minutes. The pastry will shrink as it chills and then you can trim the excess. If you trim it first, the pastry will shrink down inside your tart cases, probably unevenly, and your pastry cases won’t have a nice finish.
Preheat the oven to 200°C, 180ºC Fan.
Prick the bottom of the tart/s with a fork to prevent blistering, line with baking parchment and fill with beans/rice/beads.
Bake for 10 minutes for small tarts, 12-14 minutes for a large tart.
Remove the parchment and beans and bake for a further 3 minutes for small tarts, 5-8 minutes for a large tart, until fully baked.
Make a paste of the flour with a little of the milk, then stir in the rest of the milk.
Pour this milk mixture into the butter mixture and whisk vigorously.
Continue whisking until the mixture comes to the boil. Simmer for 2-3 minutes, stirring, to ‘cook out’ the taste of the flour. The mixture will thicken.
Remove from the heat. Add a little extra milk – or scotch! – if it seems too thick, then pour into the bake pastry case/s and allow to cool.
Toffee filling
Warm the golden syrup before measuring it out, it will be much easier to pour accurately.
100g butter
40g plain flour
250ml milk
60g dark muscovado sugar
100g golden syrup
chocolate sprinkles (optional)
Melt the butter in a pan and add the flour. Whisk until frothed and starting to darken.
Warm the milk and sugar together and pour into the butter mixture, whisking briskly.
Keep stirring over the heat until the mixture thickens, then remove from the heat and stir in the golden syrup.
If the mixture seems too thick, add a little extra milk to loosen it.
When you’re happy with the consistency, pour into the pastry shells and set aside to cool.
Scatter over the chocolate sprinkles, if using, before serving.
Gypsy Tart filling
1 x 170ml tin evaporated milk – chilled
120g dark muscovado sugar
Chill the tin of evaporated milk in the fridge overnight. Do not skip this step. It will not whip up to its frothy perfection unless the milk is thoroughly chilled.
Get rid of all the lumps in the sugar by pounding it in a pestle and mortar. Work a little at a time rather than trying to get the whole batch lump-free in one go. It’ll give you something to do while the milk chills.
Put the sugar and the chilled milk into a bowl and whisk for AT LEAST ten minutes. You want the sugar to dissolve and the milk to increase in volume and become light and frothy, like half-whipped double cream. You can test whether the sugar is fully dissolved by rubbing a little of the mixture between finger and thumb – it should not feel grainy at all. If you have a stand mixer and a balloon whisk attachment, this might take a little less time, but not much.
Preheat the oven to 120°C – NO FAN
Pour your mousse-like mixture into your pre-baked pastry case/s. It will not rise much in baking, so you can fill them pretty full.
Bake for 20 minutes or until the filling has set: no wobble when gently shaken.
This pudding has a lot going for it: its fruity, spiced, zesty with candied peel, suet-free and thus vegetarian, less than 2 hours in the making/baking – and over 300 years old!
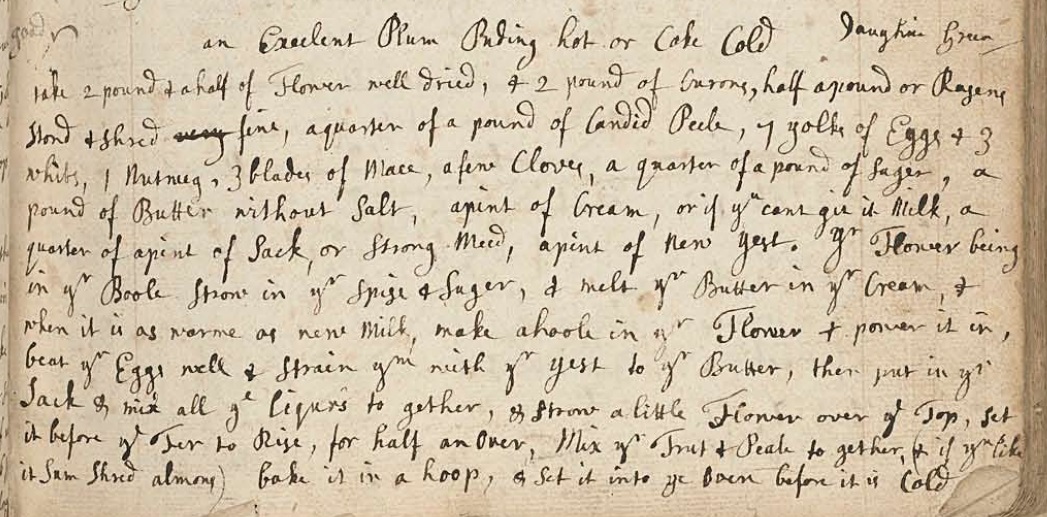
I found this recipe in the manuscript recipe book of Elizabeth Philipps (circa 1694), when I was hunting for Christmas recipes. The recipe’s full title is “An excellent Plum Pudding Hot or Cake Cold”, which is just the kind of two-for-one recipe that our modern Christmas needs – especially if you’re running late and missed stir-up Sunday. Excellent example of Deja Food too!
The recipe is marked with the annotation “daughter Green”. I think this must mean the recipe was passed on by her daughter, whose married name was Green – although there were unusual naming conventions back then; perhaps Mistress Philipps had a rainbow of daughters? We can but guess. As if the title wasn’t endorsement enough, a later hand has also awarded a tick and the comment ‘good’. This made this recipe a culinary ‘dead cert’ in my opinion: something that was so delicious when tasted, the recipe was requested and recorded by hand in the family recipe book, and this approval was then endorsed by a third party coming across the recipe at a later date.
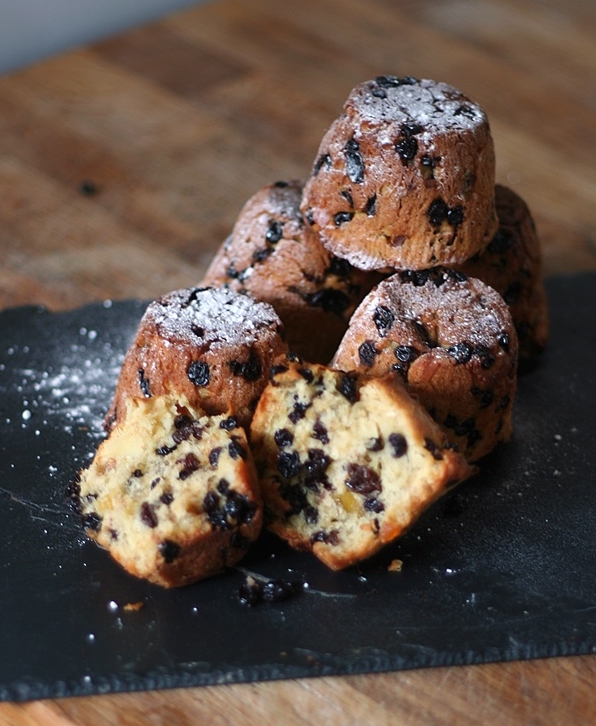
Mini Puddings
You can bake this in a regular cake tin, but a ceramic pudding bowl works just as well, and makes the resemblance to a Christmas Pudding much clearer. The hour-long baking time creates a wonderfully dark and crunchy crust, which contrasts dramatically with the light, pale insides. You can also bake it in individual pudding bowls (the recipe makes 10 small puddings), which looks very sweet too, although the shorter cooking time makes for a paler outside. This would be too much traditional Christmas Pudding for one person, but this pudding is a yeast-raised, light, fruited, cake texture, and much more refreshing to the palate as well as being easier on the stomach.
Put the sugar, butter and milk/cream in a pan and warm gently until the butter is melted.
Add the sherry or mead.
If the mixture is still hot, let it cool a little first, then whisk in the eggs.
Add the liquids to the flour and mix thoroughly. It should form a soft dough. Add up to 150ml more milk if you think it is required.
Set somewhere warm to rise for 30 minutes.
Stir in the fruit and almonds until thoroughly combined.
If you are making small, individual puddings, each mould or aluminium foil cup will take about 125g of dough. Otherwise, generously butter a 1.6 litre pudding bowl and add the dough.
Set aside for 15 minutes while the oven warms up.
Preheat the oven to 180°C, 160°C Fan.
Bake
a single, large pudding for about an hour. Turn the basin round after 30 minutes and check for done-ness at 50 minutes.
the small, individual puddings for 15-20 minutes.
Remove from the oven and set aside to rest for 10 minutes.
Run a spatula around the sides of the basin to loosen the pudding, and carefully turn out onto your serving plate.
Serve warm, with double cream.
For later: Even though this pudding is nice cold, it really is at its best just warm, so for serving later, zap slices/individual puddings in the microwave for 20 seconds before serving.
[1] I used 20g each of orange, lemon and pink grapefruit, rinsed of excess syrup
Goathland is a tiny village – population less than 500 – tucked away in the North York Moors National Park, just south-west of Whitby. It looks an absolutely delightful place, and Harry Potter fans will recognise Goathland Station as doubling for Hogsmeade (the station nearest Hogwarts) as well as Aidensfield from the popular TV series Heartbeat.
In the 1930s, Mrs Arthur Webb was commissioned by the BBC to visit farms throughout the UK “in order to secure something that was characteristic of its cooking and preparation of food.” In much the same way as her contemporary, Dorothy Hartley, would – Mrs Webb tramped around the countryside conversing with farmers wives and watching them cook in their own kitchens, frequently with awe and respect.
I looked at the fireplace. I watched the flames travelling under the oven.
“How do you manage to keep the heat going – you burn coal, of course?”
“Oh no” the answer came swiftly; “I never trust coal or anything else than wood for my baking. I understand wood better and I know exactly what heat it will give.”
“Do you ever have failures?”
“Failures? Of course not. I know exactly what I want and I make it.”
“Well, how do you manage to arrive at such delicious pies as these?” and I pointed to the laden table. “Do you weigh the ingredients?”
“Never. I could not spare the time. I just know how much the flour, butter, lard, milk, water and eggs will make.”
Luckily for us, Mrs Webb was able to jot down the ingredients for this fantastic tart, which I have only tweaked very slightly in converting to metric measurements and adding cooking times/temperatures. I’m curious to know which farm in this peaceful area was the origin of such a flavour-packed bake.
As you can see from the photograph. it bears little resemblance to the traditional British, tooth-achingly sweet, open-topped Treacle Tart made with golden syrup and fresh breadcrumbs. Whilst still containing breadcrumbs, the filling for this double-crust tart is packed with fruit both fresh and dried, actually contains treacle, and is much closer in taste to a traditional mincemeat, although blessedly fat-free. Along with the dried fruit and spices, the filling is given some fresh zing with chopped apple and lemon zest/juice. The dry breadcrumbs absorb any apple juice during cooking, resulting in a tart with a firm, fruity filling, no soggy bottom, and packing a huge wallop of flavour. The lack of fat in the filling means that the taste is bright and fresh and never cloying or overly rich.
I’ve chosen to wrap this in my favourite cornflour shortcrust, as its dry crispness when baked is the perfect foil against which the filling can really shine.
Sidebar: Mrs Webb’s notes tell us merely to “cover with another pastry” – which is all well and good, but pays little attention to the presentation which is, after all, usually the first thing that tempts us with a dish. I’ve made a conscious decision to try to present dishes, no matter how humble their ingredients, in the most appetising and eye-catching way. If I may paraphrase the great William Morris “Serve nothing from your oven that you do not know to be delicious or believe to be beautiful.”
Tart top
Which is all well and good, except that when it comes to decorating, I usually have the patience and finesse of a potato. But I also have a little imagination, so I created the above decoration for the tart lid, in the best traditions of housewives across the years, with what I had to hand: namely, a teaspoon, an apple corer and a skewer.
The pastry was crimped by laying the pastry lid so that the edges lay vertically against the sides of the tin. Insert the handle of a teaspoon between the outer edge of the pastry and the tin and your finger and thumb against the inside of the pastry. Press inwards with the spoon handle as you pinch the two pieces of pastry together. I had intended only to hand-crimp the tart edges, but the imprint of the teaspoon handle has made a pretty design, so I’m going to run with it. *lying* I totally meant to do that.
The pattern was made firstly by gently pressing an apple-corer into the lid – enough to mark, but not enough to cut all the way through the pastry. Then I used a wooden skewer to poke holes in lines from the centre ring to each of the surrounding rings. Lastly I added a line of holes between each of these lines.
If you’re in any doubt whether or not to try this tart – and I really hope you will – let me just say that I’m seriously considering using this as my mince pie recipe this year.
Just sayin’.
Goathland Treacle Tart
Pastry
225g plain flour
60g cornflour or rice flour
140g butter
ice cold water
Put the flours and butter into the bowl of a food processor and blitz until the mixture resembles breadcrumbs.
With the machine running, gradually add the cold water a tablespoon at a time until the mixture comes together in a ball.
Tip the mixture onto a floured surface, knead smooth then wrap in clingfilm and chill for 30 minutes.
Remove the pastry from the fridge and cut off two thirds. Put the remaining third back into the fridge.
Roll this piece out to a thickness of 4-5mm and use it to line a greased 18cm pie tin, loose-bottomed for preference, making sure there is enough pastry overlapping the sides of the tin to allow for joining the lid.
Chill while you mix the filling.
Filling
60g dry breadcrumbs [1]
60g currants
60g sultanas
30g candied orange peel – diced
30g candied lemon peel – diced
1 small cooking apple – peeled, cored and chopped/grated
zest and juice of 1 lemon
1/2tsp ground ginger
1/2tsp ground mixed spice
30ml treacle
30ml milk
Mix the breadcrumbs, dried fruit, candied peel, spices and lemon zest in a bowl.
Warm the treacle by placing the open can in a saucepan of water over a low heat. As it warms, it becomes less viscous and easier to pour.
Pour out the required amount of treacle and mix with the lemon juice, then add the milk afterwards. NB Don’t mix the lemon juice with the milk first, otherwise it will curdle.
Add the liquids and the chopped apple to the rest of the ingredients and stir to combine.
Preheat the oven to 200°C, 180°C Fan.
Add the filling to the chilled pastry case and smooth over.
Roll out the remaining pastry to make the lid.
Wet the edges of the pastry with water, and lay the pastry lid onto the filling. Ease the edges together as per the diagram above. Make sure there’s no air trapped underneath the lid – in the oven this air will expand in the heat and may cause the lid to lift away from the filling.
Use the back of a knife (so as not to scratch your non-stick tin) to trim away the excess pastry, then crimp the edges as described above.
Decorate as desired.
Brush with beaten egg, or with milk and then sprinkle with a little caster sugar. (I used just egg).
Bake for 30 minutes, turning the tin around after 20 minutes to ensure it colours evenly.
Set aside to cool.
After cooling for 10 minutes, if you’ve used a loose-bottomed tin, the tart can be gently removed and served, or set onto a wire rack until cold.
[1] These must be really dry. Definitely not fresh. If you have none to hand, nor any stale bread, make breadcrumbs of 3 slices of bread and lay them on a parchment-lined baking sheet. Dry (without browning) in a 120°C/100°C Fan oven for 20-30 minutes.
An unusual and simple cake, with the bonus of being gluten-free!
As I was perusing one of my several vintage baking books, I came across this recipe – not in any specific allergy-related book or even chapter of a book. No, it was just included with a bunch of other recipes in a book aimed at the commercial baker, dating from the early 20th century. I have scaled the recipe down from the originally huge quantities, but otherwise, it is unchanged.
This cake is made using potato flour. IMPORTANT: Potato flour is made from RAW potatoes and is a bright white and very fine powder, with no discernible taste. It is NOT dehydrated cooked potato, which is coarse, yellowish and tastes of potato. That makes mashed potatoes when reconstituted and will add a similar texture to your cake. Readers in the US: use potato starch flour.
At first, I thought the cake got its name from it colour, because, as you can see from the photo, it is indeed a very pale cake. However, after tasting the cake, I’m now of the opinion that its name comes from its texture. It has the same quality of settled snow, in that there is a thin ‘crust’ on the top and soft, friable, almost powder-like substance underneath. The cake dissolves in the mouth – but in a different way to, say, Melting Moments. It’s incredibly light and tender and is best enjoyed simply, where it can really shine.
That said, the cream that I have teamed with it is pretty awesome itself. It is a variation of the filling I used for the mille-feuilles in the final of The Great British Bake Off. The mixture of sweetened cream cheese and whipped double cream is given a firmer set by the addition of gelatine, which helps to hold in the moisture and makes for a very luscious, rich, creamy and mousse-like texture. Just to continue the frozen theme, it’s like the very best soft-serve ice-cream, without the cold.
I’ve brightened the filling with some Apricot Jam, but any other sharp jam would also work well.
Grease and line the base of a 20cm diameter, tall cake tin – not a sandwich tin. The high sides will help shield the cake from the direct heat of the oven and keep it from becoming over-coloured.
Beat the butter and sugar together until light and fluffy – 5-10 minutes.
Add the eggs one at a time, beating well each time.
Add the remaining ingredients and beat thoroughly – a good 5-10 minutes. Ordinarily, you’d run the risk of over-beating a cake mixture, which would develop the gluten in the flour, leading to a tough cake. Since the potato flour has no gluten, there’s no need to worry about this. You want to try and get as much air into the mixture as possible to make for a light texture in the cooked cake.
Turn the mixture into the prepared tin and smooth the surface.
Bake for 20 minutes, then turn the tin 180 degrees and bake for a further 10-15 minutes, for a total of 30-35 minutes. When you turn the cake after 20 minutes, slip a sheet of baking parchment over the top of the tin to keep the colour from getting too dark.
When cooked, remove from the oven and let rest for 10 minutes, then remove from the tin and cool on a wire rack.
Soak the leaves of gelatine in cold water for 15 minutes.
Warm the double cream and caster sugar until the sugar is dissolved.
Shake off the excess water from the gelatine and add to the pan.
Stir until the gelatine has melted, then remove from the heat and set aside.
Once the mixture has cooled a little, pour it into a bowl and add the remaining ingredients.
Whip the mixture until the cream has thickened and it is soft and pillowy.
To Assemble
Even though this is a light sponge cake, the weight of the top half will be too heavy initially, to avoid squidging (technical term) the cream out of the sides of the cake. Therefore, I strongly recommend using the following method to assemble your cake.
200g apricot jam – warmed and pureed
Using cocktail sticks, mark the midpoint of the cooled cake around the edge and cut it horizontally.
Spread the cut side of each cake half with apricot jam.
Put the bottom half of the cake back into the tin in which it was baked.
Slip a band of parchment or food-grade acetate around the inside of the tin, between the cake and the inside of the tin.
Smooth or pipe the cream filling over the bottom of the cake, making sure it reaches the edges of the cake.
Place the other half on top and press gently.
Cover with cling-film and chill for 2-3 hours, until the gelatine in the cream has set.
Remove from the fridge and allow to come to room temperature.
Remove the cake from the tin and gently peel the parchment/acetate from around the filling.