Fruit Sponge

Of all the puddings of my childhood, this is the one that I return to the most. There is something just so comforting and delicious in the simplicity of sweet sponge, sharp fruit and cold cream.

It’s so simple it doesn’t even have a proper name, just a terse description of the ingredients; fruit, sponge. But that simplicity in no way detracts from it’s appeal.

Like all good recipes, it is incredibly versatile and can be used with almost any fruit you have to hand, although my recommendation is for sharper fruits to highlight the contrast with the other elements.

If you have some prepared fruit to hand, it can be brought together in a reassuringly short space of time. Popped in the oven as you sit down to a meal, it will be ready by the time the plates are cleared. Alternatively and indulgently, you can sit hunched in front of the oven door, spoon in hand, watching it’s progress in anticipatory delight for a brief half hour.

Serves 4
500g apple puree
250g damson puree
1 large egg
The weight of the egg in softened, unsalted butter, caster sugar and plain flour
1tsp baking powder
milk to mix
caster sugar to sprinkle

double or pouring cream to serve

  • Preheat the oven to 180°C/160°C fan/gas 4.
  • Stir the fruit purees together and pour into an oven-proof dish. Smooth over.
  • Put the egg, softened butter, sugar, flour and baking powder into a bowl and mix thoroughly to a smooth batter.
  • Gradually stir in a little milk until the mixture achieves dropping consistency – when a dollop of batter drops easily from a spoon.
  • Pour the batter over the fruit and smooth the surface.
  • Bake for 35-40 minutes until the sponge is risen and golden.
  • Remove from the oven and sprinkle with a little caster sugar.
  • Serve with chilled double cream.

Bacon and Egg Pies

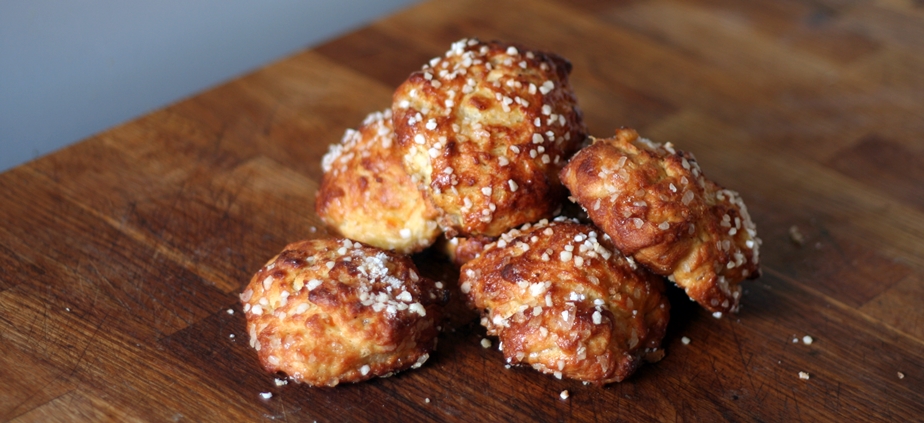
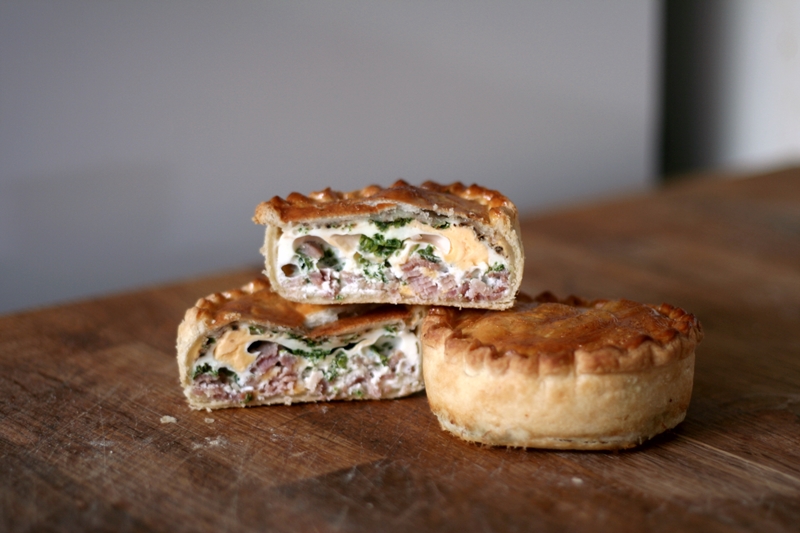
Sometimes the best-tasting food is also the simplest. This recipe was yet another from one of my many dusty W.I.pamphlets from the mid 20th century. It was so brief it barely qualified as a paragraph, let alone a recipe, so I’ve added some detail below to help things along. In essence, you can count the number of ingredients in this pie on one hand: pastry, egg, bacon, seasoning. The pie in the picture above also contains diced tomato, which I thought would add freshness; it did to a certain extent, but not to the degree I was hoping, and in fact, the ‘plain’ bacon and egg pie was tastier. Alas, my cross-section photo for this pie (see below) wasn’t as visually arresting as the one above, so I decided to lure you with the picture above, then set the record straight. You can choose whichever version appeals most.

Bacon and Egg Pie
Also, I’ve mentioned them before, but I just LOVE my small cake/tart tins I found at my local The Range (4 x 10cm diameter pans for £2.50). They have a small lip on the side, which makes them great for tarts or, in this case, for firmly attaching the pastry lids of pies. This is not a paid endorsement – I just think they are a bargain and am sharing.

You can be as pro-active or as lazy as you like with these pies – make everything from scratch or buy it in if you’re pressed for time. Personally, I like to hover, metaphorically, between the two: make the pastry for the base, but buy a sheet of ready rolled puff pastry for the top, on account of life too short etc. The cornflour shortcrust is dry and crisp, and the buttery, flaky, puff pastry is both delicious and a fantastic contrast. Once the pans are lined, sprinkle over a little cooked bacon, crack in a whole egg and add the lid and you’re done!

OK, yes, you should add a sprinkling of fresh parsley too.

And pepper. Of course pepper.

Well OBVIOUSLY crimping the edges is a good idea.

And it goes without saying that egg-yolk wash will give both colour and shine.

I’ll come in again.

AMONGST OUR WEAPONRY are such diverse elements as….

Oops! Wrong sketch.[1]

Once the pans are lined, sprinkle over a little cooked bacon and some fresh parsley, season with black pepper, crack in a whole egg, a little more parsley and pepper, add the lid, crimp the pastry edges, wash over with beaten egg and you’re DONE!

The quantities are up to you and however many you’re catering for. The suggestions below are for 4 individual pies. Any excess pastry, of either sort, can be frozen for later, as can the cooked pies, for up to a month.

Bacon and Egg Pies

1 batch cornflour shortcrust – scroll down on this page
1 sheet of puff pastry
100g lean bacon
4 large eggs
4-6 tablespoons of chopped, fresh parsley
coarse-ground black pepper
4 tomatoes – skinned, de-seeded and diced finely – optional

1 large yolk – for glazing

  • Pre-heat the oven to 200°C/180°C Fan.
  • Roll out the shortcrust pastry to a thickness of 5mm.
  • Grease and line your tart tins with the shortcrust pastry, making sure to ease the pastry into the bottom edge of the pan, not stretch it. Leave excess pastry hanging over the sides of the tin and chill in the fridge until required.
  • Chop the bacon into small dice and cook until just done. No browning. Drain on kitchen roll.
  • Remove pies from fridge.
  • Scatter the bacon in the bottom of the pies.
  • Add a sprinkling of chopped parsley and a little back pepper. No need for salt, as the bacon is salty enough. Add the tomatoes if using.
  • Crack an egg into each pie. If you want the yolk to be dead centre, you could clear a space amongst the bacon, but it’s not really necessary.
  • Add more parsley and black pepper.
  • Cut four squares of puff pastry, large enough to cover the pies.
  • Brush the rims of the pies with water then lay over the puff pastry squares.
  • Press firmly around the edges, then trim the excess pastry with a sharp knife.
  • Crimp the edges of the pies for a decorative effect.
  • Whisk the yolk with a tablespoon of water and brush the pie tops liberally.
  • Cut three or four small vent holes, NOT in the middle – you don’t want to break the yolk inside.
  • Bake for 15-20 minutes until the top is puffed and golden and the underside crisp.
  • Enjoy hot, warm or cold.

[1] NOBODY expects the Spanish Inquisition! Least of all my husband who read all of the above with a blank expression then said “I don’t get it.” *sigh*

Fruitbowl Tea Loaf

Retrieved from  an old farmhouse baking book, this recipe has dates and walnuts, which make for a delicious tea loaf, but can also make it a little dry, almost dusty, especially if the walnuts aren’t in their first flush of youth. Deliciously, the inclusion of mashed bananas helps with the moistness and the apple sauce really brightens the flavour with its freshness. Neither flavour dominates, making the loaf wonderfully flavoursome. Finally, it is brought to a rich, batter consistency by a splash-ette of lager – and indeed, Lager Loaf was the original recipe title – but that sounds too much like Lager Lout to my ears – which is far from tasty – so I feel justified in renaming it.

And it is a distinct improvement to eat spread with butter, with a cup of something hot.

Fruitbowl Tea Bread

You don’t HAVE to make this with the apple – if you have the eggs, just use two and no apple.

85g unsalted butter
1tbs golden syrup
85g soft brown or light muscovado sugar
1 sharp eating apple, e.g. Jazz or Braeburn
1 large egg
280g self-raising flour
¼ tsp bicarbonate of soda
½ tsp cream of tartar
pinch of salt
150ml lager
2 ripe bananas, peeled and mashed
125g chopped dates
50g walnuts, roughly chopped

  • Preheat the oven to 180°C, 160°C Fan.
  • Grease and line a 1kg loaf tin with parchment paper. Tear off a second piece of parchment and make a fold down the middle. This piece will be used during the baking.
  • Peel and core the apple, then grate finely into a small saucepan. Cover with a lid and heat gently until the apple has broken down into a puree. Sieve to remove any lumps. If you’re impatient, whizz it in a small food processor.
  • Gently warm the butter, syrup and sugar either in a pan or using the microwave, until melted.
  • Add the lager and apple puree, then whisk in the egg.
  • Mash the bananas. Make sure your dates and walnuts are also chopped and ready.
  • Sift the flour, bicarbonate of soda and cream of tartar into a bowl.
  • Add the liquid mixture and stir thoroughly.
  • Quickly fold through the bananas, dates and nuts and pour into the prepared tin.
  • Place into the oven and prop the second piece of parchment over the tin with the fold at the top, rather like a tent. This will prevent the top of the loaf from becoming too dark during baking.
  • Bake for 30 minutes, then remove the ‘tent’ and bake for a further 15-20 minutes.
  • Be sure to test the cake for done-ness using a cocktail stick/skewer/cake tester before removing from the oven – the moisture in the bananas and apple will make it very moist, so be sure it’s baked all the way through, especially towards the bottom.
  • Allow to cool in the tin for 10 minutes before removing to a wire rack to cool completely.
  • Serve sliced and buttered, and store in an airtight container.

Sweet Shortcrust Pastry

This pastry has been scaled down from a recipe I found in a Victorian/Edwardian commercial bakers’ book. It’s an all-butter (and therefore vegetarian) pastry  and includes a small proportion of cornflour. This makes the pastry extra crispy, which isn’t always easy with an all-butter pastry. It also gives it a really smooth, almost silken, dry feel which makes it very easy to handle.

60g cornflour
225g plain flour
140g butter
1 large egg
85g icing sugar
ice-cold water

  • Put all the ingredients into the bowl of a food processor and blitz until the mixture resembles breadcrumbs.
  • Gradually add the water, one tablespoon at a time, until the mixture comes together in a ball.
  • Knead smooth, then roll out.
  • Cover with plastic and chill for 30 minutes.


Nectar Rice Pudding

I received an email from a friend this week, being very complimentary about this rice pudding recipe I’d given her. She wrote “This is so yummy on a chilly winter day in Melbourne!” I made a mental note to put it on the blog in the autumn, but then I got up this morning and looked out the window at the clouds and the cold and the rain and decided that you all needed this recipe today.

Adapted from May Byron’s wartime Pudding Book (1917) it is an absolute delight in a number of ways. It’s a variation of the traditional, some would say nursery, pudding, but these variations elevate it much higher than its list of ingredients might at first imply. For a start, the method is markedly different from the traditional, first boiling the rice in water  followed by a slow simmer on the stove top, then just a brief 20 minutes in the oven. Cooking time is practically halved, compared to the traditional method requiring 2 hours baking and the result is astonishingly soft and creamy. The best part of this recipe, however, is the flavourings. Against just a suspicion of vanilla, the mandarin peel imparts a light and fragrant note, which is in turn enhanced by the aromatic honey and flakes of coconut. The whole dish is lifted out of the nursery and into something altogether more elegant and refined, whilst still retaining it’s simplicity.

Very definitely a grown-up treat for a gloomy, rainy Sunday in June.

Nectar Rice Pudding

120g pudding rice
580ml whole milk
75g granulated sugar
1 large or 2 medium mandarin oranges
½ tsp vanilla extract
280ml double cream
4 large yolks
70ml aromatic honey – acacia, orange blossom, heather, etc
2tbs unsweetened dessicated coconut

  • Bring some water to the boil and add the rice.
  • Cook for five minutes, then drain well in a sieve.
  • Put the rice, milk, and sugar in a thick-bottomed, lidded pan.
  • Peel the mandarins.
  • Eat the mandarins.
  • Put the peel into the pan with the rice.
  • Add the vanilla.
  • Cover the pan and put over the lowest heat available.
  • Simmer softly for 40 minutes, stirring every 10 minutes.
  • Mix the cream, yolks and honey together.
  • Preheat the oven to 140°C/120°C Fan.
  • After the 40 minutes is up, remove the mandarin peel and discard.
  • Pour in the cream and honey mixture. Stir briskly whilst pouring to ensure the eggs don’t cook immediately and curdle.
  • Stir the mixture over the heat until the mixture almost simmers, then pour into a deep oven-proof bowl. To achieve the perfect consistency after baking, the mixture should be about 5cm deep in the dish.
  • Sprinkle the coconut over the surface.
  • Bake for 20 minutes until just wobbling in the middle, and golden brown and bubbling on top.
  • Allow to cool for at least 10 minutes.
  • Serve warm.

Bara Brith

This week it’s the classic Welsh speckled bread Bara Brith. Nowadays, this is usually made using baking powder as the leavener, but personally I prefer the more traditional yeast.

And bonus! There’s two recipes for you to choose from!

When looking at an old recipe, I usually study the range of recipes available and select the one that, to my imagination, sounds the nicest. If there is a tie, then I will make both and decide which makes the cut by taste. This time, however, it was too difficult to decide, so I chose not to choose and leave that decision to you.

Both recipes have their strongpoints, not least from their provenance and pedigree.

On the left of the photo above, we have the recipe from Walter Banfield’s classic book “Manna”: A Comprehensive Treatise on Bread Manufacture (1937), a book admired by Elizabeth David and breathtaking in its breadth and scope. It is based on additions made to ordinary white bread dough after its first proving. The large quantity of fruit and peel contrast brightly against the white of the dough and make for a very sturdy slice that will keep moist for a long time.

On the right of the photo, a possibly more authentic Bara Breith from Mrs E.B.Jones, who, for many years, ran the Powys Temperance Hotel on Market Square, Llanrhaeadr-Ym-Mochnant in the first half of the 20th century. The recipe was collected by Dorothy Hartley and included in her iconic book Food in England, first published in 1954. As can be seen from the picture, this recipe isn’t as heavily fruited as the first one, but it has the added interest of being made from half wheat flour and half oat flour (finely ground oatmeal). Against expectation, the crumb is very light, making it a much more delicate slice.

I love the richness of the fruit in the bread dough version, but also really enjoy the delicate flavours of Mrs Jones’ version. I suggest you make both and decide for yourself.

Both loaves will keep well wrapped in parchment and foil, in a cake tin. Both are best enjoyed sliced and buttered, with a hot cup of something in front of a roaring fire.

Mrs Jones’ Bara Brieth

Don’t feel the need to order oat flour especially for this recipe, you can make your own by blitzing rolled oats in a spice grinder, or just use medium oatmeal for a more robust texture.

60g candied orange peel – diced
100g currants
70g sultanas
225g strong white flour
225g oat flour or medium oatmeal
115g lard
115g Demerara sugar
¼ tsp salt
1 large egg
1 tsp mixed spice
1tsp soft brown sugar
30g fresh yeast

  • Put the peel and the fruit into a bowl and pour over boiling water. Set aside to plump for about 30 minutes.
  • After 15 minutes, cream the yeast and the soft brown sugar together.
  • Put the flours and the lard into the bowl of a food processor and blitz until the mixture resembles breadcrumbs.
  • Tip into the bowl you will be using for mixing and add the Demerara sugar, spice and salt
  • Drain the fruit, retaining the water, and use it to mix the dough. Keep the fruit warm in a low oven while the dough is kneaded.
  • Add the yeast to the flour mixture with the egg, lightly whisked. Use the (by now just) warm fruit-soaking water to mix everything to a soft dough.
  • Knead for 10 minutes.
  • Mix in the warm fruit, cover with plastic and allow to rise until doubled in size. Due to the richness of the ingredients, this may take anything between 1 and 2 hours.
  • Grease a large loaf tin.
  • When the dough has risen, tip it out and pat down to deflate. Form into a loaf shape and lay into the prepared tin.
  • Cover lightly and allow to rise for about 45 minutes.
  • Preheat the oven to 170°C, 150°C Fan.
  • Bake for 30 minutes.
  • Turn the tin around 180 degrees and lay a sheet of foil lightly over the top, to prevent the loaf browning too much.
  • Bake for a further 25-30 minutes.
  • Remove from the tin and if the bottom doesn’t sound hollow, return to the oven for 5-10 minutes to crisp up. You can place the loaf directly onto the oven bars.
  • Cool on a wire rack.

Walter Banfield’s Bara Brith

450g strong white flour
½ tsp salt
1tsp soft brown sugar
30g fresh yeast
warm water to mix

115g lard in small cubes
5g mixed spice
65g Demerara sugar
1 large egg
300g currants
90g sultanas
90g raisins
60g candied orange peel – diced
50g plain flour

  • Cream the sugar and yeast together with a tablespoon of the flour and a little warm water and set aside to work
  • Mix with the rest of the ingredients into a soft dough.
  • Cover with plastic and set aside to rise for 1 hour.
  • After 30 minutes, spread the fruit (not the peel) out on a baking sheet lined with parchment and put into the oven on its lowest setting, just to warm through.
  • Grease a large loaf tin.
  • When the dough has risen to twice its original size, add in the finely cubed lard, spice, egg and sugar and knead smooth.
  • Add the warmed fruit and peel and mix thoroughly.
  • Sprinkle over the flour and mix thoroughly.
  • Shape into a large loaf and place into the prepared tin.
  • Allow a long second rise, of 1-2 hours.
  • Preheat the oven to 170°C, 150°C Fan.
  • Bake for 30 minutes.
  • Turn the tin around 180 degrees and lay a sheet of foil lightly over the top, to prevent the loaf browning too much.
  • Bake for a further 25-30 minutes.
  • Remove from the tin and if the bottom doesn’t sound hollow, return to the oven for 5-10 minutes to crisp up. You can place the loaf directly onto the oven bars.
  • Cool on a wire rack.

Luxury Bath Buns

Here’s a variation of a recipe in MY BOOK which I have adapted from one of my favourite vintage recipe books, snappily entitled “Morning and Hot-Plate Goods including Scones, Buns, Teabread, etc” by John Boyd.

It is a book for professional bakers, in that the recipes inside involve ingredients measured in pounds rather than ounces, but it is compact nevertheless, with a jaunty yellow cover and both line and photographic illustrations throughout. It is undated, but after a quick search of t’internet, the mid 1940s seems a good guesstimate of age.

The book claims that this is the original recipe of those buns in the 18th century that caused everyone ‘taking the waters’ in Bath to put on so much weight, allegedly forcing Dr Oliver to invent the altogether much less fun Bath Oliver biscuit for people to nibble on instead. The dough is a deep, golden colour from all the butter and eggs, and dotted with crunchy sugar and orange peel. Don’t be alarmed at the quantity of nutmeg, it looks a lot, but it’s not overpowering at all – skimp on it at your peril.

These buns are definitely an indulgence  –  a delicious, DELICIOUS indulgence, but the freezer is your friend and thus these treats can be spread over a few weeks, rather than having to consume them all in one sitting, however tempting that may be.

Since my book came out, I’ve picked up a couple of snippets of additional information about Bath Buns. Despite their rich ingredients, their appearance wasn’t supposed to be a smooth, spherical ball of dough, rather they were deliberately of a rough and craggy exterior, which, I must admit, is a great contrast to their soft, luxurious interiors. The iconic sugar nib topping remains.

Some recipes suggest using a pair of spoons to portion out the soft dough, but thanks to a quick flick through MANNA by Walter Banfield, I discovered an altogether easier method (see below).

The recipe calls for fresh yeast – my latest fad – but feel free to substitute rapid-rise yeast if preferred.

Luxury Bath Buns

Makes 16-ish

450g strong white flour
4 large eggs
225g unsalted butter
30g granulated sugar
30g fresh yeast
60ml milk
2 whole nutmegs – grated
225g sugar nibs
2oz candied orange peel – finely chopped
3 drops lemon essence (original) or the zest of a lemon (my suggestion)

1 large egg for glazing

  • Heat some water in a small pan.
  • Crack the eggs into a bowl and add the milk.
  • Whisk together, then put the bowl over the simmering water and whisk until the mixture is warmed, but no hotter than blood-temperature (dip a clean finger in to test).
  • Whisk in the yeast and 50g from the flour and set aside  to rise for 30 minutes.
  • While this is working, in another bowl, gently warm the butter over the simmering water until soft. Add the granulated sugar, nutmeg and lemon essence/zest and whisk to combine.
  • Combine the two mixtures after the yeast has been working for 30 minutes and stir into the remaining flour.
  • Knead well for 10 minutes. It is an extremely soft dough, but please resist the temptation to add any more flour as this would compromise the texture of the finished buns (I use a stand mixer & a dough hook).
  • Adding the nibs and peel: Here you have a choice. You can add in 150g of the nibs at the end of the kneading, then set it to rise, OR you can add in 150g of the sugar after the first rise. Adding the sugar straight after the kneading will mean it leeches moisture from the dough and starts to dissolve as the dough rises, leading to less of a crunch in the bite of the finished bun. Add 150g of sugar nibs after the first rise, and they are still relatively large and crunchy, even after baking. The rest of the nibs will be scattered over the top of the buns, so their crunchiness needs to be factored into your decision as well. The peel can be added at either time, but I generally add it after the kneading to allow its aroma to permeate the dough.
  • Cover the bowl with cling film and leave to rise for 1 hour.
  • Tip out the dough and pat down.
  • Add the sugar/peel if not already done so.
  • Portion the dough into pieces weighing 150g. Form these pieces into neat balls, then gradually stretch the ball of dough between your hands until it pulls in half – pretty much like those diagrams of cells dividing. Place the buns with the torn side upwards onto baking sheets lined with parchment paper. In the recipe in my book, the buns were placed atop a sugar cube soaked in lemon juice. As the buns cooked, the sugar and lemon juice melted together to give a deliciously crunchy coating to the base of each bun. These buns are so rich from the butter and the sugar nibs, this isn’t necessary, however the parchment is a must to ensure they don’t stick.
  • Whisk the egg with a little water and glaze the buns, then allow to rise for 45 minutes.
  • Preheat the oven to 200°C/180°C Fan.
  • Glaze the buns again, then top with the remaining sugar nibs
  • Bake for 15-20 minutes, turning the tins around after 10 minutes to ensure even browning.
  • Remove from the oven and leave on the tins. Cover the hot buns with clean tea towels to keep the crust soft as they cool.
  • Enjoy warm.

Sea Foam Fudge

This is another fantastic textured fudge recipe, but in a whole different way to the Condensed Milk Fudge.

It is made with whisked egg-whites and a hot sugar syrup, beaten to grain the sugar. The result is a dazzlingly white, almost marshmallow appearance. The magic, however, happens when you take a bite. Just like it’s namesake, Sea Foam Fudge melts away like a whisper.

It is positively ethereal. Which is why it needs a jolly great handful of cranberries, apricots and a few chopped nuts for zing and colour and a bit of texture. Some Yuletide flotsam, to be carried into your mouth on a cushion of sea foam, if you will. Or not. I tend to get a bit carried away with my extended metaphors.

ANYHOO….

In the US I believe this is called Divinity and lacks the fruit,  but also veers dangerously (for my not-very-sweet-tooth) towards the soft and nougat-y.

As with meringues, this will absorb moisture if left uncovered, so pack into a ziplock bag for personal indulgence, or shiny, crackly cellophane if gifting as presents.

This comes from a delightful book in my collection – Sweet-Making For All by Helen Jerome, originally published in 1924. Just as with Ms Nell Heaton, I have great confidence in Ms Jerome’s recipes, which are always clear and straightforward. If you come across any of their books, I can highly recommend them.

Sea Foam

450g white granulated sugar
60g golden syrup or glucose[1]
180ml water
2 large egg whites
50g chopped nuts – pistachios are colourful, almonds keep things pale
50g chopped dried apricots
50g chopped cranberries – dried or candied

1tsp vanilla extract or 1tbs rum

  • Line a 20cm square tin with baking parchment.
  • Put the sugar, syrup and water into a pan and heat gently until the sugar is dissolved.
  • Bring to a boil and continue to heat until the syrup reaches 130°C. Do not stir.
  • When the temperature of the syrup reaches 120°C, start whisking the egg-whites until stiff. The temperature of the sugar syrup will rise relatively quickly, so keep an eye on each. Or get a glamorous assistant to help.
  • Still whisking, pour the hot syrup slowly into the whisked egg-whites, as if making Italian meringue, and continue beating until the mixture begins to thicken and lose its gloss. Add the flavouring whilst whisking.
  • When the mixture has lost its high sheen and thickened slightly add the fruit and nuts and continue beating until the mixture has thickened further and becomes cloud-like. NB This might happen suddenly, so be prepared.
  • Smooth your Sea Foam into the tin. Alternatively, roll lightly into logs about 2cm in diameter Try not to squash out the air you’ve just whisked in as you do so. Wearing latex gloves or dusting your hands with cornflour, or both – will help.
  • Cover lightly and allow to cool completely. If you can enclose your tin in a large ziplock bag to protect from humidity, so much the better.
  • When cold, cut into squares and/or dip into tempered chocolate. Store in an airtight container.

[1] The glucose will keep the fudge startlingly white, the golden syrup will add a very pale golden hue.

Candied Cranberries

Here’s a recipe you might want to try when fresh cranberries are back in the shops.

After discovering the joys of home-candied peel a few years ago, I have since tried my hand at several different fruits. With it being the season for mincemeat and fruit cake decorating, when I spotted some punnets of fresh cranberries on sale, I thought I’d give them a try.

Hunting around on the internet, it seems many people’s idea of candied cranberries is to dip them in egg-white and roll them in caster sugar. Beautiful and festive and twinkly-frosty, but not really candied in the traditional sense.

I also found no recipes on the traditional method of candying for these particular berries, so I thought I’d make up my own, based on the many examples of preserving recipes I’ve found in various manuscript books.

My method is a combination of the old-fashioned method of making conserves with delicate fruit, and how to make sloe gin *hic!*

This recipe takes about a week, but your active involvement is little more than an hour. Over the week, the delicate berries will gradually exchange their juice for sugar, making the cranberries more robust the more sugar they absorb, and as a bonus you’ll get a beautifully-coloured cranberry syrup.

For ease, select a pan you can get by without using for a week.

Candied Cranberries

1kg fresh cranberries
1kg caster sugar

  • Poke holes in each cranberry with a cocktail stick in order to let the juice out (and the sugar in). You don’t have to be too fastidious – I made about 5 or 6 holes around the middle.
  • Layer the cranberries and the caster sugar in a pan – a wide pan is better than tall saucepan, for ease of gently moving the berries around later.  Leave for 24 hours. The sugar will draw out some of the juice.
  • Next day, heat the pan very gently to melt the sugar. You’ll probably have to add a little water to get it started – about 1/2 a cup. Shake, don’t stir – or if you absolutely have to, stir very gently. Vigorous stirring and/or heating will cause the berries to burst. Some will burst anyway, but try and keep that at a minimum by being gentle.
  • Once the sugar is melted, turn off the heat, cover, and leave 24 hours. As the sugar is absorbed by the cranberries, they will gradually become more robust, but for the first day or two, you’ll need to be careful.
  • Repeat the heating gently for 5 minutes then leaving overnight for 5 days. Gradually the syrup will become redder and the cranberries more jewel-like.
  • After 5 days, warm the syrup (to make it easier to drain) and pour through a sieve to separate the cranberries from the syrup.
  • To finish, the cranberries need to dry a little, so line 2 large baking sheets with parchment and scatter the candied cranberries over. Try and get them separated, to facilitate drying, but there will be some squished ones you can’t do much about at this stage.
  • Last thing at night, put the trays in the oven and turn the heat to 170°C/150°C Fan for 5 minutes, then turn off and leave to dry overnight.
  • Repeat the drying next day – 170°C/150°C Fan for 5 minutes then turn off and leave to dry. If extremely sticky, they might need another overnight drying (I did Friday night/Saturday day/Saturday night).
  • Once only slightly tacky to the touch, they’re ready to use. I sorted mine into 3 groups: Perfect ones went back into the syrup (to keep moist) to use as decorations. I dipped a few of the not-so-perfect ones in dark chocolate, and rolled the rest in caster sugar and stored in a ziplock bag. The exploded ones I chopped and put in a jar for mincemeat.

Fudge

Confession: This is not my recipe.

It is the original fudge recipe that used to be posted on the Carnation website and for some reason was taken down a few years ago.

Luckily for me – and you – I have it ingrained on my brain as it is the best, no-fail recipe I have ever used, and I am posting it here so I can be lazy and just point everyone who asks for the recipe here, instead of writing it out again and again.

It makes the kind of fudge that has texture: when cooled, it is hard to bite into – yet it melts in the mouth. Very similar to the confection known in Scotland as Tablet.

The secret is two-fold: boiling the mixture to the correct temperature, and beating it as it cools to ‘grain’ the sugar.

You CAN make this the Old School way, testing for the Firm Ball stage by doing the drop test in water, and by beating the cooling mixture hard with a wooden spoon. However, I’m all for using gadgets wherever possible, so a thermapen or similar thermometer and an electric whisk or stand mixer are my recommendations.

Each batch makes a 1.2kg slab large enough to last over the festive season. Alternatively, you can make a batch and divide it up into small batches in clear plastic bags and use it for presents, or make two batches of contrasting flavours and make it go even further.

You can use the basic recipe to make a number of equally delicious variations, and I’ve thrown in an extra one by Nell Heaton – a favourite author of mine from the 1940s/1950s, who deserves greater recognition for her delicious, trustworthy recipes – which is a real explosion of flavour when made with home-made candied peel, fruit and nuts.

Fudge

1 x 397ml tin of sweetened, condensed milk
150ml milk
125g butter
450g Demerera sugar

  • Line a baking pan with parchment. The size of the pan doesn’t really matter, but I recommend a rectangular pan, for ease of cutting the fudge into cubes once cooled. The original recipe suggested a pan 18cm square, which will make for a small, very thick slab. Personally, I use a pan 30cm by 24cm
  • Put all of the ingredients into a pan and stir over a low heat until the sugar has dissolved.
  • Bring to the boil and stir continuously until it registers between 116°C and 120°C on a thermometer dipped into the centre of the pan. Make sure the tip of the thermometer doesn’t touch the bottom of the pan, as this will be much hotter and the thermometer will thus give a false reading.
  • When your fudge reaches temperature, remove from the heat and allow the bubbles to settle. Pour into your stand mixer and use the beating paddle (not the whisk) to beat slowly until the mixture thickens. Alternatively, use your electric hand mixer directly into the pan, also whisking until the mixture has thickened.
  • When it is thick and still just pour-able, tip it into your parchment-lined tin and smooth over. I tested the most recent batch I made and when sufficiently thickened and cooled, it registered 80°C.
  • Leave to cool completely.
  • When cold, cut into cubes with a sharp knife and store in an airtight box.

Variations

  • Rum and Raisin Fudge: Warm 115g raisins in 3-4tbs dark rum and leave to plump. Add just before beating.
  • Chocolate Fudge: Melt 170g dark, 60% chocolate and add just before beating.
  • Fruit and nut fudge: Stir in 85g mixed dried fruit and chopped nuts.
  • Nell Heaton’s Tutti Frutti Fudge (my favourite) Add 350g – yes, a whopping 12 ounces in old money – of mixed chopped nuts, dried fruit and candied peel sliced or diced small. I suggest about 90g mixed candied peel, 130g flaked or slivered almonds and chopped walnuts, and 130g mixed raisins, sultanas, cranberries and chopped apricots.