I spend a lot of our holidays in southwest France prowling around patisseries and artisan boulangeries with eyes like saucers, admiring the delicate and stylish combinations of cream and fruit and chocolate and truffle and glaze and, and, and….
However, in order to get there, it is rather a mammoth road trip, so I generally make sure I’ve got a handful of recipe books with me in the car to while away the hours. With no other reading matter to hand, I find it’s a good way to make sure I actually READ some of the hundreds of books on my shelves and I invariably discover something I’ve overlooked before. Sure enough, this year, yet again, I have re-discovered a recipe in a dusty housewives’ pamphlet from umpty-plonk years ago that reveals itself to be a real gem and, despite my hopeless and complete admiration for the exotic and awe-inspiring patisserie creations of France, I am enchanted all over again by British simplicity.
The recipe for these cakes was so brief I almost passed it by, yet curiosity caused me to pause and read it over, wondering what ‘trick’ there was; surely the small paragraph didn’t contain making, baking AND decorating instructions for cream cakes?
Sure enough, it didn’t, because the recipe was for cakes MADE with cream. Specifically, substituting cream into the mix instead of butter.
So simple – flour, sugar, eggs, cream, baking powder. I just had to try them.
And they were delicious, and a complete breeze to make; no fretting over whether the butter is soft enough, or whether the sugar is dissolved sufficiently. They rose, magnificently domed, in the oven and are light and tender of crumb.
If I had just one niggle, it was that they were sweet. Tooth-achingly so. I couldn’t resist tweaking them a little. Even the sugar-pop posing as my daughter prefers this version. Of course she ate the sweet batch too, but she prefers these.
There’s no added flavouring – you could add some if you like, but I urge you to try the recipe just once, with farm-fresh eggs and rich double – or even clotted – cream.
The simplicity, lightness and flavour will be a delight.
Promise.
Cream Cakes
The cakes in the photo are made in mini layer tins I bought in my local The Range, 4 x 10cm diameter pans for £2.50 (also fab for Yorkshire Puddings – I bought 2 sets) and I put 100g of batter per pan and made six. If you’re using large cupcake/muffin tins, I suggest just 50g of batter per ‘hole’, and thus twelve cakes. Cooking time is the same for both sizes.
150g caster sugar
2 large eggs
125ml cream – double or clotted
150g plain flour
1.5 tsp baking powder
Preheat the oven to 180°C/160°C Fan.
Crack the eggs into a bowl and add the sugar. Beat with a balloon whisk (or by hand or stand mixer) until the eggs are frothy and the sugar dissolved – about 5 minutes.
Add the cream and whisk in.
Sift the flour and baking powder together and stir into the rest of the ingredients – the balloon whisk/attachment is best for this, less washing up too!
Grease and line your tins, or use cupcake cases.
Spoon your mixture into your tins. Spread the batter to the sides, leaving a hollow in the middle. They will still dome up during cooking, but this way it should be a little more controlled.
Bake for 15 minutes until risen and golden brown.
Cool on a wire rack.
I think these are delicious served warm, lightly dusted with icing sugar and with a drizzle of cold cream poured over and a few fresh berries on the side. You can also split them and fill with whipped cream and berries or jam, or indeed any way that takes your fancy!
Similar to, but also different from Soda Bread, this loaf actually works out to be a little bit slower to make than Soda Bread, but the extra time is worth the wait because it is also lighter.
As a bonus, it doesn’t require buttermilk, using instead a 30 minute ‘lactic ferment’ of ordinary milk and plain flour to mix the ingredients together. Allowing the mixture to stand for 30 minutes stimulates the enzymes that help produce the lift in the finished loaf. And it has to be 30 minutes – no longer. And definitely don’t try and make it less because the results are immediately visible – and not that fun to eat!
One final tweak was to bake it under a pan. In a tin, but also under a pan. Much like the Overnight Bread and Jim Lahey’s No-Knead Bread, an enclosed baking space keeps in the steam, helps the rise and protects the crust from becoming overly dark. The results can be seen below.
Side by side comparison of three different baking conditions. Left: Mixed without the 30 minute wait. Middle: 30 minute ferment, baked uncovered in a tin. Right: 30 minute ferment, baked in a tin covered by an inverted saucepan.
Here’s a closer look at the crumb of each loaf:
Loaf mixed without the 30 minute ferment The loaf hasn’t risen much at all and consequently has retained a great deal of cragginess on the top. The dough did not expand to fill the tin, causing rough and uneven sides. The crumb is very dense and noticeably yellow in colour.Loaf mixed with 30 minute ferment, baked uncovered in a tin. A dark crust, but well-risen and most of the cragginess has been smoothed by the rise. Crumb fairly open, but loaf noticeably flat across the top.The most impressive result. Baked with the 30 minute ferment, in a tin, covered by an inverted saucepan. The crust isn’t overly dark and the crumb nice and open. The rise has allowed the top of the loaf to be pleasantly crusty and for the dough to fill the tin, as demonstrated by the smooth sides of the loaf.
Baking Powder Bread
Recipe adapted from MANNA by Walter T. Banfield, 1938.
For the ferment:
285ml cold whole milk
225g plain white flour
For the rest of the loaf
150g plain white flour + 40g (maybe)
12g cream of tartar + 6g of bicarbonate of soda OR 24g baking powder[1]
25g lard or butter
1/2 tsp salt
10g golden syrup, agave nectar or mild-flavoured honey
Whisk the milk and flour together and cover the bowl with plastic. I use the bowl of my stand mixer, so that I can use the machine to mix in the rest of the ingredients later.
Set aside for 30 minutes.
Preheat the oven to 210°C, 190°C Fan.
Grease a deep, 20cm, loose-bottom cake tin or similar.
Put the remaining ingredients into the bowl of a food processor and blitz to combine. Make sure the sugar syrup mixes in thoroughly and isn’t left stuck to the side of the bowl.
When the milk mixture has sat for 30 minutes, add the rest of the ingredients and stir to combine. If the mixture seems a little too wet, add up to 40g more flour, until it is dry enough to handle.
Working quickly, knead the dough a few times to smooth it out, and shape it into a disk.
Drop the disk of dough into the prepared tin and put the tin onto a baking sheet.
Invert a large saucepan or casserole over the top of the tin to keep in the steam. Make sure the rim lies flat against the baking sheet.
Bake for 30 minutes.
Remove the pan covering the loaf and bake for a further 10-15 minutes, until crisped and brown and sounding hollow when tapped on the bottom.
Cool completely on a wire rack before using.
Variations
You can use this basic method to make any number of different flavoured loaves, merely by mixing up the types of flour you use in both the ferment and the remaining ingredients: barley flour, oat flour, wholemeal, brown, etc.
Also consider adding interesting texture in the form of flax seeds, pinhead oatmeal, bran, wheatgerm etc.
The sugar syrup can also be varied by using treacle, maple syrup, malt, and so on.
Whatever changes you decide on, just make sure the overall quantity of flour remains constant.
Here are a couple of combinations to get you started. These loaves are slightly denser, so they have the enrichment of a little beaten egg to help lift the texture. I know half an egg is a ridiculous amount – sorry about that – the quantities for a whole egg were huge, and would require a huge oven to bake in. Use a small egg if you can find them, or double the recipe and make 2 loaves (as long as you’ve got 2 large pots to cover them as they bake) or one giant loaf.
Wholemeal/Granary Bread
285ml cold milk
150g brown flour
75g plain white flour
——
150g wholemeal or granary flour
12g cream of tartar + 6g of bicarbonate of soda OR 24g baking powder
25g lard or butter
½ tsp salt
10g treacle or molasses
½ large egg – whisked
Oat Bread
285ml cold milk
150g brown flour
75g plain white flour
——
150g oat flour
12g cream of tartar + 6g of bicarbonate of soda OR 24g baking powder
25g lard or butter
½ tsp salt
10g treacle or molasses
½ large egg – whisked
[1] Commercial baking powder is usually 25% rice flour or cornflour, to keep the active ingredients from clumping. The cream of tartar and bicarbonate of soda are the actual active ingredients, and therefore all you need to add. If, however, you’re using commerical baking powder, you’ll need to add 24g in order to get the above quantities of active ingredients.
Some time ago *waves hand vaguely* I introduced you to an all-butter pastry which I had adapted from an old Victorian commercial baker’s book. The crust for my Cheese and Potato Pies has about 25% cornflour, which makes it fantastically silky-smooth to handle and which also bakes beautifully crisp and dry.
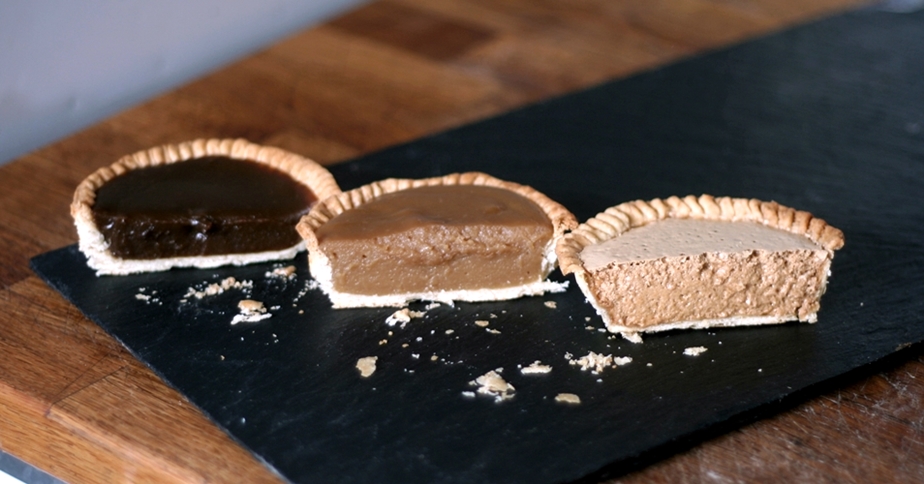
The recipe this week is for a sweet version, also from the same baking handbook: slightly different flour/butter proportions and enriched with the yolk of an egg, it is both more crisp and more delicate than the savoury version and a perfect foil for the three sweet fillings I’ve lined up for you, because I thought it rather a cheek to give you just a pastry recipe this week and let you get on with it. Plus I couldn’t get a lump of pastry to look tempting all by itself, so here we are.
The fillings are very much variations on a theme of dark muscovado sugar and I’m really pleased with the three differing flavours that resulted. The Butterscotch is really dark and very much a ‘grown-up’ flavour – you could even add a slosh of real scotch to ramp it up to dinner-party level. The Toffee is very child-friendly in flavour – almost mild – and a real comfort food. The Gypsy Tart is a 2-ingredient classic that harks back to memories of school dinners. There are many recipes for the filling ‘out there’, most of which generally have too high a proportion of sugar and too much milk, resulting in gigantic pies of tooth-aching sweetness. This version makes for a light and frothy filling with just the right balance of flavour and sweetness. It is the only one of the three that needs any further cooking once poured into the pre-baked pastry shell, but at just 20 minutes in a cool oven, these too are ready in a flash.
I’ve left all three unadorned, but you could add embellishment if you like – unsweetened whipped cream or creme fraiche rather than more sweetness in a chantilly or buttercream, is my recommendation. A smattering of chocolate sprinkles for the toffee tart, perhaps? Your call.
Cut Retro Tarts Dark Butterscotch (left), Toffee (middle), Gypsy Tart (right)
Sweet Shortcrust Pastry
This quantity makes enough for one large tart or 4-8 individual tarts.
Put the flours, butter, sugar and yolk into the bowl of a food processor and blitz until the mixture resembles breadcrumbs.
With the machine running, gradually add the cold water a tablespoon at a time until the mixture comes together in a ball.
Tip the mixture onto a floured surface, knead smooth then wrap in clingfilm and chill for at least 30 minutes.
Roll out thinly and line your greased tart tin. If making smaller tarts, cut the pastry into 4 and roll out individually.
Leave the excess pastry hanging over the side of the tin/s and chill in the fridge for another 30 minutes. The pastry will shrink as it chills and then you can trim the excess. If you trim it first, the pastry will shrink down inside your tart cases, probably unevenly, and your pastry cases won’t have a nice finish.
Preheat the oven to 200°C, 180ºC Fan.
Prick the bottom of the tart/s with a fork to prevent blistering, line with baking parchment and fill with beans/rice/beads.
Bake for 10 minutes for small tarts, 12-14 minutes for a large tart.
Remove the parchment and beans and bake for a further 3 minutes for small tarts, 5-8 minutes for a large tart, until fully baked.
Make a paste of the flour with a little of the milk, then stir in the rest of the milk.
Pour this milk mixture into the butter mixture and whisk vigorously.
Continue whisking until the mixture comes to the boil. Simmer for 2-3 minutes, stirring, to ‘cook out’ the taste of the flour. The mixture will thicken.
Remove from the heat. Add a little extra milk – or scotch! – if it seems too thick, then pour into the bake pastry case/s and allow to cool.
Toffee filling
Warm the golden syrup before measuring it out, it will be much easier to pour accurately.
100g butter
40g plain flour
250ml milk
60g dark muscovado sugar
100g golden syrup
chocolate sprinkles (optional)
Melt the butter in a pan and add the flour. Whisk until frothed and starting to darken.
Warm the milk and sugar together and pour into the butter mixture, whisking briskly.
Keep stirring over the heat until the mixture thickens, then remove from the heat and stir in the golden syrup.
If the mixture seems too thick, add a little extra milk to loosen it.
When you’re happy with the consistency, pour into the pastry shells and set aside to cool.
Scatter over the chocolate sprinkles, if using, before serving.
Gypsy Tart filling
1 x 170ml tin evaporated milk – chilled
120g dark muscovado sugar
Chill the tin of evaporated milk in the fridge overnight. Do not skip this step. It will not whip up to its frothy perfection unless the milk is thoroughly chilled.
Get rid of all the lumps in the sugar by pounding it in a pestle and mortar. Work a little at a time rather than trying to get the whole batch lump-free in one go. It’ll give you something to do while the milk chills.
Put the sugar and the chilled milk into a bowl and whisk for AT LEAST ten minutes. You want the sugar to dissolve and the milk to increase in volume and become light and frothy, like half-whipped double cream. You can test whether the sugar is fully dissolved by rubbing a little of the mixture between finger and thumb – it should not feel grainy at all. If you have a stand mixer and a balloon whisk attachment, this might take a little less time, but not much.
Preheat the oven to 120°C – NO FAN
Pour your mousse-like mixture into your pre-baked pastry case/s. It will not rise much in baking, so you can fill them pretty full.
Bake for 20 minutes or until the filling has set: no wobble when gently shaken.
Goathland is a tiny village – population less than 500 – tucked away in the North York Moors National Park, just south-west of Whitby. It looks an absolutely delightful place, and Harry Potter fans will recognise Goathland Station as doubling for Hogsmeade (the station nearest Hogwarts) as well as Aidensfield from the popular TV series Heartbeat.
In the 1930s, Mrs Arthur Webb was commissioned by the BBC to visit farms throughout the UK “in order to secure something that was characteristic of its cooking and preparation of food.” In much the same way as her contemporary, Dorothy Hartley, would – Mrs Webb tramped around the countryside conversing with farmers wives and watching them cook in their own kitchens, frequently with awe and respect.
I looked at the fireplace. I watched the flames travelling under the oven.
“How do you manage to keep the heat going – you burn coal, of course?”
“Oh no” the answer came swiftly; “I never trust coal or anything else than wood for my baking. I understand wood better and I know exactly what heat it will give.”
“Do you ever have failures?”
“Failures? Of course not. I know exactly what I want and I make it.”
“Well, how do you manage to arrive at such delicious pies as these?” and I pointed to the laden table. “Do you weigh the ingredients?”
“Never. I could not spare the time. I just know how much the flour, butter, lard, milk, water and eggs will make.”
Luckily for us, Mrs Webb was able to jot down the ingredients for this fantastic tart, which I have only tweaked very slightly in converting to metric measurements and adding cooking times/temperatures. I’m curious to know which farm in this peaceful area was the origin of such a flavour-packed bake.
As you can see from the photograph. it bears little resemblance to the traditional British, tooth-achingly sweet, open-topped Treacle Tart made with golden syrup and fresh breadcrumbs. Whilst still containing breadcrumbs, the filling for this double-crust tart is packed with fruit both fresh and dried, actually contains treacle, and is much closer in taste to a traditional mincemeat, although blessedly fat-free. Along with the dried fruit and spices, the filling is given some fresh zing with chopped apple and lemon zest/juice. The dry breadcrumbs absorb any apple juice during cooking, resulting in a tart with a firm, fruity filling, no soggy bottom, and packing a huge wallop of flavour. The lack of fat in the filling means that the taste is bright and fresh and never cloying or overly rich.
I’ve chosen to wrap this in my favourite cornflour shortcrust, as its dry crispness when baked is the perfect foil against which the filling can really shine.
Sidebar: Mrs Webb’s notes tell us merely to “cover with another pastry” – which is all well and good, but pays little attention to the presentation which is, after all, usually the first thing that tempts us with a dish. I’ve made a conscious decision to try to present dishes, no matter how humble their ingredients, in the most appetising and eye-catching way. If I may paraphrase the great William Morris “Serve nothing from your oven that you do not know to be delicious or believe to be beautiful.”
Tart top
Which is all well and good, except that when it comes to decorating, I usually have the patience and finesse of a potato. But I also have a little imagination, so I created the above decoration for the tart lid, in the best traditions of housewives across the years, with what I had to hand: namely, a teaspoon, an apple corer and a skewer.
The pastry was crimped by laying the pastry lid so that the edges lay vertically against the sides of the tin. Insert the handle of a teaspoon between the outer edge of the pastry and the tin and your finger and thumb against the inside of the pastry. Press inwards with the spoon handle as you pinch the two pieces of pastry together. I had intended only to hand-crimp the tart edges, but the imprint of the teaspoon handle has made a pretty design, so I’m going to run with it. *lying* I totally meant to do that.
The pattern was made firstly by gently pressing an apple-corer into the lid – enough to mark, but not enough to cut all the way through the pastry. Then I used a wooden skewer to poke holes in lines from the centre ring to each of the surrounding rings. Lastly I added a line of holes between each of these lines.
If you’re in any doubt whether or not to try this tart – and I really hope you will – let me just say that I’m seriously considering using this as my mince pie recipe this year.
Just sayin’.
Goathland Treacle Tart
Pastry
225g plain flour
60g cornflour or rice flour
140g butter
ice cold water
Put the flours and butter into the bowl of a food processor and blitz until the mixture resembles breadcrumbs.
With the machine running, gradually add the cold water a tablespoon at a time until the mixture comes together in a ball.
Tip the mixture onto a floured surface, knead smooth then wrap in clingfilm and chill for 30 minutes.
Remove the pastry from the fridge and cut off two thirds. Put the remaining third back into the fridge.
Roll this piece out to a thickness of 4-5mm and use it to line a greased 18cm pie tin, loose-bottomed for preference, making sure there is enough pastry overlapping the sides of the tin to allow for joining the lid.
Chill while you mix the filling.
Filling
60g dry breadcrumbs [1]
60g currants
60g sultanas
30g candied orange peel – diced
30g candied lemon peel – diced
1 small cooking apple – peeled, cored and chopped/grated
zest and juice of 1 lemon
1/2tsp ground ginger
1/2tsp ground mixed spice
30ml treacle
30ml milk
Mix the breadcrumbs, dried fruit, candied peel, spices and lemon zest in a bowl.
Warm the treacle by placing the open can in a saucepan of water over a low heat. As it warms, it becomes less viscous and easier to pour.
Pour out the required amount of treacle and mix with the lemon juice, then add the milk afterwards. NB Don’t mix the lemon juice with the milk first, otherwise it will curdle.
Add the liquids and the chopped apple to the rest of the ingredients and stir to combine.
Preheat the oven to 200°C, 180°C Fan.
Add the filling to the chilled pastry case and smooth over.
Roll out the remaining pastry to make the lid.
Wet the edges of the pastry with water, and lay the pastry lid onto the filling. Ease the edges together as per the diagram above. Make sure there’s no air trapped underneath the lid – in the oven this air will expand in the heat and may cause the lid to lift away from the filling.
Use the back of a knife (so as not to scratch your non-stick tin) to trim away the excess pastry, then crimp the edges as described above.
Decorate as desired.
Brush with beaten egg, or with milk and then sprinkle with a little caster sugar. (I used just egg).
Bake for 30 minutes, turning the tin around after 20 minutes to ensure it colours evenly.
Set aside to cool.
After cooling for 10 minutes, if you’ve used a loose-bottomed tin, the tart can be gently removed and served, or set onto a wire rack until cold.
[1] These must be really dry. Definitely not fresh. If you have none to hand, nor any stale bread, make breadcrumbs of 3 slices of bread and lay them on a parchment-lined baking sheet. Dry (without browning) in a 120°C/100°C Fan oven for 20-30 minutes.
An unusual and simple cake, with the bonus of being gluten-free!
As I was perusing one of my several vintage baking books, I came across this recipe – not in any specific allergy-related book or even chapter of a book. No, it was just included with a bunch of other recipes in a book aimed at the commercial baker, dating from the early 20th century. I have scaled the recipe down from the originally huge quantities, but otherwise, it is unchanged.
This cake is made using potato flour. IMPORTANT: Potato flour is made from RAW potatoes and is a bright white and very fine powder, with no discernible taste. It is NOT dehydrated cooked potato, which is coarse, yellowish and tastes of potato. That makes mashed potatoes when reconstituted and will add a similar texture to your cake. Readers in the US: use potato starch flour.
At first, I thought the cake got its name from it colour, because, as you can see from the photo, it is indeed a very pale cake. However, after tasting the cake, I’m now of the opinion that its name comes from its texture. It has the same quality of settled snow, in that there is a thin ‘crust’ on the top and soft, friable, almost powder-like substance underneath. The cake dissolves in the mouth – but in a different way to, say, Melting Moments. It’s incredibly light and tender and is best enjoyed simply, where it can really shine.
That said, the cream that I have teamed with it is pretty awesome itself. It is a variation of the filling I used for the mille-feuilles in the final of The Great British Bake Off. The mixture of sweetened cream cheese and whipped double cream is given a firmer set by the addition of gelatine, which helps to hold in the moisture and makes for a very luscious, rich, creamy and mousse-like texture. Just to continue the frozen theme, it’s like the very best soft-serve ice-cream, without the cold.
I’ve brightened the filling with some Apricot Jam, but any other sharp jam would also work well.
Grease and line the base of a 20cm diameter, tall cake tin – not a sandwich tin. The high sides will help shield the cake from the direct heat of the oven and keep it from becoming over-coloured.
Beat the butter and sugar together until light and fluffy – 5-10 minutes.
Add the eggs one at a time, beating well each time.
Add the remaining ingredients and beat thoroughly – a good 5-10 minutes. Ordinarily, you’d run the risk of over-beating a cake mixture, which would develop the gluten in the flour, leading to a tough cake. Since the potato flour has no gluten, there’s no need to worry about this. You want to try and get as much air into the mixture as possible to make for a light texture in the cooked cake.
Turn the mixture into the prepared tin and smooth the surface.
Bake for 20 minutes, then turn the tin 180 degrees and bake for a further 10-15 minutes, for a total of 30-35 minutes. When you turn the cake after 20 minutes, slip a sheet of baking parchment over the top of the tin to keep the colour from getting too dark.
When cooked, remove from the oven and let rest for 10 minutes, then remove from the tin and cool on a wire rack.
Soak the leaves of gelatine in cold water for 15 minutes.
Warm the double cream and caster sugar until the sugar is dissolved.
Shake off the excess water from the gelatine and add to the pan.
Stir until the gelatine has melted, then remove from the heat and set aside.
Once the mixture has cooled a little, pour it into a bowl and add the remaining ingredients.
Whip the mixture until the cream has thickened and it is soft and pillowy.
To Assemble
Even though this is a light sponge cake, the weight of the top half will be too heavy initially, to avoid squidging (technical term) the cream out of the sides of the cake. Therefore, I strongly recommend using the following method to assemble your cake.
200g apricot jam – warmed and pureed
Using cocktail sticks, mark the midpoint of the cooled cake around the edge and cut it horizontally.
Spread the cut side of each cake half with apricot jam.
Put the bottom half of the cake back into the tin in which it was baked.
Slip a band of parchment or food-grade acetate around the inside of the tin, between the cake and the inside of the tin.
Smooth or pipe the cream filling over the bottom of the cake, making sure it reaches the edges of the cake.
Place the other half on top and press gently.
Cover with cling-film and chill for 2-3 hours, until the gelatine in the cream has set.
Remove from the fridge and allow to come to room temperature.
Remove the cake from the tin and gently peel the parchment/acetate from around the filling.
Time was, we used to mark the passing of the year with festivals and their associated foods. The list of celebrations that have continued into the 21st century is a lot shorter than it used to be: pancakes on Shrove Tuesday, Simnel Cake on Mothering Sunday, Cross Buns on Good Friday are about all that remain in national consciousness.
Regionally, there are still pockets of celebration peculiar to that particular area. Whilst researching my book (shameless plug) Great British Bakes, I discovered two such celebrations with which I have a personal connection.
The first was that of Pax Cakes at King’s Capel, near Ross-on-Wye, where my father spend his final years and is now buried. Under the terms of the sixteenth century will of Lady Scudamore, cakes and ale were to be distributed to the parishioners of Hentland, Sellack and King’s Capel on Palm Sunday, to be consumed in church with the aim of fostering good will and letting the grievances of the past year be forgotten. The cakes became known as Pax Cakes and the toast/blessing was “Peace and good neighbourhood”.
The second was the celebration at Kidderminster, where I now live, held on Midsummer Eve, for all residents of Church Street. A bequest left by John Brecknell in 1778 added to an earlier bequest and provided cake for each child or unmarried woman born or living in the street. The men-folk were to gather together to oversee the distribution, and for this meeting both beer and tobacco were paid for by the bequest. Old quarrels had to be set aside in order for the meeting to proceed. Over the years, the celebration evolved into a Midsummer’s Even dinner for residents of the street, where the toast was “Peace and good neighbourhood”.
All of which leads me to this week’s recipe found in my grandmother’s cookery book. It’s for a cake to celebrate Whitsun, originating from Lincolnshire. The recipe was very insistent that, after baking, the cake be wrapped and carefully stored for “several days” in order for the flavours to mingle. The first time I made it, I dismissed this notion, as the aroma was so tantalising, and indeed, it was absolutely delicious, warm from the oven. This time I decided to follow the instructions as written, purely to compare taste. Long story short, although the cake I unwrapped this morning was nice, I still prefer the cake fresh and warm. The flavour is akin to an Eccles or Banbury cake, but with an enriched dough taking the place of pastry.
This recipe makes two, 20cm cakes. You can either do your own taste test, by eating one warm and trying the second several days later, or make just one cake by halving the recipe.
There’s no indication, other than the recipe title, what exactly this cake was meant to symbolise or celebrate, so whether you choose to make one cake or two, Peace and Good Neighbourhood to you!
450g currants
450g soft light brown sugar
60g butter
1 large egg yolk
2 tsp grated nutmeg
1 tsp allspice
1 large egg white for glazing
caster sugar
Grease and line with parchment paper two 20cm loose-bottom or spring-form cake tins. Tart tins are not suitable, as the sides need to be relatively high because of the cakes rising both before and during cooking.
Put the first four ingredients into the bowl of a food processor and blitz until the mixture resembles breadcrumbs.
Tip the mixture into a bowl.
Gently warm the butter and milk together until the butter has melted.
Allow to cool to blood temperature, then add to the flour mixture. It will form a very soft dough.
Knead for 10 minutes, then set aside to rise for 30 minutes.
Mix the fruit, sugar, yolk, butter and spices together in a saucepan and warm through until moist and the fruit soft.
After 30 minutes, divide the dough into two and then each half into four equal pieces.
Divide the fruit filling into six
Pat each piece of dough into a circle of diameter 20cm and place in the prepared tins, alternating with layers of the fruit mixture. The top layer will be of dough.
Set tins aside to rise for 30 minutes.
Preheat the oven to 180°C, 160°C Fan.
Bake the cakes for 30 minutes, then remove and quickly brush them with the beaten egg-white and sprinkle with caster sugar.
Return to the oven and bake for a further 25-30 minutes, until the top is browned and the cakes have shrunk away from the sides of the tin a little.
Cool in the tins for 10 minutes, then remove and cool on a wire rack.
Eat warm, or wait until completely cold before wrapping tightly in foil and storing in a tin, or wrap in plastic and freeze for later.
If you have an extended social life in the run-up to Christmas, and sample nothing but mince pies throughout December, by the time you get to the 25th, what with the Christmas Cake and Christmas Pudding, you can be all mince-pied out.
Also, sometimes you find yourself fancying something a little savoury at the end of a meal, and this is why this recipe is perfect. It’s simple and straightforward – just two main ingredients of fresh cranberries and juicy raisins. The raisins take the edge off the sometimes eye-popping sharpness of the cranberries and the little dash of vanilla also gives the aroma of sweetness, so only the merest sprinkle of sugar is required. It’s festively reminiscent enough of a mince pie to deserve a place on the table, its fresh-tasting, palate-cleansing, sweet but not too sweet, can be served hot or cold, but ALWAYS with a slice of cheese. I’m thinking some vintage cheddar, crumbly white Cheshire or even one of the fruited cheeses – white Stilton and apricot anyone?
It is a traditional (Welsh) border tart, ideal for Christmas – just look at that glorious colour! The original 1930s recipe in Mrs Arthur Webb’s Farmhouse Cookery didn’t specify any particular pastry, so I’m taking the opportunity to offer for your delectation and amusement, a new pastry recipe! Yes, I know I love the cornflour pastry – and I really do, both sweet and savoury versions – but I can’t resist something that has the potential to add a new arrow to my pastry quiver, as it were, and in this case, I’m really glad that I did.
It’s Eliza Acton’s 1845 recipe for cream pastry and it has my seal of approval for several reasons:
Simplicity – in its basic form, it can be whisked together with just two ingredients.
Taste – when baked, it is crisp and dry, without any hint of greasiness or stodginess.
It can be enriched with butter, but at a ratio of just 1/4 fat-to-flour, it is not as indulgent as it tastes. When enriched with butter, the texture is moving towards the flakiness of flaky pastry, yet with the ‘dryness’ and crispness of the cornflour pastry – Nom!
And on the practical side, it handles and rolls really nicely.
You can, of course, use your own favourite pastry instead.
Radnor Cranberry Tart
Eliza Acton’s Cream Pastry
This quantity makes enough for a 20cm pie.
225g plain flour
0.5tsp salt
300-450ml double cream
56g butter
Put the flour and salt into the bowl of a food processor.
With the motor running, gradually add in the cream, a little at a time, until the mixture comes together.
Tip the mixture out and knead until smooth.
Roll out the pastry into a long rectangle.
Using the same method as for Flaky Pastry, dot over half the butter.
Fold the ends over, turn the pastry 90 degrees and repeat.
Roll out one last time, and fold the ends inwards.
Wrap in plastic and chill in the fridge for 30 minutes.
Make the filling (see below).
Remove the pastry from the fridge and cut into 2 pieces (2/3 + 1/3 is about right).
Roll out the large piece and use it to line a greased, 20cm loose bottomed tart tin. Ease the pastry into the sides, rather than just stretching it by pressing down too hard. Leave the excess hanging over the edge of the tin.
Roll out the smaller piece of pastry to make the lid, and lay it onto a cutting board.
Chill both pieces of pastry in the fridge for 20 minutes. This will make sure it is relaxed and less prone to shrinkage in the oven.
By this time, the filling should be cool enough to use.
Preheat the oven to 200°C, 180°C Fan.
Remove the two lots of pastry from the fridge.
Fill the lined tin with the cooled filling and smooth over.
Using a pastry brush, wet the edges of the pastry, then lay the lid across the top and press the edges together.
Trim off the excess using the back of a knife.
Crimp the edges to your liking – I used the tines of a fork to make for a good seal.
Brush the surface of the tart with milk and sprinkle with caster sugar.
Cut a steam vent in the middle of the pastry lid using a sharp knife.
Bake for 25-30 minutes until the pastry is crisp and golden brown.
Allow to cool for 10 minutes in the tin, then remove to a wire rack to cool, if not serving warm.
Rinse the cranberries and put them in a pan with the raisins, sugar and water.
Cover and warm on a low heat until the mixture comes to the boil and you can hear the cranberries starting to pop.
Simmer for just five minutes, then turn off the heat.
Taste to make sure of the sweetness, but remember, this is not supposed to be a really sweet tart, however, it shouldn’t be too sour either. If you think it needs a little more sugar, add it by all means.
This recipe was an absolute delight to discover in an old Women’s Institute recipe book. For a start, the use of honey instead of refined sugar is so much better for you, and it increases the keeping properties immensely. The original recipe claimed that it would keep a year.
I used the cheapest, runny honey to see how much the flavour of the honey impacted on the final result, and it’s not overly intrusive – just a gentle hint at the end.
The real beauty of this recipe is how you can tweak both the honey and the accompanying fruit to give an almost limitless variety – Lime Tree Honey and limes, Orange Blossom Honey and oranges are just a couple of suggestions that sprung into my mind. Update: I have now tried both these flavour combinations, and can honestly say, hand on heart, that they are two of the most sublime-tasting citrus curds I have EVER tasted.
This recipe will make double the quantity of honey, so you’ll need just one extra jar in addition to your jar of honey. Wash both jars and lids and put them into a cold oven. Turn the oven on to 100°C, 80°C Fan until dry and hot.
As for the instructions, they couldn’t be easier. The original recipe contained just one line of instruction, but I’ve managed to pad that out to four!
Honey Curd
340g jar of runny honey[1]
2 large eggs
1 large yolk
zest and juice of 1 lemon
juice of 1 extra lemon
45g clarified butter
Put all of the ingredients into a small pan and whisk together over a low heat until thickened.
Pour into the clean, warm jars and seal.
Set aside to cool.
Use as any other curd – the original recipe recommends it as a filling for little tarts.
[1] Don’t be too precious about being exact – I only specify 340ml because that’s how much honey was in the jar that I used. 300ml-ish is fine.
As you may know, I have one or two cookbooks lying around and I haven’t actually got around to making absolutely all of the recipes contained therein.
But I’m working my way through slowly – and it’s just fabulous when I discover little gems like the recipe this week, tucked away as it was in a nondescript little booklet from the 1940s.
For a start, I have all the ingredients in the cupboard. I just LOVE it when that happens. It s a great irritation to find something delicious to make, only to discover a trip to the shops is required. So these are a great ‘spur of the moment’ bake.
Second, the recipe doesn’t make a whole mountain of biscuits – I got just twelve out of this batch. And they’re so fast to put together – little bit of melting/warming of liquids, chuck in the dry ingredients and you’re done. Even taking the time to pretty their appearance up doesn’t take long, and with 12 minute cooking time, you can be dunking them in a cup of something hot in not much more than 20 minutes.
Also – oats. LOVE oats in a biscuit – they make them it so crunchy and satisfying. Great energy snacks too. I can just imagine these biscuits being stuffed into pockets to snack on during invigorating afternoons tramping about the countryside.
And then we come to the main reason this recipe caught my eye. The lard. Yes – I did a double take too. But it works beautifully – and deliciously. And for me it also absolutely makes it a biscuit of country origin. Back in the day, not everyone could keep a cow – but most cottagers would have a pig, and once butchered for the winter, a ready and plentiful supply of lard. If you really can’t face it, you could try butter, but I haven’t tried it myself, so do let me know how it goes if you do.
Hunter’s Biscuits
56g golden syrup
56g lard
28g demerera sugar
56g plain flour
56g wholemeal flour
56g medium oatmeal
1/2 tsp bicarbonate of soda
1/2 tsp ground mixed spice
1/2 tsp ground ginger
grated zest of a small lemon – or of half a large lemon
1/2 tsp salt
6 almonds – halved
Preheat the oven to 175°C, 150°C Fan.
Put the lard and the golden syrup into a small pan over a low heat to melt/warm
Mix all the other ingredients together.
When the lard has melted, tip in the dry ingredients and stir to combine. You’ll end up with a moist paste.
Divide mixture into 12. I have a small-ish ice cream scoop which was perfect at portioning out the mix. Roll into a ball then flatten slightly. Place half a split almond on each biscuit.
Put the biscuits onto a baking sheet lined with parchment and bake for 12 minutes, turning the baking sheet round 180 degrees halfway though the cooking time. The biscuits should be just browning around the edges when done. They might seem a little soft, but will crisp up beautifully as they cool.
Lift the biscuits from the baking sheet and cool on a wire rack.
Something a little different this week – not just an unusual recipe but also a method of baking a loaf that might be new to you.
It’s called baking ‘under tin’ and is very useful if your loaf is decorated on the outside with seeds or grains, as it prevents them from becoming over-coloured in the high heat necessary for baking bread. It’s not just for use with speciality loaves, however, it is also useful for creating a very regularly-shaped loaf for making sandwiches, etc or keeping a delicately-crumbed loaf of enriched or milk bread from over-browning. You can splash out and buy a special sandwich tin with a lid that slides on/off (also known in the US as Pullman Tins), but it’s not necessary. Ideally, the tin would have vents in the lid to allow the steam to estape, but inverting a solid tin is fine – since the tin isn’t weighted down, any steam can escape from under the edges.
The other interesting aspect of this week’s post is one of the ingredients. I found the recipe for cracked wheat loaves in Walter Banfield’s classic book “Manna”: A Comprehensive Treatise on Bread Manufacture (1937). The cracked wheat is used both in the dough itself and also to decorate the outsides. I decided to adapt the recipe slightly in order to use an ingredient I picked up recently but had yet to use in anything – freekeh.
Freekeh a cereal made from air-dried and roasted green wheat and is popular in the middle east. It can be used as an alternative to rice or couscous, or substituted for bulgur wheat in tabbouleh salad. It is available in a couple of UK supermarkets, and also health food shops and online. It needs only a brief amount of cooking in water in order to soften it. If you zoom in to the picture, you can just make out the little yellow nuggets of chewy freekeh dotted through the slice. They make for great texture and add a pleasantly nutty flavour. This loaf is also nice made with half freekeh, half bulgur or all bulgur if you can’t find freekeh anywhere.
Whilst you can choose any flour to make these loaves, my recommendation is for strong brown flour (pictured) or malted flour. 100% stoneground wholemeal is tasty, but extremely dense. If you want the grains to be more noticable, you could mix 1/2 brown and 1/2 white, or experiment with rye, barley and other unusual grain flours.
Cracked Wheat Bread
100g freekeh, bulgur wheat or a mixture of both
500g strong brown flour
10g salt
EITHER 15g fresh yeast mixed with 5g brown sugar until liquid OR 1 sachet fast-action yeast.
warm water to mix
50g freekeh and/or bulgur wheat for coating
Put the 100g of freekeh into a small pan, cover with water and bring to a boil. Simmer for 10 minutes then drain. If using bulgur wheat, there’s no need to pre-cook, just cover with water and allow to soak for 30 minutes, then drain.
Add the drained freekeh or bulgur to the rest of the dry ingredients.
Add sufficient warm water to bring the dough together.
Knead for 10 minutes, then cover the bowl with plastic and allow to rise until doubled in size (about an hour).
Prepare the 50g freekeh and/or bulgur wheat in a similar manner and drain.
Grease a large loaf tin. The tin should be slightly larger than you would normally use for a loaf of this quantity of flour.
When the dough has risen. turn out of the bowl and deflate by patting gently.
Fold the edges into the middle and form the dough into a loaf shape. The top should be smooth and the seam underneath. Use as little flour as possible. The surface of the dough should be tacky to the touch.
Scatter the prepared grains over the work surface and roll the loaf of dough over them to coat. If there are any patches, pat the grains onto those areas by hand.
Put the dough into the loaf tin UPSIDE DOWN – that is, with the seam uppermost – and set aside to rise for about 30 minutes.
Preheat the oven to 200°C, 180°C Fan.
When the dough has risen almost to the top of the tin, lay a sheet of parchment over the top of the loaf tin and lay a baking sheet on top. Carefully invert both loaf tin and baking sheet so that the upside-down loaf tin is on top of the baking sheet, and the dough completely enclosed.
Slide a second baking sheet under the first and put all into the oven. The second sheet will help prevent the bottom of the loaf becoming too crisp.
Bake for 45 minutes, until the loaf sounds hollow when tapped.