This week’s recipe subject came about, as it increasingly does of late, with a casual thought when looking for something else.
Behold this recipe from Mary Jewry, editor of Warne’s Model Cookery and Housekeeping Book (1868). The first thing that caught my eye, and got me thinking, was the proportions of the ingredients. Nowadays, a proportion of 1:2:3 (of sugar, butter and flour) is touted by many as traditional, but here was a proportion of 1:2:4. Also of interest was the addition of ground almonds to add texture, whereas modern purist recipes staunchly abide by the ‘rule of three’ (i.e. no additions, especially not caraway comfits and citron). Lastly, there was the cooking temperature – a slow oven – which is different to the short sharp bake at high temperature in use today.
I resolved to put these variations to the test, but then the addition of the almonds got me thinking some more: what else has been added to traditional shortbread, and to what end? The answer turned out to be: quite a bit. I ended up baking twelve batches of 1:2:4 shortbread, each with a different ingredient making up 1/4 of the flour component, and performing a giant taste test to see which was, for me, the ultimate combination. And here’s a key point: it’s all down to personal taste. What I might find delightful, others may find not to their taste. I’m hoping that by presenting a wide range of options, you too may find your ultimate shortbread recipe.
Here are the choices I made:
- Sugar: I chose to use soft light brown. This was to give a more rounded flavour to the shortbread. White caster (superfine) sugar is sweet, but only that – rather one note.
- Butter: unsalted, but with a small quantity of salt added. I had made some shortbread recently, and used salted butter, and the shortbread was delicious, but the finishing lick of saltiness might be an acquired taste. I tried another batch with unsalted butter, and this proved less popular, so for the run of test batches I resolved to split the difference and use unsalted butter, with just a quarter teaspoon of salt.
- Flour: regular, unbranded white plain flour. After baking a control batch using 100% flour, the remaining batches each had 1 part of the flour component as a different ingredient. These comprised: ground almonds, rice flour, ground rice, cornflour, ground almonds, semolina, fine cornmeal and coarse cornmeal (caveat: I was unable to find any coarse cornmeal, and used polenta instead).
The Results
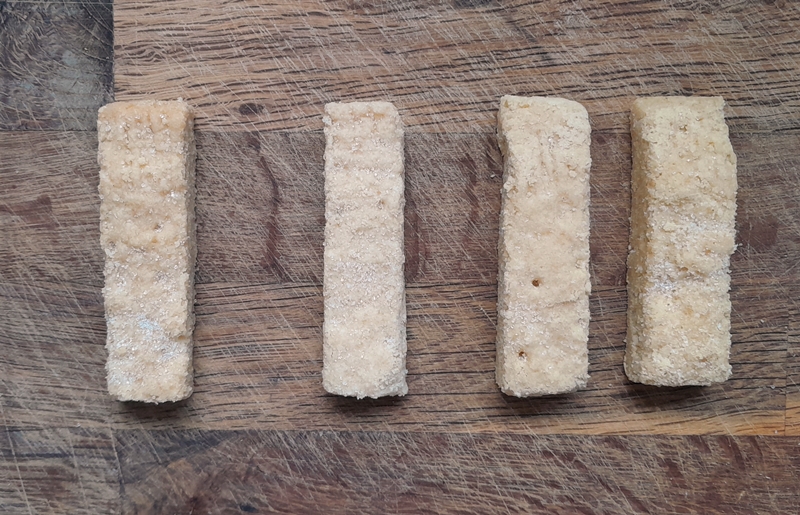
There are several outcomes from this mammoth bake and taste test. (Top image, Shortbread Variations: From the left, classic (butter, sugar, flour), then baked with: cornflour, rice flour, semolina, ground rice, ground almonds, polenta).
- The ‘flours’ – these can be divided into two groups, the powders and the granules. Both affect the texture of the finished shortbread.
- The powders include cornflour, rice flour, fine cornmeal (and possibly by extension, arrowroot, potato starch). The effects of using these powder-fine flours is to make the texture of the shortbread crisp and ‘melt in the mouth’.
- The granules include ground almonds, ground rice, semolina, coarse cornmeal, polenta. The effects of using these granules is to make the shortbread both crisp and crumbly. They create a thin, outside ‘crust’ and inside deliciously friable and crumbly. Ground almonds obviously bring a nuttiness to the cooked shortbread, which, if it’s your favourite, could be intensified by using ground hazelnuts. The polenta/cornmeal versions also baked to a gorgeous golden colour.
- The long, slow baking allows the shortbread to cook though thoroughly. Sometimes I have had shortbread where the outsides are cooked, but the insides moist, dense and almost doughy. This method of cooking eliminates that.
- To further improve the texture of the shortbread, it was returned to the oven to cool, to ensure all moisture is eliminated. The shortbread should not be stored until completely cold.
- A number of gluten-free batches were made, although fewer that those using regular flour. I have always had good results by substituting Doves Farm gluten-free flour on a 1-for-1 basis, and so it proved here. NB Gluten-free shortbread is extremely delicate when freshly baked, and will need a very careful approach (see below). However, if my advice is followed, once cooled they will be much more sturdy.
To summarise: All the shortbread versions were delicious, and unless you line them up side by side like I did, it is unlikely that you would be able to rate one over another, It’s really almost splitting hairs to rank them – everyone’s personal taste is different – so I won’t. One observation of mine, which you are free to discard, is that, for my tastes, the shortbreads were a little sweet, so in my perfect recipe (below), I reduced the amount of sugar to just 45g – it’s practically health food! With the sprinkling of sugar on the top, it made for the perfect amount of sweetness.
People with gluten sensitivity: At the risk of stating the obvious, almost all of the flours can be enjoyed – rice flour, corn flour, ground rice, fine corn meal, coarse cornmeal/polenta, ground almonds, ground hazelnuts – and as already mentioned, probably arrowroot and potato starch as well. A gentle reminder that the one exception is semolina. SEMOLINA is made from durum wheat and is NOT GLUTEN-FREE.
The Recipe
60g soft brown sugar
120g unsalted butter, chilled
180g plain flour – or gluten-free flour
60g your choice of additional flour
¼ tsp salt
a little caster sugar for sprinkling
- Line a small baking tin (18cm x 25cm) with baking parchment. Leave extra parchment overlapping the sides, to assist in moving the baked shortbread.
- Heat the oven to 160°C, 140°C Fan.
- Cut the butter into cubes and add to the bowl of a food processor fitted with a blade.
- Add the remaining ingredients to the butter and pulse briefly until the mixture resembles breadcrumbs.
- Tip the mixture onto the parchment, and press into an even layer.
- Use a round skewer to poke holes all over the surface of the slab of shortbread.
- Use the tines of a fork to mark the shortbread along the long edges of the tin.
- Bake the shortbread for 30 minutes, turning the tin around after 15 minutes to ensure even baking.
- Once the shortbread is baked, there are additional steps you need to take in order to make your shortbread the very best,
- Remove the shortbread from the oven. Keep the oven on.
- Sprinkle the surface of the shortbread with a little caster sugar.
- Using a very thin bladed knife or (ideally, in my opinion, a metal dough scraper), cut the shortbread into pieces. I cut mine lengthwise in half, then across into fingers 3cm wide.
- Allow to cool in the tin for 15 minutes.
- Gently slide the parchment out of the tin and onto a baking sheet. Smooth out the parchment.
- Using the dough scraper (or palette knife turned sideways), ease the shortbread pieces apart to leave a 5mm gap in-between. You want to gently push them apart, not try and slide anything underneath, because the shortbread will break. NB The gluten-free shortbread will be EXTREMELY delicate, take extra care at this point.
- Return the shortbread to the oven, switch the oven off and leave to cool until both oven and shortbread are completely cold. I baked most batches in the evening and let the shortbread cool overnight. If baking during the day, it will take between 3-4 hours.
- When completely cold, transfer the shortbread to an airtight container to store.
Bonus
On a personal level, I discovered that I much preferred the gluten-free shortbread made with the grains, specifically cornmeal, the texture being surprisingly moreish. I think the natural sweetness of maize and the greatness of the flavour when pairing with butter is a significant contribution. To this end, I decided to make one more batch, with cornmeal, and some raw butter (made from unpasteurised milk). In the 19th century all butter was raw butter, so I reasoned that this would be even more authentic (I had brought some raw butter back from France this summer). To cut a long, rambling story short – it was amazing. If you have the opportunity to get your hands on some raw butter made from unpasteurized milk, do it, and then make shortbread. It’s sublime. It is possible to get raw butter in the UK, but it is more expensive than regular, and in the current cost of living crunch, it might not be your number one priority. However, if you fancy treating yourself, then Sainsbury’s stocks Isigny Sainte-Mère salted raw butter, whilst Ocado has both salted and unsalted (doux).
My Perfect Shortbread
45g soft brown sugar
120g raw butter made from unpasteurized milk, chilled
180g plain white gluten-free flour
60g coarse cornmeal
¼ tsp salt
a little caster sugar for sprinkling
Make and bake as above.