
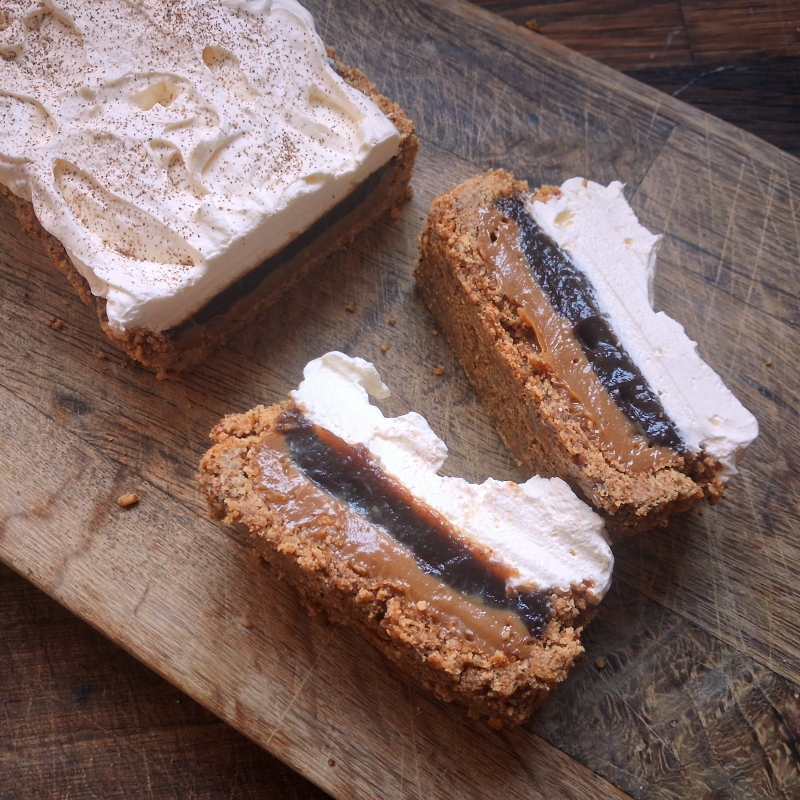
Welcome, welcome, welcome to the NEW and IMPROVED Apploffi Pie – Apploffi Pie Mark II if you will – this time made with spiced Apple Butter!
On the one hand, this is an update of the recipe of a couple of weeks ago, but there’s also one or two additional tweaks that might just tickle your fancy and make this recipe into the dessert of your dreams.
Over on the TimeToCookOnline blog, I’ve published an easy spiced Apple Butter recipe, because I just couldn’t get the thought of making the Apploffi Pie recipe using this rich and concentrated apple preserve out of my mind. The more I thought about it, the more I was convinced that it might actually be better than my version using fresh apple puree.
Long story short, it is.
It’s wonderful. The intense and concentrated appleyness is just what was needed to really bring the flavour, and stand up to the rich sweetness of the caramel. I used just a whisper of gelatin to ensure the thick paste held its shape during cutting. The buttery crust has also been tweaked (MOAR BROWNED BUTTER!) and then I looked again at the cream.
I thought it could do with a little flavouring of its own. The unsweetened coffee cream of the original really made the dish, and elevated it to a refined elegance. I thought using the spices used in the apple butter might go well, and bring a different flavour profile with the freshness of the cream. However, the ground spices I’d used also darkened the apple pulp considerably, and I wanted to retain the billowy-whiteness of the fresh cream, so this appeared something of an impasse.
The solution was a method I’d initially read of in the handwritten manuscripts, which was to steep whole spices overnight in scalded cream. By doing this, they could impart their flavours without leaving any visible signs. The flavouring from the whole spices is very delicate – a very subtle whisper, befitting the lightness of the cream – but it is definitely there. The downside is that this turns the process for making this dessert, even with ready-made apple butter, a two-day event.
I opted for cinnamon and nutmeg, but any whole spices that you like can be used. I infused the cream, chilled it overnight, strained out the spices and then whipped it to billowy peaks. Half was sweetened slightly and half left unsweetened. I tried each one with some extra assembled-but-as-yet-unused pie because I wanted to taste each cream together with all of the other flavours. And the result?
I DON’T KNOW!!

I went from one to the other, back and forth, many, many times. So. Many. Times.
Both were good in different ways.
Because I couldn’t decide, I thought maybe I was over-complicating things and went back to trying just plain whipped cream, both sweetened and unsweetened. But again, both were great.
This could have sent me into a depression of indecision but the upshot is, whatever you decide to do with the cream, it’ll be great. The gently-spiced cream is delicious and unusual and will be a wonderful surprise for your guests – sweetened or unsweetened. The plain whipped cream, with or without a little sugar, can be just the foil for all the strong flavours of the other ingredients, much like the plain shortcrust pastry is in the original banana version – it is very much needed in order for the other ingredients to shine.
Apple Butter Apploffi Pie
In the UK, you can order jars of apple butter online, but it’s arguably easier/cheaper/better making your own. I’ve copied most of the text over from the previous post, to save you having to switch back and forth, and have edited the recipes with the tweaks adopted during taste testing.
Browned Butter Pretzel/cracker base
250g unsalted butter – divided
120g pretzels
130g Salti crackers/ saltines
3 tbs packed soft dark brown/muscovado sugar
½ tsp salt
- Prepare your tin. I used a long, rectangular, fluted tin with a loose bottom. I lined it with a double layer of foil to ease lifting it out/serving. I made sure the foil was really pressed closely into the sides to ensure the details of the fluting would be reflected in the crumb shell. The shape and size don’t really matter. Smaller tins will just give deeper layers. It’s all good.
- Put the block of butter into a pan over a medium (level 5 on my induction hob) heat. You’re not going to use all of the browned butter, but it’s difficult to calculate how much fresh butter will make just the right amount of browned butter, because the water content of the butter isn’t set in stone. Much simpler to make a whole block into browned butter, use what you need and then you have delicious browned butter to use on other things.
- Allow the butter to melt, and continue to heat, stirring occasionally. The milk solids will eventually start to turn brown and will release an amazing, nutty caramel aroma. This will take about 10-15 minutes. It will happen quicker if you raise the heat, but this will also speed up the browning, making the line between toasty brown and burnt very sudden.
- Stir more frequently as the solids brown, and remove from the heat and pour into a bowl once they are sufficiently toasty.
- Set aside to cool. NB Keep giving your butter a stir as it cools, so the delicious browned bits are mixed throughout – otherwise they will just all sink to the bottom.
- Prepare the tin you are going to use. I like to line the tin with foil to help remove the pie once set and ready to serve.
- Put the pretzels, crackers, sugar and salt into a food processor and blitz to crumbs. NB if you’re using salted butter, reduce the salt to ¼ teaspoon.
- Tip the blitzed crumb mixture into a bowl.
- Stir your browned butter and measure out 180g (¾ cup + 2 teaspoons).
- If your butter has solidified, warm it with a brief zap in the microwave.
- Stir the butter into the crumb mixture until well mixed. It should clump together if you press it firmly. Press the crumb into the bottom and sides of your tin. I recommend pressing the crumbs into the sides first, and finish with the bottom. Use a flat-bottomed glass to get a smooth, compact finish on the bottom. NB Don’t feel you have to use all the crumb. Any left over can be served on the side for extra crunch, or indeed spooned into your mouth on the grounds of ‘cook’s perks’. *lying* Not that I’d ever do that.
- Heat your oven to 200°C, 180°C Fan, 390°F.
- Bake your crumb shell for 10 minutes, then set aside to cool. However, I’ve found that the toastiest crust is formed if you leave the tin in the oven, turn the oven off, prop the door ajar with a wooden spoon and let it cool in the oven until needed.
Caramel
1 tin sweetened condensed milk OR 1 tin caramel.
If you are catering for large number, you might want to use 2 tins, but in all honesty, the dish is so rich, one tin is enough for 8-10 servings.
- As I’ve already mentioned elsewhere, making your own caramel from sweetened condensed milk is both cheaper and better than buying it pre-made – the finished caramel is firmer and not as sweet. You do whatever suits your situation. Aldi stock their own unbranded tins that are half the price of the well-known named brand.
- To recap making your own: put unopened tins (do several at once and keep the spares in the cupboard for EBS (Emergency Banoffi Situations)) of sweetened condensed milk into a slow cooker and add water to cover. Cook on Low for 8-10 hours. Overnight is ideal. In the morning, switch off the slow cooker and leave the tins to cool in the water. You can, of course, take them out of the slow cooker to cool, but trying to lift out slippery, hot and heavy cans from almost-boiling water seems unnecessarily risky to me. And, just to belabour a safety point, UNDER NO CIRCUMSTANCES open a tin while it is hot.
- When ready to use, warm your caramel gently in a pan so that it is easier to pour. As it warms, stir to remove lumps. If you are using your home-made caramel, which has a firm set, you might want to use an immersion blender or hand mixer to get rid of any lumps. Tins of ready-made caramel have a softer consistency.
- Pour your smooth, warmed caramel over your cooled crumb shell. Spread it evenly and smooth over.
- Cover with plastic wrap so that it touches the surface of the caramel and chill until required.
Apple Layer
300g OR 1 rounded cup of apple butter
1 sheet of gelatine (I use Dr. Oetker Platinum Grade Leaf Gelatine)
OPTIONAL: the juice and/or zest of one lemon to sharpen the pulp
- Bloom your gelatine in water until softened.
- Put your apple pulp into a pan and heat through.
- Taste your apple butter and add the lemon zest/juice if liked.
- Drop the bloomed gelatine onto your heated apple pulp and watch it melt. Stir thoroughly to combine.
- Spoon your apple butter over the caramel layer and spread smooth.
- Cover your apple layer with plastic wrap and chill thoroughly in the fridge until set.
Cream Layer to finish
300ml/1 ¼ cups chilled double/heavy cream
1 x 5cm/2-inch cinnamon stick (optional)
1 whole nutmeg cut in quarters (optional)
2 tbs sifted icing/confectioners sugar (optional)
ground cinnamon to decorate
- If you want to try the spiced cream:
- Put the cream and the spices into a small pan and heat gently.
- When the cream is scalded – that is, when it’s almost at a boil but not quite – remove from the heat and set aside.
- Cover the cream with plastic wrap, so that it touches the surface of the cream – this will help prevent a skin from forming.
- When cold, store in the fridge overnight.
- When ready to serve, remove the whole spices.
- Whip the cream until it holds its shape.
- Taste and decide if you’d prefer to add a little sugar. Add just 2 tbs sifted icing sugar and stir to dissolve.
- Spread the whipped cream over the apple layer of your pie and swirl it artistically. Alternatively, just spread it like I did.
- Sprinkle the top of your Apploffi Pie with ground cinnamon and serve.

