
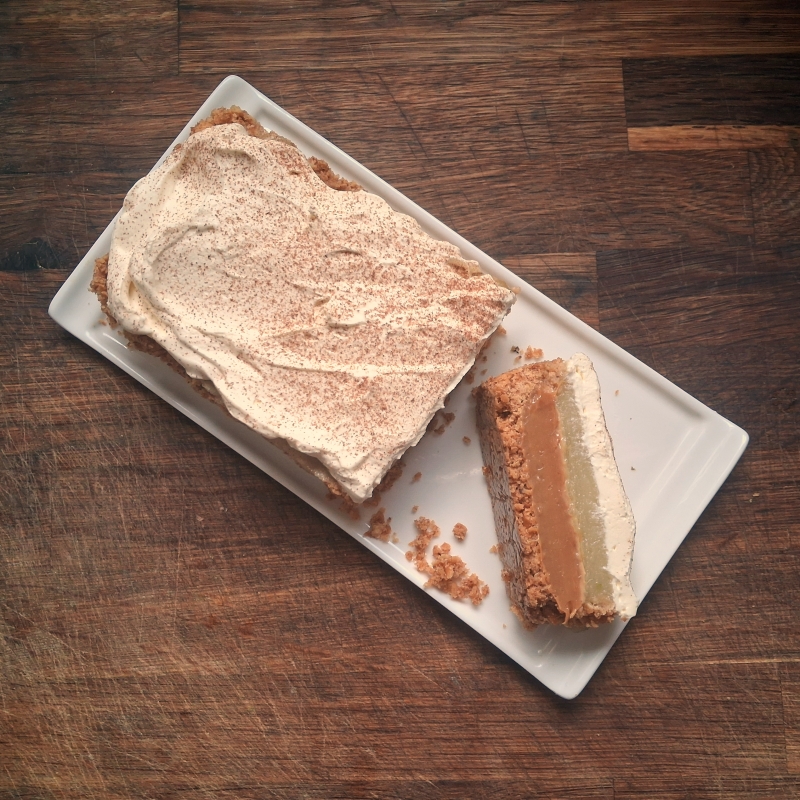
Recipe inspiration can come from many quarters. The prompt for today’s recipe comes in the form of four words in a newspaper article over 20 years ago.
Back in March 2006, The Guardian published a piece by Ian Dowding entitled “I Invented Banoffi Pie”. Dowding then spends the rest of the article chronicling how he did NOT invent the classic pudding loved by millions, rather how it evolved from an original pie – Blum’s Coffee Toffee Pie – from the famous Blum’s Bakery and Restaurant in San Francisco in the 1940s.
The owner of the restaurant where Dowding was employed felt that the dessert needed a little something extra, so experiments were conducted introducing various ingredients, including fruit.
“Apple was quite good” is the phrase that set me experimenting. There was no recipe included, although I have found examples by other people out there which involve a simple substitution of apple for banana, but I felt the dish deserved something more to set it apart.
There were a number of points to ponder:
- The base.
- The caramel.
- The fruit.
- The cream topping.
The Base
The original Banoffi Pie recipe called for shortcrust pastry, whose plainness was just the foil needed against the richness of the filling. Could this be improved upon in some way? I’m a real fan of the original shortcrust pastry, especially my version using cornflour for a proportion of the flour, as it makes it fabulously crisp and dry, and it is a great foil against the very rich sweetness of the caramel and banana. But using apple is a whole different kettle of fish. Banana is a really strong flavour, and while apples are characterised as being crisp and juicy they’re not really strongly flavoured. So I started thinking about a different kind of base that might contribute to the mix a little more than plain pastry. Since salted caramel is very much a thing in recent times, leaning into the savoury seemed a promising direction. I was reminded of the saltine crust of the Atlantic Beach Pie that was all the rage back in 2014, decided to mix in some pretzels for extra crunch, and then make the whole crust gluten-free, because why not? The Italian company Schar produces a wide range of gluten-free products, many of which are available on UK supermarket shelves. I chose their Salti crackers, which are like a cross between a Ritz cracker and a Saltine, and their pretzels. Obviously, regular crackers/pretzels are fine too.
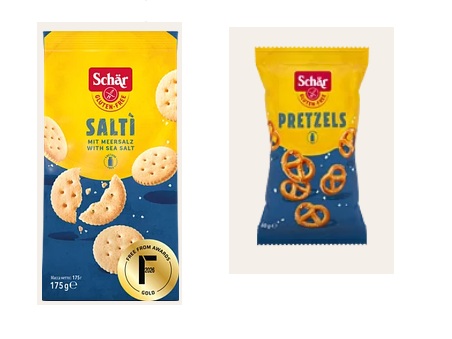
With the addition of a little salt, this was still pretty much a regular crumb crust, except I had a brainwave and opted to use browned butter. It turned a fairly straightforward crumb crust into a buttery, crunchy, salty, rubble-y, nutty delight that is just incredible against the caramel/apple/cream, and positively addictive on it’s own. Very autumnal and just the perfect pairing with all the other elements. I’m slightly obsessed with how good it is and am now thinking of all the other dishes I can use it with.
The Caramel
Classic. Not to be messed with. No notes.
That being said, you can choose whether to buy tins of caramel, or make your own, which is cheaper and less sweet than the tins of caramel. To make your own, put unopened tins of sweetened condensed milk into a slow cooker and add water to cover. Cook on Low for 8-10 hours. Switch off the slow cooker and leave to cool overnight. UNDER NO CIRCUMSTANCES open a tin while it is hot. Buy your unbranded condensed milk from Aldi – other supermarkets seem to be carrying the (much more expensive) named brand only these days.
The Apple
Which apple to choose? There are so many, dessert and cooking types. Jazz apples are my current favourite dessert apple with a crisp, clean and juicy bite. Rough-skinned russet apples have an almost nutty flavour, and go great with a variety of cheeses. My number one pick of fresh apples, however, is Bramley apples – a British cooking apple that is pleasantly sharp and breaks down into billowy apple fluff when cooked. You could slice and use it raw, but the juice might become a problem if left for a while, not to mention the discolouration, so cooked apple is probably the best way to go here. If you prefer a dessert apple, consider using a little lemon juice to sharpen it. To help prevent the juice from weeping out of your cooked apple, you can thicken your pulp with a little cornflour.
Other Apple Options
I thought of this after finishing up all the taste testing and using up all my apples, but you could also use gelatine to set your pulp. Bloom it in water, either sheet or powder, and then add to your hot apple pulp and stir well until it melts and is well combined. Pour over your caramel.
A third option would be to use Apple Butter, a favourite autumn preserve made mainly in the United States, which is already seasoned and spiced, and solid when cold. The apple flavour is much more rich and concentrated and is definitely something I would have chosen, had we not already scoffed all of the last batch I made.
The Cream
The unsweetened cream flavoured strongly with coffee was the original, classic recommendation. I was puzzled after reading the above article – and wasn’t sure if it was it supposed to go with the apple version as well. I had my doubts, so I decided to taste-test a number of flavouring options for the cream as follows:
-
- Coffee, (unsweetened) – Not a fan. I was going to go as far as ‘revolting’ but that seemed a bit harsh. For my palate, the bitterness just jars against the sharpness and freshness of the apple.
- Lemon (sweetened juice) – Had potential, as it goes well with apple, but it did not tie in with the caramel at all.
- Vanilla (unsweetened) – Pleasantly surprising. Having it unsweetened made it a little unusual, but it was great with both the apple and the caramel, and the sweetness of both more than made up for it.
- Unflavoured – I don’t know whether it was because all my flavouring thoughts had turned out to be less than a roaring success, but I decided to try just plain whipped cream – no flavourings, no sugar. And, ladies and gentlemen, we have a winner. It was great with the apple, great with the caramel, and great with the brown butter base. Sometimes the simplest idea is the best.
So there we have it. A cracking autumnal variation on a classic crowd-pleaser whipped up from just a 4-word prompt!
Apploffi Pie
If you already have a favourite Banoffi Pie recipe, you can just swap out the banana for the cooked apple. However, I strongly recommend trying the brown butter cracker crust – it’s a taste sensation!
Use whatever tin/dish you prefer. I used a rectangular, loose-bottomed fluted tart tin. As in the picture, you want to aim for roughly the same depth for each of the layers – crumb/caramel/apple/cream – Mine is about 1.5cm.
Browned Butter Pretzel/cracker base
250g unsalted butter – divided
60g GF pretzels
90g GF Salti crackers
2tbs soft dark brown/muscovado sugar
½ tsp salt
- Put the block of butter into a pan over a medium (level 5 on my induction hob) heat. You’re not going to use all of the browned butter, but it’s difficult to calculate how much fresh butter will make just the right amount of browned butter, because the water content of the butter isn’t set in stone. Much simpler to make a whole block into browned butter, use what you need and then you have delicious browned butter to use on other things.
- Allow the butter to melt, and continue to heat, stirring occasionally. The milk solids will eventually start to turn brown and will release an amazing, nutty caramel aroma. This will take about 10-15 minutes. It will happen quicker if you raise the heat, but this will also speed up the browning, making the line between toasty brown and burnt very sudden.
- Stir more frequently as the solids brown, and remove from the heat once they are sufficiently toasty.
- Set aside to cool.
- Prepare the tin you are going to use. I like to line the tin with foil to help remove the pie once set and ready to serve.
- Put the pretzels, crackers, sugar and salt into a food processor and blitz to crumbs. NB if you’re using salted butter, reduce the salt to ¼ teaspoon.
- Tip the crumb mixture into a bowl.
- Stir your browned butter and measure out 75g. Save the rest to use on popcorn or to make more crumb mixture! NB Keep giving your butter a stir as it cools, so the delicious browned bits are mixed throughout – otherwise they will just all sink to the bottom.
- If your butter has started to solidify, warm it with a brief zap in the microwave.
- Stir the butter into the crumb mixture until well mixed. It should clump together if you press it firmly. Press the crumb into the bottom and sides of your tin. Use a flat-bottomed glass to get a smooth, compact finish on the bottom. Fingertips are probably best for the sides.
- Heat your oven to 200°C, 180°C Fan.
- Bake your crumb shell for 10 minutes, then set aside to cool. The baking will help solidify and firm up your tart shell.
- Chill in the fridge until needed.
Caramel
1 tin sweetened condensed milk OR 1 tin caramel.
If you are catering for large number, you might want to use 2 tins, but in all honesty, the dish is so rich, one tin is enough for 8 servings.
- As I’ve already mentioned, making your own caramel from sweetened condensed milk is both cheaper and better than buying it pre-made – the finished caramel is firmer and not as sweet. You do whatever suits your situation.
- To recap making your own: put unopened tins (do several at once and keep the spares in the cupboard for EBS (Emergency Banoffi Situations)) of sweetened condensed milk into a slow cooker and add water to cover. Cook on Low for 8-10 hours. Switch off the slow cooker and leave the tins to cool overnight. And, just to belabour a safety point UNDER NO CIRCUMSTANCES open a tin while it is hot.
- Warm your caramel gently in a pan so that it is easier to pour. As it warms, stir to remove lumps. If you are using your home-made caramel, which has a firm set, you might want to use an immersion blender or hand mixer to get rid of any lumps. Tins of ready-made caramel have a softer consistency.
- Pour your smooth, warmed caramel over your chilled crumb shell. Spread it evenly and smooth over.
- Cover with plastic wrap so that it touches the surface of the caramel and chill until required.
Apple Layer
300g OR 1 rounded cup of fresh apple pulp (made from 3 Bramley apples OR 5-6 dessert apples) OR apple butter
OPTIONAL: the juice and/or zest of one lemon to sharpen the pulp
EITHER 1tbs cornflour mixed with 1tbs water OR 2 tsp powdered gelatine OR 2 sheets gelatine
- Put your apple pulp into a pan and heat through.
- Taste your pulp and add the lemon zest/juice if liked.
- If using cornflour…
- Mix the cornflour with the water until smooth.
- Stir the cornflour slurry into your warm apple pulp and cook for 1-2 minutes until the pulp thickens and no white from the slurry remains.
- If using gelatine…
- Bloom your gelatine in water according to instructions.
- Add the bloomed gelatine to your heated apple pulp and stir thoroughly to combine.
- If using apple butter, just warm it enough to make it pourable.
- Pour your thickened apple over the caramel layer and spread smooth.
- Cover your apple layer with plastic wrap and chill thoroughly in the fridge until set.
Cream Layer to finish
300ml chilled double/heavy cream
ground cinnamon to sprinkle
- Whip the cream until it holds its shape.
- Spread the whipped cream over the apple layer of your pie and swirl it artistically. Alternatively, just spread it like I did.
- Sprinkle the top of your Apploffi Pie with ground cinnamon and serve.

