18th Century Bath Buns

We don’t eat buns as frequently as we used to, and I think it is a great shame, because buns are synonymous with fun!

I spend a lot of time pondering different recipes, and one thing that causes much musing is the way recipes evolve in the UK, compared to, say, France.

French recipes tend to be rather rigid and proscribed. Definitions of what constitutes those two most recognisable of French baked goods – the croissant and the baguette – have been firmly established, almost set in stone. A croissant is a croissant, a baguette de tradition is a baguette de tradition, – there are rules, there is order, and there is never, ever, deviation. You want to tweak a recipe a little? Then you have to give it a new name. The French have no truck with ‘croissant-ish’ or ‘baguette de tradition adjacent.’ No messing about with rules that have been decided decades, even centuries, ago. Absolument pas!

In contrast, British recipes are a lot more open to interpretation. On the Books and Writing page of this website you will find, amongst other things, a paper I wrote on Pikelets, and how, over the centuries, the word has been used to describe different recipes for arguably quite different items. Also a paper on Summer Pudding, which has undergone its own transformation during its long and illustrious history.

Having given the matter a great deal of thought, I’m pretty comfortable with viewing recipes, especially British ones, as having a timeline. Some are long, some short, but throughout which adapts and changes with tastes and fashions. To illustrate this, in Great British Bakes, I included multiple recipes for Shrewsbury Cakes, an all but forgotten English shortbread that has a history spanning centuries. Others, such as the less-successful Crimson Biscuits (be honest – have YOU ever heard of them?) in Ann Peckham’s 1767 book, have timelines of alarming brevity. An added feature (frustration) with British recipes is that they might go by a number of different names, according to region, or indeed the one name may refer to numerous different dishes.

And so, after WAY too much preamble, we come to Bath Buns, whose history stretches back into the 1600s, and might be a genuine contender for Britain’s Oldest Bun, much to the probable dismay of fans of Sally Luns and Chelsea Buns, very much the Johnny-Come-Latelies of the eighteenth century pastry scene. The glitterati of Bath were happily taking the waters and chomping on this style of bun for the best part of a century before Dr Oliver invented his biscuit in an effort to improve the health of The Ton.

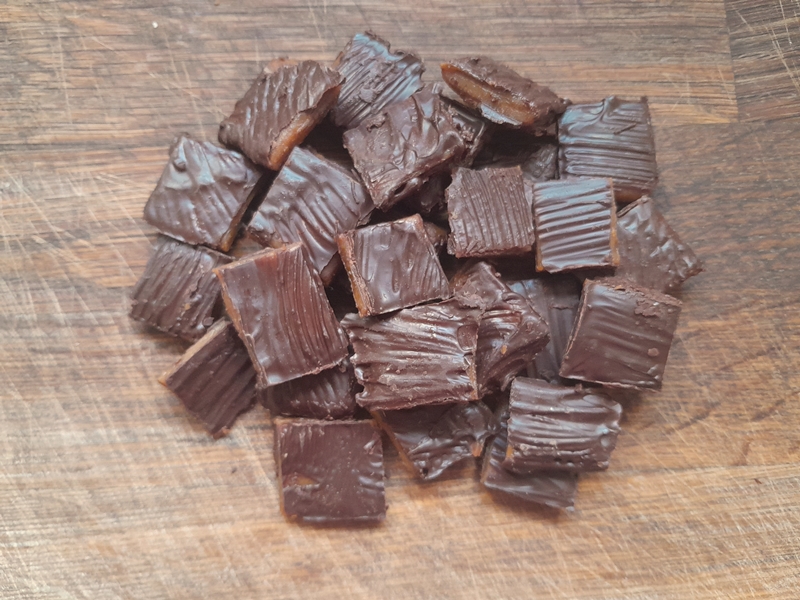
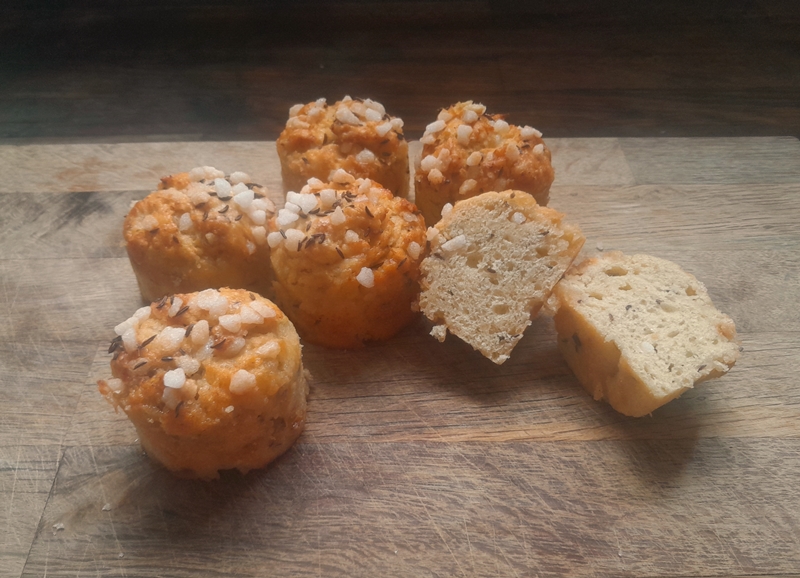
The Bath Bun of the late 17th century is rather different to the buns we might find in bakeries and tea shops today. The early Bath Buns were sweetened and flavoured with caraway comfits: seeds enclosed in numerous layers of sugar and enjoyed as sweetmeats and digestives. Today, a classic Bath Bun should retain the image of these candied seeds by being topped with pearled or candied sugar, which retains its colour and shape during baking, giving them a very distinct appearance. The time and effort required to create seeded comfits is considerable, and it is unsurprising to learn that they are no longer made. In imitation, I have found that using pearled/candied sugar and a sprinkling of unadorned seeds provides the sweetness, flavour and crunch of these forgotten sweetmeats.

The original Bath Buns were also incredibly rich with butter. Looking at recipes throughout the century, the most popular ratios ranged from an almost paltry one third of the weight of flour in butter, up to croissant-exceeding levels of 1.5 times the weight of flour in butter. Add in, as in the recipe below, a couple of pounds of caraway comfits, and these buns are probably a major cause of the gentry having to ‘take the waters’.

The first recipe below, the earliest I could find, is from an old manuscript dated to ‘late 17th century’ and has an equal weight of flour and butter. I scaled the recipe down, but there was still an alarming quantity of butter in not much dough. I broke my own rule too, in the baking, and did not bake it as written. Partly because I suspect that there is an error in the transcribing the original ingredients, and partly because I just couldn’t bring myself to put the full complement of sugar into the dough. I settled for half, and even that was a challenge – the buns were practically crystallized!

Earliest Bath Bun recipe I’ve found, from manuscript dated 1675-1725, MS1792, Wellcome Collection

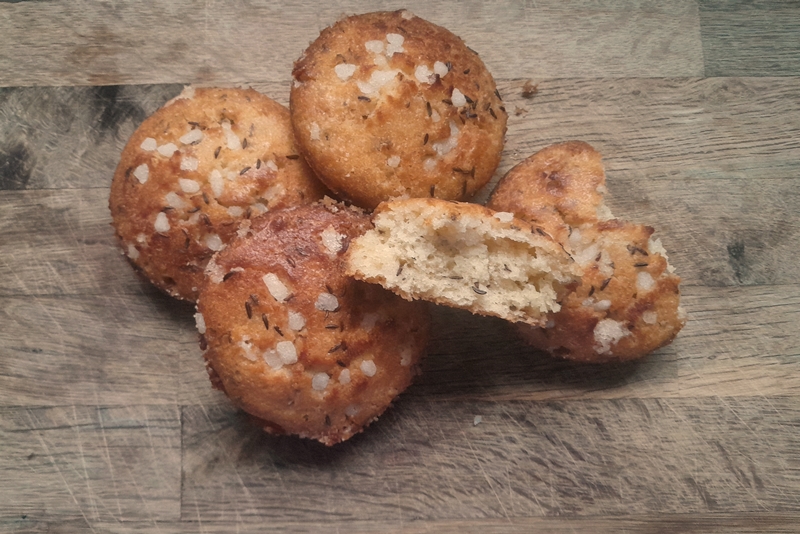
With all the eggs and butter and sugar the dough is incredibly soft – too soft to knead – and is practically spooned onto baking trays – something which later recipes mention frequently. The modern Bath Bun traditionally should have a rather rough appearance, and shuns the round perfection of Sally Luns or the even sugared, square edges of the Chelsea Buns. Due to all this richness, the dough can take a long time to rise and the finished texture is cake-like rather than bready, crunchy with the sugar crystals and with the unusual (to our modern palates) and distinct flavour and aroma of caraway.

Bath Buns recipe from manuscript dated 1675-1725, MS1792, Wellcome Collection

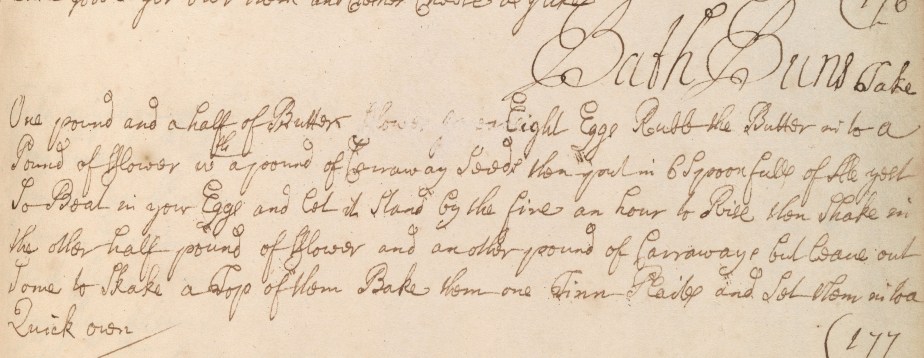
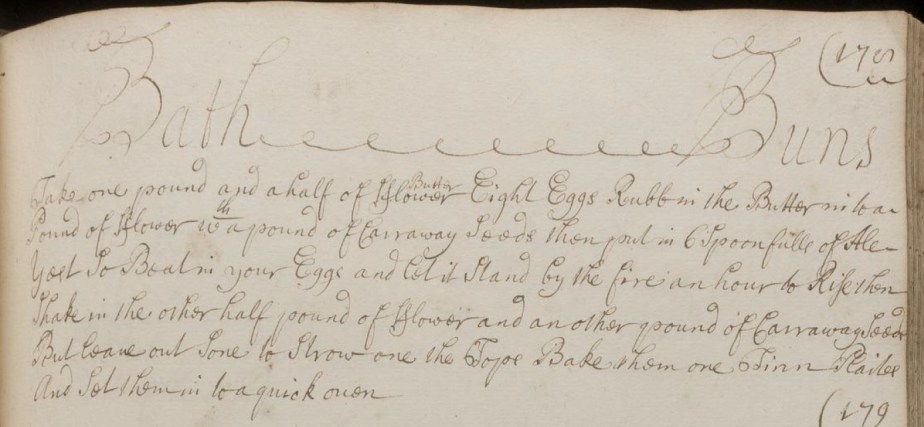
This recipe is particularly interesting because it has a twin, in another manuscript, on the other side of the Atlantic Ocean. This manuscript is one of the holdings at Yale University Library, and are both written in the same handwriting, possibly that of a scribe. They are mostly similar, but not exact copies. My guess is that one was copied from the other, with edits being made to exclude recipes not liked and including new recipes in the copy. With this in mind, I’m of the opinion that the Wellcome Collection manuscript is the copy. Below is the potential ‘original’.

Bath Bun recipe from MS Osborn fc181, Yale University Library.

All of which is an interesting detour, but doesn’t really get us an enjoyable Bath Bun that respects the traditions of the original, but is also acceptable to our 21st century tastes. Fear not, for galloping to our rescue comes a heroine for the ages: Mrs Bridget Ilbert (1712-1790), daughter of the 6th Earl of Devon and the wife of William Ilbert of Bowringsleigh, Devon.

Recipe for Bath Buns in Bridget Ilbert’s manuscript MS1821, Wellcome Collection

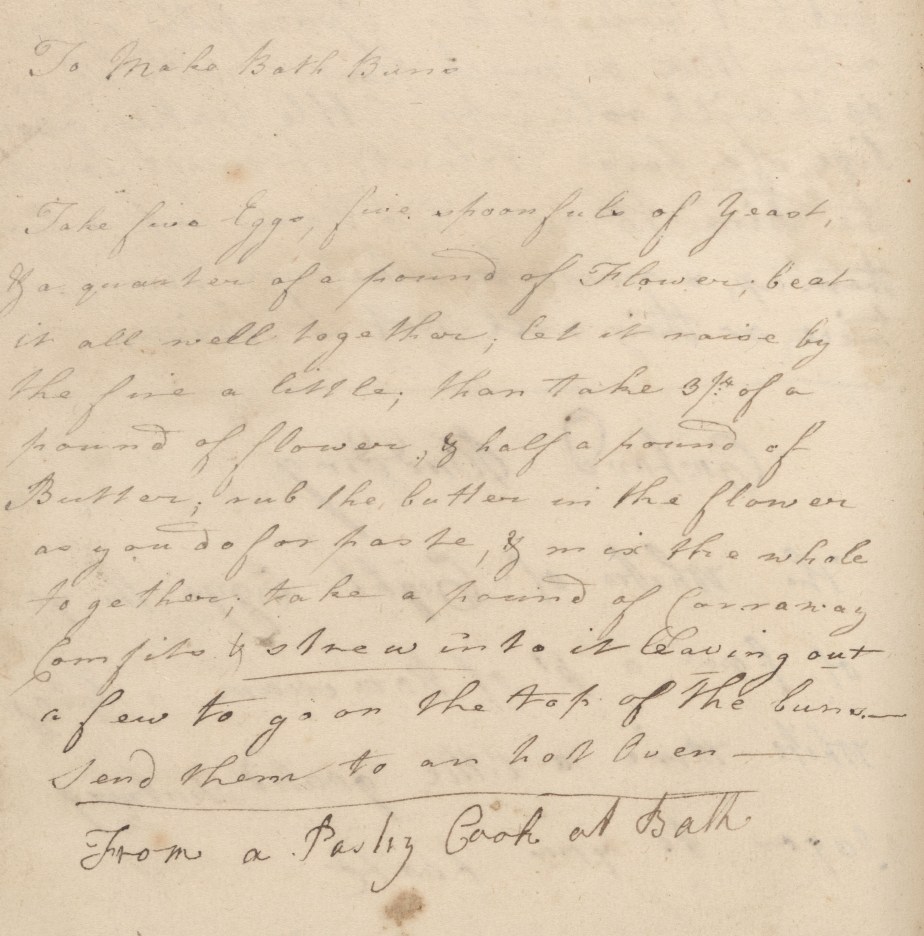
Bridget’s manuscript is held at The Wellcome Collection, and one of the recipes within is for Bath Buns. I particularly like this recipe because it comes with the added credentials of being “From a Pastry Cook at Bath” – and you can’t get much better than that. The recipe is undated, unfortunately, but it is not too big a stretch to allocate a date in the general area of early-to-mid 18th century.

Miniature bath buns adapted from a recipe MS1821, Wellcome Collection

Original 18thC Bath Buns

You can bake these on baking sheets or in silicone moulds. I used a mould like this, and had dough enough left over to make 4 free-form buns in the photo at the top of the page.

Makes 10-12 buns.

225g plain flour – divided
115g unsalted butter
1 sachet fast action yeast
2 large eggs
2tbs warm water
1tbs caraway seeds
100g crystallised sugar

1 large egg for glazing
milk
more crystallised sugar for  finishing
a few caraway seeds to sprinkle

  • Crack the eggs into the bowl of a stand mixer and add the yeast, water and 50g of flour.
  • Whisk together thoroughly, then set aside to rise for 20 minutes.
  • Prepare your baking items – parchment paper on baking sheets if baking ‘free-form’, butter your silicone moulds if using.
  • Put the remaining flour and the butter into a food processor and blitz until the mixture resembles breadcrumbs.
  • Add the butter mixture to the yeast mixture, together with the caraway seeds and mix thoroughly to a smooth paste.
  • Mix in 100g crystallised sugar.
  • Spoon onto/into your prepared baking items. 50g of dough makes an elegant size. Try and make your dough sit up high in as round a shape as you can make. N/A if baking in moulds.
  • Whisk the egg with half an egg-shell of milk.
  • Brush the egg glaze over the buns.
  • Add a scattering of crystallised sugar onto the top of each bun, followed by a pinch of caraway seeds.
  • Allow to rise for 30-45 minutes, depending on how warm your kitchen is. There won’t be a huge rise, because of all the sugar and butter.
  • Heat the oven to 180°C, 160°C Fan.
  • Bake for 15-20 minutes until golden brown. The bottoms of the buns will be slightly brown when baked.
  • Allow to cool for 10 minutes to firm up before transferring to a wire rack to cool completely.
  • Best served fresh.
  • Store in an airtight container.
  • To reheat before serving, microwave briefly, 10 seconds per bun, i.e. for 4 buns, zap them for 40 seconds.

Russian Toffee

This is a recipe that I’ve had on my ‘To Do’ list for years. I first came across it in an old, spiral-bound, Women’s Institute cookery book. Over the years I’ve seen many different versions, some with sour cream, some from the 19th century are made with “Swiss Milk” (the equivalent of modern condensed milk – although just to be confusing, some recipes sometimes list “unsweetened Swiss Milk”, thus making it equivalent to evaporated milk). It would be interesting to see how these recipes compare in texture to the classic fudge recipe posted elsewhere on this site.

But anyhoo…

From “The Art of Sweetmaking” by Beatrice Manders, L. Thorne & Co., London, 1901, pp31/2

This version, from 1901,  uses red currant jelly, which gives the toffee a lovely reddish tinge and a delicious tang of sharpness against the sweetness from all the sugar. Redcurrants are about to come into season, and this recipe might be useful to either use up last year’s jelly or make use of this year’s fresh batch. Alternately, you can just buy red currant jelly in the supermarket.

I deliberately chose this version because it dates to the height of Russian Toffee popularity, and I find it funny that the writer sees fit to include finger-wagging admonishment to take care to make it properly and not over-cook it, all the while failing to give proper instructions on how to do just that.

So! Let us talk about the intricacies of toffee making.

In short, there aren’t any. It is fundamentally about heating your sugar mixture to a particular temperature point in order to achieve a certain texture when it cools down. This is done by heating until sufficient moisture has evaporated, which will result in the sugar reaching a high-enough temperature.

The difficulty for our Victorian ancestors and earlier was, a lack of sufficiently detailed thermometers with which to aid their efforts. That’s not to say that sugar confectionery was unheard of in earlier times. Quite the opposite, in fact. Confectioners in Times of Yoreâ„¢ devised a visual scale to judge the heat of the sugar solution, and divided it into six levels, each with their own particular uses: smooth, pearled, blown, feathered, cracked and caramel. Francis Massialot’s “The Court and Country Cook” (1702) goes into detail across several pages describing the physical and visual cues of each stage.

Luckily for modern cooks, there are digital thermometers which can eliminate much of the guesswork. The difficulty lies in ensuring that the whole of your batch of boiling sugar has reached the correct temperature, hence the need to keep your mixture well stirred. Care must also be taken, if using a probe thermometer, not to accidentally touch the tip against the bottom of the pan, which will register as several degrees higher than the sugar itself.

All that remains is to decide on the consistency you wish to enjoy your toffee. You can take it to whatever degree you prefer. I have made this specific recipe four times, taking each batch to a different temperature and each has its pluses and minuses. Its up to you which you choose.

  • 120°C – toffee is soft and chewy at room temperature.
  • 130°C – toffee is firmer but still chewy. Thin sheets will bend easily.
  • 140°C – toffee is hard at room temperature, but will soften in the mouth and become chewy.
  • 150°C – toffee is brittle at room temperature, will eventually soften in the mouth and become chewy.

Personally, I prefer the last two: for toffee to consume as is I like to take it to 150°C; for toffee to use in other recipes, since it will have further heating in the oven, I prefer to take it to just 140°C.

One final point, toffee is hygroscopic. It loves to absorb moisture. As soon as it is cooled, you should pack it in an airtight container. A plastic ziplock bag might lack visual appeal, but it is marvellous for keeping your toffee shiny and free of stickiness for days on end. Alternatively, you can choose to either wrap your toffee pieces in waxed paper or cover your toffee in chocolate to prolong its shelf life.

Russian Toffee

This is just a half batch of the original recipe, and still makes a sizeable slab. I have elected to interpret ‘loaf sugar’ as soft, light brown sugar, for added flavour. After a few trial runs, I opted to omit the vanilla as it wasn’t adding anything to the flavour, and actually impairing the redcurrant flavour coming through. You could vary this recipe by using similar quantities of other sharp fruit jellies such as cranberry, black currant, quince or apple.

225g soft light brown sugar
115g unsalted butter
100g red currant jelly
150g double cream

200g dark chocolate (optional)

  • Line an edged baking pan with baking parchment. I used a pan 30cm x 22cm and it was more than large enough.
  • Add all ingredients to a pan and heat gently until the butter and jelly have melted and the sugar dissolved. A wide pan (like a frying pan) is better than a tall (saucepan) pan, as the greater surface area facilitates evaporation.
  • Increase the heat slightly (I suggest level 6 on a 1-9 scale) and stir gently but continuously until the mixture boiled for several minutes and has thickened slightly.
  • Check with a thermometer (if using a frying pan, you may need to tilt it in order to get an accurate reading of the sugar mixture temperature), and remove from the heat when your sugar mixture has reached your chosen temperature.
  • Pour the mixture onto the baking parchment in your prepared pan and allow to cool. NB If you wish to mark out your toffee into squares like in the top picture, don’t let it cool longer than 8 minutes before doing so, otherwise it will have set too firmly.
  • To mark out your toffee, lightly butter the blade of a long, straight-bladed knife and press down firmly into the toffee. About 1.5cm squares is a good size. The knife won’t easily cut all the way through, but will make strong enough marks so that it is easy to break into pieces when cooled.
  • After 20 minutes of cooling, cover the pan with cling film, or slide the whole thing, pan and all, into a large ziplock bag, and leave to cool completely (both Sainsbury’s & Tesco sell XL ziplock bags that are ideal for this).
  • If you’re planning to enjoy your toffee as is, then, once completely cold, you can give it a sharp tap on the counter and it should break into pieces quite easily. Be sure to transfer it to an airtight container to keep it free of stickiness.
  • If you’d like to cover it with chocolate, you can temper it relatively quickly and easily by using the seeding method and 200g of the chocolate of choice. I used dark chocolate. Also, Instead of dipping pieces individually, which is a Faffâ„¢, I opted to brush the tempered chocolate over the whole sheet, on both sides, then break into pieces once the chocolate had set and cooled. It doesn’t cover the toffee completely, but enough to keep it from dissolving into a sticky mess, and the contrast between the bitterness of the chocolate with the sweetness of the toffee and the tang of the redcurrants is delightful.

Hard Sauce

100g unsalted butter – softened
150g caster sugar
120ml cream sherry, or any favourite alcohol

  • Whisk the softened butter until extremely light and fluffy. This is easiest with a stand mixer and paddle attachment, but electric mixer is fine.
  • Add the caster sugar and continue whisking until even paler and fluffier.
  • Gradually add the sherry a tablespoon at a time until fully incorporated. The mixture should look like thick whipped cream.
  • You can either use as is, or do the following for a pourable sauce.
    • Spoon the mixture into a small pan and put over the lowest heat possible.
    • Allow the mixture to melt, and DO NOT stir. It will slowly form a creamy sauce the consistency of double cream.
    • Pour into a jug and serve at once.