Chestnut Apple Pie

Lady Grisel Baillie was a Scottish noblewoman who lived in the 17th/18th century. She was married to a Scottish MP, and became known to social historians for the meticulously detailed account books she kept, which  offer a glimpse into the cost of living during that time, including food and drink, servants wages, travel costs and entertainment. Lady Grisel was also something of a foodie, as she noted down many a menu from various dinners she and her husband attended.

Extracts of Lady Grisel’s household books were published by the Scottish Historical Society in 1911 and over the years I have dipped into this book many times, and have been somewhat frustrated that menus are recorded, but not recipes. She definitely had a recipe book, because the Scottish Historical Society lists it amongst her papers:

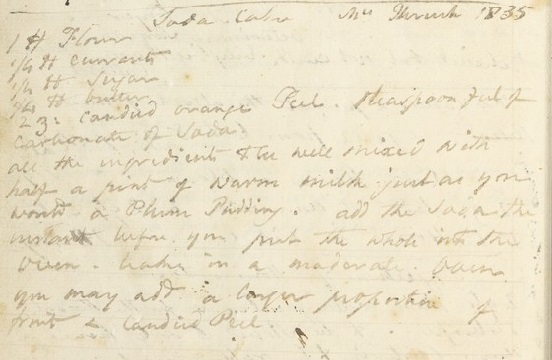
“Lady Grisell left three ‘Day Books’ folio size, the first running from 1692 to 1718 inclusive, and containing 442 pages ; the second from 1719 to 1742 inclusive, and containing 354 pages, and the third from 1742 to the date of her death (6th December 1746), continued by her daughter, Lady Murray. She also left books containing the accounts of expenses in connection with their journeys to Bath and to the Continent ; Books containing Inventories of Bottles, etc. ; a Book of Receipts ; a Book of Bills of Fare ; Books relating to estate management during the years 1742, 1743 and 1744, and many other Account and Memoranda Books.”

A few years ago, I revisited a manuscript at the Folger Library to study a recipe for Stilton Cheese that had caught my eye, (the results of which can be found in Petits Propos Culinaires 114, June 2019), and in the course of my research, discovered that the manuscript in which it appeared was the long-lost recipe book of Lady Grisel Baillie! The manuscript had been purchased by the Folger Library in June, 1959 from the London bookseller Francis Edwards, Ltd. for the princely sum of £35.00. More intriguing is what happened to it during the preceding 48 years, from 1911, when its existence was noted by the Scottish Historical Society, and its purchase and trans-Atlantic voyage in 1959, and why the current Mellerstain estate owners didn’t know where it was. Very mysterious!

The point of this extended preamble is that this recipe comes from that self-same, long-lost recipe book. It has been on my radar for a while, because it is a sweet pie with chestnuts, and when I spotted nets of fresh chestnuts in the shops this week, I was enthused to have a stab at it.

A Cheston Pye, from the cookbook of Lady Grisel Baillie, Folger Digital Image Collection, Ms W.a.111, p289, circa 1706.

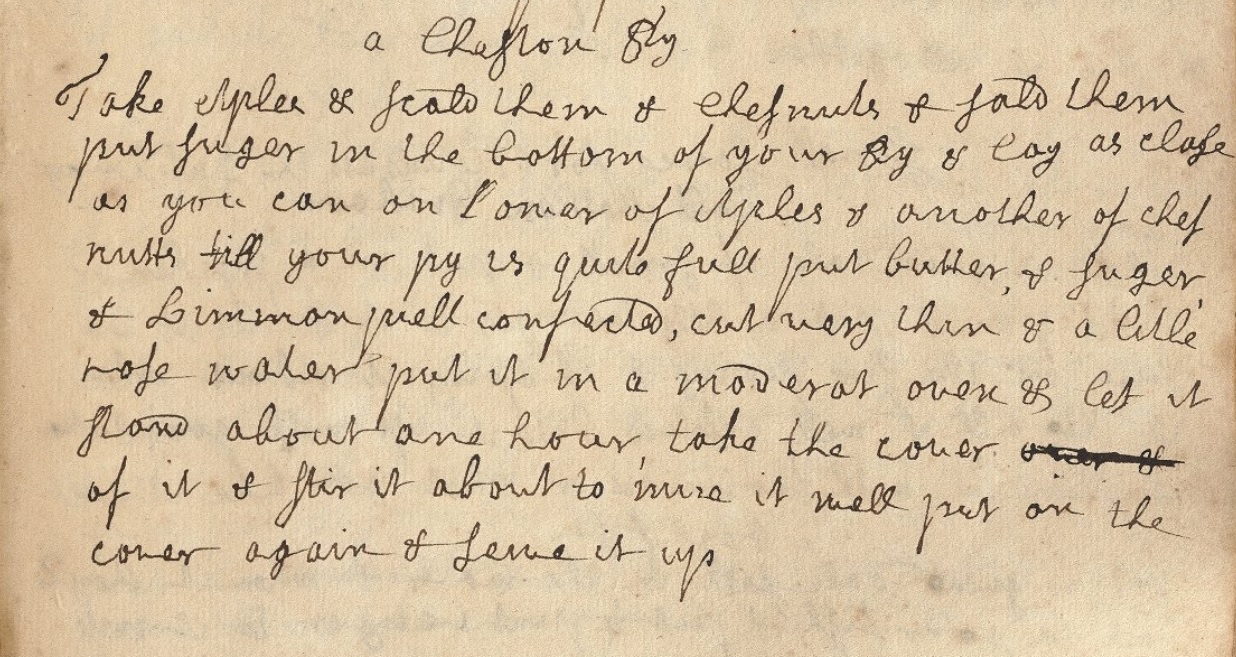
Which also brings me to the word of the day: scald. Both apples and chestnuts are scalded in this recipe, and after much hunting about reading other usages, the best definition I can come up with is: cooked gently in their skins. When scalded, the apple skin will peel off by itself freely, leaving the partially cooked flesh intact. I suspect this was done to prevent wastage, preserve flavour and minimise juice. Similarly, the chestnuts are scalded in order to soften them and to loosen both the skin and the pith surrounding the nut. This all sounds simple, but, from experience, left unsupervised, things can get a little tricky. It doesn’t take much for the water in which the apples are scalding to become too hot, thereby causing the apples to burst, and then you have to retrieve your apple pulp from the ‘soup’ in the saucepan. Scald the chestnuts for too long, and then you will have difficulty extracting them whole. This isn’t too much of a disaster, as the crumbled pieces are perfect for this dish, but if you were wanting them for another use – candying, for example – the wastage in broken nuts can get quite high.

Why you should make this pie

Well, it’s absolutely delicious, that’s why! It’s unusual, in that it is a sweet pie with chestnuts, and thus something of a novelty in modern recipes. During the long, slow baking, the pastry crisps up beautifully, and the chestnuts and candied lemon soak up some of the apple juice and become soft. The texture of the apples and the chestnuts is much more interesting that a regular apple pie and the contrast between the filling and the two different types of pastry is a delight. This pie embodies autumn in a deliciously comforting way, you’ll be elbowing your way back to the nets of chestnuts to make it again. Perfect for the upcoming holiday season!

Sliced of Chestnut Apple Pie
Slices of Chestnut Apple Pie: The pie slices very neatly when cold, and the chestnuts and candied lemon peel are shown.

Chestnut and Apple Pie

These quantities are for a 20cm diameter pie. You can obviously use as many or as few chestnuts as you like. You can, of course, shorten the prep time by using stewed apple and ready-cooked chestnuts. The only caveat to this I would add is that the ready-cooked chestnuts you can buy tend to be a little dark, whereas if you scald them yourself, they come out very similar in colour to the apple pulp.

If you’re making this from scratch, prepare the apples and chestnuts a day or so ahead, and then assemble the pie when required. The cooked apples and chestnuts will keep in the fridge several days.

Filling
4 Bramley Apples (or 600g unsweetened stewed apple)
1 x 400g net of raw chestnuts (or 300g cooked chestnuts)
30g candied lemon peel
30g unsalted butter
3-4tbs caster sugar
3tbs cornflour
zest of 1/2 a lemon (optional)

1 x box of ready rolled puff pastry
egg-white for glazing

Base Pastry
225g plain flour
60g cornflour
140g unsalted butter
ice cold water

  • Put the flours and butter into the bowl of a food processor and blitz until the mixture resembles breadcrumbs.
  • With the machine running, gradually add the cold water a tablespoon at a time until the mixture comes together in a ball.
  • Tip the mixture onto a floured surface, knead smooth.
  • Roll out the pastry to the desired thickness (5mm) and line a greased, 20cm pie tin. Ease the pastry into the corners of the tin, rather than stretch it, and allow the excess to hang over the edges of the tin.
  • Place in the fridge to chill until required.

To scald the apples

  • Put the apples, whole, into a saucepan and add just enough water to cover.
  • Lay a saucer upside-down on top of the apples, to keep them submerged.
  • Put the saucepan on a gentle heat (I use 5 on a 1-9 scale) and allow the apples to barely simmer for 30 minutes. Keep an eye on them, and if the skin starts to split, remove from the heat and the water immediately.
  • Lift the scalded apples out of the pan and set aside to cool.
  • When cool enough to handle, peel away the skin and then scoop all the flesh from the core.
  • Mash the apple pulp with a fork. You don’t need to make it puree-smooth, just get rid of the larger lumps.
  • Mix the sugar and cornflour together and then add to the apple pulp and mix thoroughly.
  • Taste the apple pulp and add more sugar to taste.
  • Set the apple pulp aside until required.

To scald the chestnuts

  • Using a sharp knife, cut a slit ito each nut, being sure to pierce bith the hard outer shell and the soft skin underneath.
  • Put the nuts into a saucepan and cover with cold water.
  • Set pan on a gentle heat, and simmer the chestnuts for 30 minutes.
  • Remove from the heat and allow to cool in the water.
  • Remove the chestnuts one at a time and peel away the softened shell and skin. Don’t worry if the nut doesn’t come out whole, as pieces are perfect for this recipe. Don’t drain the chestnuts, because the shells will harden quickly once out of the water, and make peeling them difficult.
  • Crumble the chestnuts into pieces – not too small – and store in a covered container in the fridge until required.

To assemble the pie.

  • Heat the oven to 180°C, 160°C Fan.
  • Slice the candied lemon peel into thin slivers. If you don’t have whole pieces, diced is fine, just make sure they’re not too big.
  • Divide the butter into three. Keep chilled until required.
  • Remove the pie tin from the fridge and trim the excess pastry. Leave about a 2cm overhang from the edge of the tin.
  • Fill the pie
    • Add a layer of apple pulp.
    • Add half the chestnuts in a layer
    • Add half the lemon peel
    • Dot over 1 portion of the butter in thin slices.
    • Add a layer of apple pulp.
    • Add half the chestnuts in a layer
    • Add half the lemon peel
    • Dot over 1 portion of the butter in thin slices.
    • Add a layer of apple pulp.
    • Dot over the last portion of the butter in thin slices.
    • Grate over the zest of half a lemon (optional). I like the lemony zing, but it can be omitted if you prefer.
  • Unroll the puff pastry and smooth out with a few strokes of the rolling pin.
  • Wet the edges of the shortcrust pastry with water.
  • Lay the puff pastry over the top of the pie and press the edges together gently.
  • Trim the puff pastry to the size of the shortcrust pastry.
  • Crimp the pastry edges as shown in the top photograph.
  • Cut out decorations for the top of the pie from the puff pastry offcuts and lay them on the pastry lid. I did a few apples and chestnuts.
  • Brush the top of the pie with eggwhite.
  • Bake the pie for 60 minutes. Turn the pie around after 30 minutes to ensure even colouring.
  • After a further 20 minutes, if your puff pastry isn’t quite cooked through, turn the heat up to 220°C, 200°C Fan for the last 10 minutes.
  • Remove the pie from the oven and cool on a wire rack for 10 minutes.
  • Remove the pie from the tin and allow to cool until just warm.
  • Serve with double cream.

Fruit Puffs

This recipe appears in the 17th century manuscript book of Lady Anne Fanshawe (MS.7113 at the Wellcome Collection), and is attributed to Lady Scarborough. What might appear, from the name, at first to be something pastry-based, is in fact a form of meringue.

Unsweetened fruit (I used apples) pulp is mixed with sugar and eggwhites and whisked until stiff and white. The recipe calls for this to be dropped in spoonfuls onto glass and dried in the oven, although I made adaptations for the modern kitchen. After a couple of practice runs, the result is, to all intents and purposes, an apple-flavoured meringue. Not as sweet as regular meringues, with the pleasantly tart flavour of sharp apples.

It is from the same recipe family as Apple Snow, with a slight alteration in porportions and a spell in the oven, and to my mind would be delightful served alongside that ethereal confection.

The main challenge with this recipe was the missing details. Apple and sugar quantities are given, but the instruction to beat them ‘with white of egg’ is open to interpretation. Additionally, “dry it in a stove” is hardly suffering from an over-abundance of detail. Hence the trial runs.

One of the batches I made whilst juggling baking times and temperatures turned a light caramel colour, which I suspect is not how the finished puffs should look, but proved to be absolutely delicious – crisp, delicate with a whisper of toffee apple. I’m counting that particular error as a win!

Apple and Caramel Apple Puffs

Fruit Puffs

Although I have only used apple here, the recipe does state that any fruit pulp can be used. My advice would be to choose pulp that has some bulk to it. Berries might prove too moist. Stone fruit, rhubarb and gooseberries would all be suitable, especially if tart, as the sugar content is quite high, and it would ‘cut through’ it nicely.

340g cooked cooking apples
225g caster sugar
2 large egg-whites (about 80g)

  • Puree the apple smooth with a stick blender. Sieve the puree if liked (I didn’t, but I was very thorough with the blender).
  • Add the remaining ingredients and whisk until light, white and stiff. I used a stand mixer on High and this took 10 minutes.
  • Heat the oven to 100°C, 80°C Fan. This temperature will be for the white puffs, for caramel puffs, increase the temperature to 140°C, 120°C Fan after 2 hours.
  • Add a decorative nozzle to a piping bag and spoon in some of the mixture. Pipe the mixture onto a baking sheet lined with parchment. There will be some shrinkage as the puffs dry out, so pipe them on the large side. For example, the white puffs in the top photo were 5cm tall when first piped. When dried, they are about 3cm tall.
  • Dry in the oven for 5-6 hours, depending on the size and how moist they are. Prop the oven door ajar by inserting the handle of a wooden spoon, for the first hour or so, to help dispel the moisture, (otherwise it stays trapped in the oven and slows down drying time).
  • After about 4 hours, remove the baking sheet from the oven and allow to cool for 5 minutes. The puffs should be firm enough by this stage to gently peel off from the parchment. Turn the puffs upside down and lay them back on the parchment, so that the bases can dry (about an hour). If you don’t let the puffs cool down first, you will squish them as you try to remove them from the paper. If the puffs aren’t firm even when cooled down, put them back in the oven for another 30 minutes and try again.
  • For Caramel Puffs, bake as above for 2 hours, then increase the heat to 140°C, 120°C Fan and bake for 1 hour. Check the colour/dryness and bake a little longer if still sticky.
  • Once the puffs are dried to your liking, store them in an airtight container. They will absorb moisture and become sticky if left in the open air for any length of time.

Soda Cake

This was a spur-of-the-moment bake this week, and in just over 1 hour after reading the recipe, I was taking this picture. Not as fast as scones, admittedly, but made from store-cupboard ingredients and comes together in mere minutes.

I found the recipe in a manuscript recipe book from The Wellcome Library, an impressively long-lived book containing over 100 years of family entries, starting around 1750.

The use of bicarbonate of soda became popular in the 19th century for its speed and ease of use, especially in areas where fresh yeast was difficult to come by.  This is a very early recipe – not the earliest I’ve found – that award goes to the recipe in “The Virginia Housewife” by Mary Randolph, published in the US in 1824, but this recipe has the added deliciousness of currants and candied peel.

Notes in the book suggest a larger proportion of peel and fruit can be used if liked, but I think it’s perfect as is. Best enjoyed fresh from the oven, it is delicious plain and also spread with an indulgent layer of butter.

You can add a little lemon juice to sour the milk if liked – the bicarbonate reacts best with acidity – or you could use buttermilk, a mixture of milk and plain yogurt or whey.

Soda Cake (1835) MS4645, Wellcome Library

Soda Cake

450g plain flour
115g currants
115g caster sugar
115g unsalted butter
60g candied orange peel – diced small
1tsp bicarbonate of soda
240ml milk/buttermilk/yogurt+milk/whey

  • Preheat the oven to 180°C, 160°C Fan.
  • Butter a square, 20cm tin or cover a baking sheet with parchment if you want to bake it freeform.
  • When the oven is heated, mix the flour, currants, sugar, peel and soda in a bowl.
  • Melt the butter in the microwave or in a pan on a low heat.
  • Add the milk (or whatever liquid you are using) to the melted butter and pour into the dry ingredients.
  • Mix thoroughly and either shape into a round on the baking sheet or in the tin, if using. Try and mound the mixture up into a dome shape, if possible, but don’t faff about too much The quicker you get the cake into the oven after adding the liquid, the more lift you’ll get from the reaction of the soda.
  • Bake for 50-55 minutes, until a skewer inserted into the middle comes out clean. Turn the sheet/tin around after 30 minutes to help with even colouring.
  • Cool the cake on a wire rack.
  • Enjoy warm.


Steamed Sponge

This recipe is for a traditional steamed sponge, the type many of us remember from our childhoods. So comforting in the winter months, with a blanket of hot custard draped over. They are a breeze to mix, but in these days when most people have a gas or electric stove-top, rather than an always-on range, the three-hour steaming time makes the cooking something of a marathon.

To make things easier for everyone, I’ve scaled this recipe down to make four individual puddings which can be cooked in a steamer pan over simmering water. Not only are mini puddings delightfully small and perfectly formed, they take a mere 30 minutes to steam. This means that they can be put on to cook as everyone sits down to the meal, and be ready by the time the main course is done and cleared away.

As if this weren’t cause enough to rejoice, this recipe can also be easily and infinitely adapted with different ingredients and flavours, even to the point of producing four differently-flavoured puddings from the one mixture. A few suggestions are included below, but do please experiment with your own creations too!

Steamed Sponge

Serves 4

The base instructions are for a plain sponge.

170g plain flour
1 tsp baking powder
70g butter
pinch of salt
85g caster sugar
1 large egg
½ tsp vanilla extract
120-150ml milk
softened butter for greasing the pudding bowls

  • Bring a pan of water to a simmer.
  • Put the butter, flour, salt, sugar and baking powder into the bowl of a food processor and blitz until the mixture resembles breadcrumbs.
  • Tip out into a bowl.
  • Whisk the egg and vanilla with the milk and stir into the dry ingredients until smooth.
  • Generously butter four individual pudding bowls and divide the mixture evenly amongst the prepared bowls.
  • Cut four squares of foil for the lids and make a single pleat in the middle. This will allow the sponge mixture to expand during cooking without forcing the foil cover off. Butter the inside surface of the foil, then fold over and around the pudding bowls.
  • Arrange the four bowls in the steamer pan, cover with a lid and place over the simmering water.
  • Steam for 30 minutes.
  • Peel off the foil and run a knife around the side of the puddings to loosen them.
  • Turn out the puddings and serve with cream, custard or pudding sauce of your choice.

Variations

These tweaks can be made to the basic vanilla sponge.

  • Jam Sponge – put a tablespoon of your favourite jam into the bottom of the pudding bowls before adding the sponge mixture. Have some of the jam warmed for serving.
  • Fruit Sponge – put 2 tablespoons of cooked fruit into the bottom of the pudding bowls before adding the sponge mixture. Again, have extra fruit to hand when serving.
  • Raisin decoration – dot large colourful raisins onto the sides of the buttered moulds before adding the plain sponge mixture.
  • Raisin sponge – Add 60g raisins to the plain mixture. You can also ornament the sides of the bowls as above.
  • Coconut sponge – add 60g dessicated coconut to the sponge mixture. Stick more coconut to the butter in the moulds before adding the sponge mixture.
  • Citrus sponge – omit the vanilla flavouring, add the grated zest of a lemon/orange/lime to the sponge mixture, together with the juice. Use a little less milk to mix. Add 60g of diced, candied peel of the same flavour if liked.
  • Candied fruit sponge – use 60g of candied fruit such as cherries, cranberries, pineapple, either on their own or mixed.

The following tweaks should be done by altering the method slightly and using the creaming method for the sponge (creaming butter and sugar, then eggs then dry ingredients), as the darker colour of the sponge sometimes highlights butter pieces that have not fully combined with the other ingredients.

  • Dried fruit pudding with toffee top. Use brown sugar to mix the sponge and add 60g of chopped figs, dates or prunes to the sponge mixture. Mix 30g of softened butter and 30g of soft, dark brown sugar and divide amongst the bowls before adding the sponge mixture.
  • Double jam sponge – Omit the vanilla, before adding the milk and egg, stir 3 tablespoons of jam into the sponge mixture. Add 1 tablespoon of jam to the bottom of each of the pudding bowls.
  • Chocolate sponge – Add 2 tablespoons of cocoa to the mixture and use a little more milk to mix. Add 60g chocolate chips to the mixture, or put them in the bottom of each pudding mould to form a chocolate ‘cap’. Alternately, half fill the moulds then add the chocolate chips in a well, and cover with more sponge mixture. This will make for a molten centre once cooked.
  • Coffee and Walnut sponge – Omit the vanilla, add a tablespoon of espresso powder or coffee essence to the sponge mixture and stir through 60g chopped walnuts. Put a half-walnut upside down in the bottom of each basin before adding the sponge mixture.

Fruit Charlotte

This is a deliciously simple, autumnal dessert that, although it can be assembled from very few, ordinary ingredients, ends up tasting so much better than the sum of its parts – the crisp, golden outside, hot and sharp insides and cool cream or hot, rich custard make this a dish of delicious contrasts. It is one of the many British desserts that evolved to use up stale bread and cooked fruit. Whilst the filling can be almost any fruit purée you have to hand, the construction needs to observe a few rules if it is going to look as impressive when served as it tastes.

Firstly, the fruit purée needs to be relatively firm and ‘dry’, with little or no visible liquid. If your cooked fruit is especially moist, then just set it in a sieve to drain – the resultant liquid can be sweetened and served as a pouring syrup or saved for use in/on other desserts. Alternatively, set it over a low heat in a wide pan, to help evaporate the excess liquid. If you think your fruit is still too soft, you could consider whisking in an egg yolk or two to help thicken it during cooking, making it more of a fruit custard.

The bread should not be plastic-wrapped and pre-sliced. The best charlottes are made when the bread can absorb some moisture from the filling in much the same way as it does in Summer Pudding, and sliced bread just doesn’t have a suitable surface for this. Not that having your bread sliced by a machine is bad – it can make it wonderfully thin and regular – just buy a whole loaf and get the bakery to cut it for you on their machine. If it’s not stale, just leave the slices you intend to use out on the counter for an hour, they’ll dry just enough. During baking, the dry outside will, thanks to the coating of butter, crisp up and turn wonderfully golden, and the inside will draw moisture from the filling and pull everything together, so that you have a firm pudding to turn out.

The final important consideration is the shape of the bowl in which you construct your charlotte. It needs to be both oven-proof and domed/tapering. Straight-sided charlottes are usually cold desserts such as the Charlotte Russe, which uses sponge fingers and a firmly set cream and is also thoroughly chilled before being served, which helps greatly with presentation. A traditional, domed pudding bowl, or individual pudding bowls, are ideal. Their tapering form is most conducive to maintaining an impressive shape of your hot charlotte. The fluted tins commonly marketed as brioche tins are also the ideal shape, with the added detail of fluting giving the turned-out dish a very elegant appearance.

This is an adaptation of Mrs Rundell’s recipe from 1808. Her version calls for raw apples, sugar and butter and is baked slowly for 3 hours with a weight on top to help compress the apples as they shrink during cooking. This recipe is much shorter, just over one hour, but this length of time is necessary for the bread to crisp, turn golden and be sturdy enough to support the fruit filling until serving time. Higher heat and baking for a shorter time means that, when turned out, the pudding slowly sags and collapses, like a Victorian matron with her corset removed. The use of an already-cooked puree makes preparation that much quicker and the cooked pudding less prone to loss of volume.

Fruit Charlotte cut

Fruit Charlotte

I used some apples from a friend’s garden for this recipe, and added no sugar – the sharpness was a great contrast against the rich, buttery crust. I highly recommend this approach. If your fruit is especially sharp, consider using a sweet custard as an accompaniment.

750g fruit pulp
stale white bread slices
softened butter

pouring cream or custard to serve

  • Preheat the oven to 200°C/180°C fan.
  • Butter the inside of your bowl(s) generously with softened butter.
  • Cut the crusts from the bread. Cut a circle or flower shape for the bottom of your bowl and put it in first. It will make for a neat top once you turn out the pudding, and also hide the ends of all the side pieces of bread.
  • Line your bowl(s) with the crustless bread. How you choose to do this is up to you. Personally, I keep the pieced of bread whole and patch where necessary. If your bread is fresh and springy, you can make things easier for yourself by using a rolling pin to flatten them slightly. If you are using individual pudding bowls, you might want to reduce this to a width of 1.5cm, as the smaller form will need thinner slices if it is still to look dainty when turned out.  Place the slices inside the pudding at a slight angle and press into the butter. Leave the excess sticking out of the top of the bowl for now. Make sure  there are no spaces or holes for fruit to leak through. You can see on the above photo that a little apple juice has squeezed out and been caramelised by the heat of the oven. Delicious, but a flaw if you’re after an unblemished exterior to your charlotte.
  • Fill the lined mould with the fruit puree.
  • Butter slices of crustless bread for the top of the mould. Fold the ends of the bread at the sides inward and place the final pieces of bread butter-side upward over the top.
  • Spread a little butter onto a sheet of parchment and place this butter-side down over your filled bowl.
  • Add a cake tin on top together with an oven-safe weight, such as a foil-wrapped metal weight or quarry tile.
  • Bake for about an hour until the outside of the buttered bread is crisp and golden brown and the filling piping hot. For individual puddings, bake for 30-40minutes.
  • Remove the weight/tin/parchment and bake for a further 10 minutes, to allow the lid to crisp up.
  • Remove from the oven and turn out onto your serving dish.

Fruit Pudding Pies

Mary Rooke, 1770

Pudding pies used to be immensely popular in the 18th century, and describe a particular style of dish where a pastry case is filled with a thick, flavoured and sweetened porridge and the two baked together. Obviously, you’re now saying to yourself, ‘Hang on a second, that’s a tart, not a pie’, and you’d be quite right, of course, but only by 21st century semantics. In addition, the ‘pudding’ of the title is to our modern eyes, rather vague, but to those of an 18th century cook, it was curiously specific, and not for the reason you might think.

Look up the word ‘pudding’ in the Oxford English dictionary, and the very first definition is: A stuffed entrail or sausage, and related senses. Yes, no mention of warm, comforting delicacies served at the conclusion of a meal, but innards and stuff in ’em! In the 17th and 18th centuries, pudding could be sweet or savoury. Echoes of these savoury puddings are still visible today in the black and white puddings sold in butchers shops. Sweet puddings included dense mixtures of dried fruits, peel, suet and spices, either stuffed into entrails or wrapped in floured cloths and simmered in water, as the traditional Clootie Dumplings of Scotland are today.

A more accurate description of pudding from these times would be that of a foodstuff of a certain texture, and so it is with pudding pies. The texture is more akin to a baked cheesecake, smooth and dense, but with just a fraction of the richness, they’re practically health food! In this instance, the filling is flavoured with the sharpness of gooseberries. I like the way it cuts through the denseness and really lifts and brightens the filling, but any smooth fruit puree will work well, the best results coming from sharply acidic fruit.

Original Recipe
Source: D/DU 818/1, Essex Record Office

Fruit Pudding Pies

112g ground rice
112g butter
225ml milk
112g sugar
100ml gooseberry pulp
4 large eggs
zest of a lemon
½ tsp freshly grated nutmeg
4 individual pudding, or deep tart, dishes lined with shortcrust pastry

  • Preheat the oven to 180°C/160°C fan/gas 4.
  • Stir the ground rice, butter and milk over heat until quite thick, then pour into a basin.
  • Add the sugar and stir together until cold.
  • Add the gooseberry pulp, well-beaten eggs, lemon and nutmeg.
  • Mix thoroughly.
  • Spoon the mixture into the pastry-lined dishes and smooth over.
  • Put the tarts onto a baking sheet and cover lightly with a sheet of foil, to prevent the filling darkening too much.
  • Bake for 20-30 minutes, depending on the size and shape of your pie dishes. Remove the foil after 15 minutes and turn the pie dishes around if they seem to be colouring unevenly.
  • Cool on a wire rack.
  • Serve warm or cold with cream or custard.

Fruit Sponge

Of all the puddings of my childhood, this is the one that I return to the most. There is something just so comforting and delicious in the simplicity of sweet sponge, sharp fruit and cold cream.

It’s so simple it doesn’t even have a proper name, just a terse description of the ingredients; fruit, sponge. But that simplicity in no way detracts from it’s appeal.

Like all good recipes, it is incredibly versatile and can be used with almost any fruit you have to hand, although my recommendation is for sharper fruits to highlight the contrast with the other elements.

If you have some prepared fruit to hand, it can be brought together in a reassuringly short space of time. Popped in the oven as you sit down to a meal, it will be ready by the time the plates are cleared. Alternatively and indulgently, you can sit hunched in front of the oven door, spoon in hand, watching it’s progress in anticipatory delight for a brief half hour.

Serves 4
500g apple puree
250g damson puree
1 large egg
The weight of the egg in softened, unsalted butter, caster sugar and plain flour
1tsp baking powder
milk to mix
caster sugar to sprinkle

double or pouring cream to serve

  • Preheat the oven to 180°C/160°C fan/gas 4.
  • Stir the fruit purees together and pour into an oven-proof dish. Smooth over.
  • Put the egg, softened butter, sugar, flour and baking powder into a bowl and mix thoroughly to a smooth batter.
  • Gradually stir in a little milk until the mixture achieves dropping consistency – when a dollop of batter drops easily from a spoon.
  • Pour the batter over the fruit and smooth the surface.
  • Bake for 35-40 minutes until the sponge is risen and golden.
  • Remove from the oven and sprinkle with a little caster sugar.
  • Serve with chilled double cream.

Posset Pie

Joseph Cooper, 1654

The surfeted Groomes doe mock their charge With Snores.
I have drugg’d their Possets.

Macbeth, Act II, scene II

The broadest description of a posset that I can think of is that of a hot syllabub: a thickened drink of either milk or cream, sweetened and flavoured with any of a number of alcoholic drinks and/or fruit, served warm.

In the Middle Ages it was seen as a winter warmer and it’s ability to make one feel good meant that over the years it segued into becoming borderline medicinal. It was recommended for insomnia, indigestion, as a purgative and of benefit when fasting.

Recipes abound, and the styles are as numerous as their intended uses: custard posset, cold posset, apple posset, whipped posset, froth posset, sack posset, soap sud posset, posset without milk, posset without wine, posset without milk wine or beer.

Thus far, Joseph Cooper is the only person I have found that turns posset into a dessert. Twenty years later Hannah Woolley would include this same recipe in her own book, adding a few of her own details to the method.

Apples are the recommended fruit, but this would work well with almost any fleshy fruit pulp; apricots in summer, for example, and dark, sharp damsons in autumn.

Posset Pie

Sweet shortcrust pastry
Eggwhite for glazing

500g fruit puree
2 large yolks
200ml double cream
50ml cream sherry
1tsp ginger
1/2tsp cinnamon
1-2tbs icing sugar
4 heaped tablespoons dried white breadcrumbs

To decorate
2cm matchsticks of candied orange, lemon and citron peel
sugar nibs

  • Preheat the oven to 200°C/180°C fan/gas 6.
  • Roll out the pastry and line a greased shallow tart tin. My favourite shape is long and rectangular (36 x 12 x 3cm).
  • Prick the bottom with the tines of a fork to prevent blistering and line with parchment paper and baking beads.
  • Bake for 10 minutes, then remove the parchment and baking beads and bake for a further five minutes.
  • Brush the insides of the tart with beaten egg white and bake for a further 3 minutes.
  • Turn the oven heat to 160°C/140°C fan/gas 3.
  • Mix the filling ingredients until smooth. Taste and add more sugar if liked.
  • Pour into the pastry case and smooth over.
  • Bake for 20-25 minutes until the filling is almost set. It will firm up while it cools.
  • Arrange your candied peel and sugar nibs on the pie as decoratively as you like.
  • Serve cold.

Apple Posset Pie
Apple Posset Pie Joseph Cooper, 1654

Fruitbowl Tea Loaf

Retrieved from  an old farmhouse baking book, this recipe has dates and walnuts, which make for a delicious tea loaf, but can also make it a little dry, almost dusty, especially if the walnuts aren’t in their first flush of youth. Deliciously, the inclusion of mashed bananas helps with the moistness and the apple sauce really brightens the flavour with its freshness. Neither flavour dominates, making the loaf wonderfully flavoursome. Finally, it is brought to a rich, batter consistency by a splash-ette of lager – and indeed, Lager Loaf was the original recipe title – but that sounds too much like Lager Lout to my ears – which is far from tasty – so I feel justified in renaming it.

And it is a distinct improvement to eat spread with butter, with a cup of something hot.

Fruitbowl Tea Bread

You don’t HAVE to make this with the apple – if you have the eggs, just use two and no apple.

85g unsalted butter
1tbs golden syrup
85g soft brown or light muscovado sugar
1 sharp eating apple, e.g. Jazz or Braeburn
1 large egg
280g self-raising flour
¼ tsp bicarbonate of soda
½ tsp cream of tartar
pinch of salt
150ml lager
2 ripe bananas, peeled and mashed
125g chopped dates
50g walnuts, roughly chopped

  • Preheat the oven to 180°C, 160°C Fan.
  • Grease and line a 1kg loaf tin with parchment paper. Tear off a second piece of parchment and make a fold down the middle. This piece will be used during the baking.
  • Peel and core the apple, then grate finely into a small saucepan. Cover with a lid and heat gently until the apple has broken down into a puree. Sieve to remove any lumps. If you’re impatient, whizz it in a small food processor.
  • Gently warm the butter, syrup and sugar either in a pan or using the microwave, until melted.
  • Add the lager and apple puree, then whisk in the egg.
  • Mash the bananas. Make sure your dates and walnuts are also chopped and ready.
  • Sift the flour, bicarbonate of soda and cream of tartar into a bowl.
  • Add the liquid mixture and stir thoroughly.
  • Quickly fold through the bananas, dates and nuts and pour into the prepared tin.
  • Place into the oven and prop the second piece of parchment over the tin with the fold at the top, rather like a tent. This will prevent the top of the loaf from becoming too dark during baking.
  • Bake for 30 minutes, then remove the ‘tent’ and bake for a further 15-20 minutes.
  • Be sure to test the cake for done-ness using a cocktail stick/skewer/cake tester before removing from the oven – the moisture in the bananas and apple will make it very moist, so be sure it’s baked all the way through, especially towards the bottom.
  • Allow to cool in the tin for 10 minutes before removing to a wire rack to cool completely.
  • Serve sliced and buttered, and store in an airtight container.

Bara Brith

This week it’s the classic Welsh speckled bread Bara Brith. Nowadays, this is usually made using baking powder as the leavener, but personally I prefer the more traditional yeast.

And bonus! There’s two recipes for you to choose from!

When looking at an old recipe, I usually study the range of recipes available and select the one that, to my imagination, sounds the nicest. If there is a tie, then I will make both and decide which makes the cut by taste. This time, however, it was too difficult to decide, so I chose not to choose and leave that decision to you.

Both recipes have their strongpoints, not least from their provenance and pedigree.

On the left of the photo above, we have the recipe from Walter Banfield’s classic book “Manna”: A Comprehensive Treatise on Bread Manufacture (1937), a book admired by Elizabeth David and breathtaking in its breadth and scope. It is based on additions made to ordinary white bread dough after its first proving. The large quantity of fruit and peel contrast brightly against the white of the dough and make for a very sturdy slice that will keep moist for a long time.

On the right of the photo, a possibly more authentic Bara Breith from Mrs E.B.Jones, who, for many years, ran the Powys Temperance Hotel on Market Square, Llanrhaeadr-Ym-Mochnant in the first half of the 20th century. The recipe was collected by Dorothy Hartley and included in her iconic book Food in England, first published in 1954. As can be seen from the picture, this recipe isn’t as heavily fruited as the first one, but it has the added interest of being made from half wheat flour and half oat flour (finely ground oatmeal). Against expectation, the crumb is very light, making it a much more delicate slice.

I love the richness of the fruit in the bread dough version, but also really enjoy the delicate flavours of Mrs Jones’ version. I suggest you make both and decide for yourself.

Both loaves will keep well wrapped in parchment and foil, in a cake tin. Both are best enjoyed sliced and buttered, with a hot cup of something in front of a roaring fire.

Mrs Jones’ Bara Brieth

Don’t feel the need to order oat flour especially for this recipe, you can make your own by blitzing rolled oats in a spice grinder, or just use medium oatmeal for a more robust texture.

60g candied orange peel – diced
100g currants
70g sultanas
225g strong white flour
225g oat flour or medium oatmeal
115g lard
115g Demerara sugar
¼ tsp salt
1 large egg
1 tsp mixed spice
1tsp soft brown sugar
30g fresh yeast

  • Put the peel and the fruit into a bowl and pour over boiling water. Set aside to plump for about 30 minutes.
  • After 15 minutes, cream the yeast and the soft brown sugar together.
  • Put the flours and the lard into the bowl of a food processor and blitz until the mixture resembles breadcrumbs.
  • Tip into the bowl you will be using for mixing and add the Demerara sugar, spice and salt
  • Drain the fruit, retaining the water, and use it to mix the dough. Keep the fruit warm in a low oven while the dough is kneaded.
  • Add the yeast to the flour mixture with the egg, lightly whisked. Use the (by now just) warm fruit-soaking water to mix everything to a soft dough.
  • Knead for 10 minutes.
  • Mix in the warm fruit, cover with plastic and allow to rise until doubled in size. Due to the richness of the ingredients, this may take anything between 1 and 2 hours.
  • Grease a large loaf tin.
  • When the dough has risen, tip it out and pat down to deflate. Form into a loaf shape and lay into the prepared tin.
  • Cover lightly and allow to rise for about 45 minutes.
  • Preheat the oven to 170°C, 150°C Fan.
  • Bake for 30 minutes.
  • Turn the tin around 180 degrees and lay a sheet of foil lightly over the top, to prevent the loaf browning too much.
  • Bake for a further 25-30 minutes.
  • Remove from the tin and if the bottom doesn’t sound hollow, return to the oven for 5-10 minutes to crisp up. You can place the loaf directly onto the oven bars.
  • Cool on a wire rack.

Walter Banfield’s Bara Brith

450g strong white flour
½ tsp salt
1tsp soft brown sugar
30g fresh yeast
warm water to mix

115g lard in small cubes
5g mixed spice
65g Demerara sugar
1 large egg
300g currants
90g sultanas
90g raisins
60g candied orange peel – diced
50g plain flour

  • Cream the sugar and yeast together with a tablespoon of the flour and a little warm water and set aside to work
  • Mix with the rest of the ingredients into a soft dough.
  • Cover with plastic and set aside to rise for 1 hour.
  • After 30 minutes, spread the fruit (not the peel) out on a baking sheet lined with parchment and put into the oven on its lowest setting, just to warm through.
  • Grease a large loaf tin.
  • When the dough has risen to twice its original size, add in the finely cubed lard, spice, egg and sugar and knead smooth.
  • Add the warmed fruit and peel and mix thoroughly.
  • Sprinkle over the flour and mix thoroughly.
  • Shape into a large loaf and place into the prepared tin.
  • Allow a long second rise, of 1-2 hours.
  • Preheat the oven to 170°C, 150°C Fan.
  • Bake for 30 minutes.
  • Turn the tin around 180 degrees and lay a sheet of foil lightly over the top, to prevent the loaf browning too much.
  • Bake for a further 25-30 minutes.
  • Remove from the tin and if the bottom doesn’t sound hollow, return to the oven for 5-10 minutes to crisp up. You can place the loaf directly onto the oven bars.
  • Cool on a wire rack.