
Recently, I was browsing my collection of manuscript recipes, looking for something suitable for the upcoming Mothers Day, also known as Mothering Sunday.
I have already posted about the original Simnel Cake, which has more recently morphed into a marzipan-layered fruit cake. But to be honest, my reaction to thoughts of doing anything with marzipan is, pretty much as it has always been:

I know it’s very much a part of traditional baked goods in the UK, but exposure to the neon-yellow, heavily almond-flavoured monstrosity of my youth has left its scars. Some day I shall get around to rehabilitating my taste-buds, but for now, to paraphrase the words of Syrio Forel: What do we say to things with marzipan? Not today.

So I decided to go another way and make something that many manuscript authors decide is important enough to be recorded in their book: a recipe from their own mother. The recipes they wish to preserve are many and varied, ranging from jams and marmalades, custards, pastry, cheesecakes and puddings, to spiced meats, possets, biscuits, cakes and more.
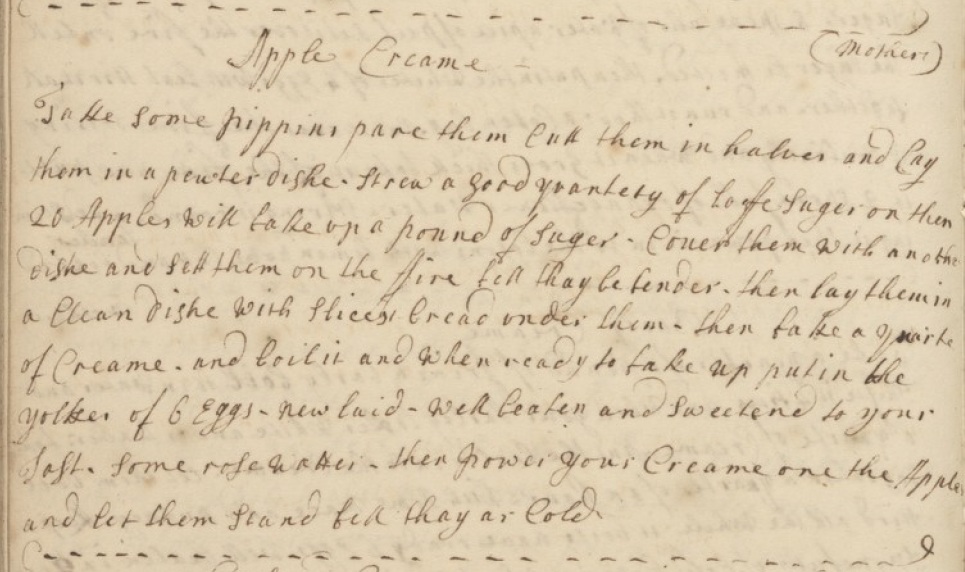
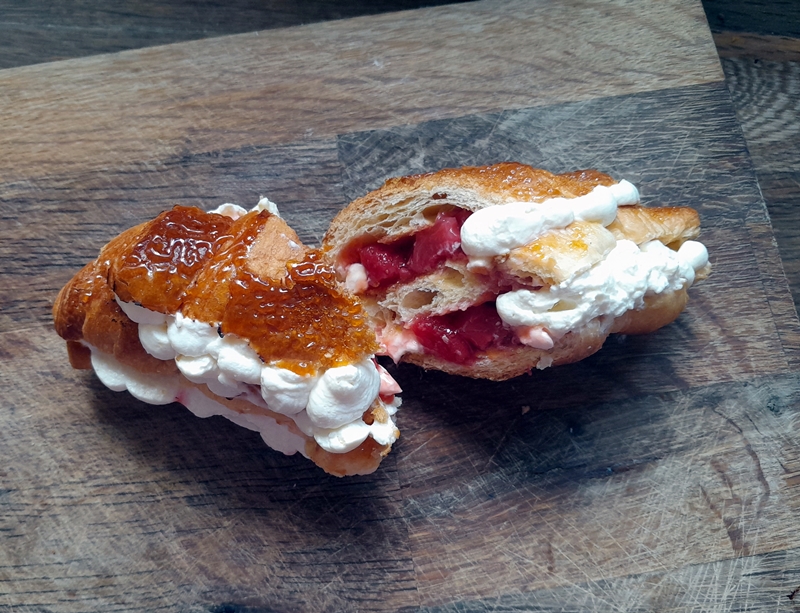
This recipe from Deborah Branch’s manuscript, dates from 1725, the early years of the Hanoverian Era. It is a simple recipe, with arguably just three ingredients, and it suggests to me that it is a treasured childhood memory: Cooked apples, bread, custard. It is served cold, and can be assembled just before serving, if more suited to your circumstances. The textures play a large part in the enjoyment of this recipe: the firm, coldness of the cooked apple, the lightness of the cream and the crunch of the toasted bread are very ‘toothsome’, as they used to say. The recipe suggests assembling and then chilling, however this will impact the crispness of the toasted bread, so I would recommend making and chilling everything, then assembling when required.
A word or two about the ingredients.
- Apples: I’ve tried this recipe with both Bramley cooking apples and (Cox’s) eating apples. Both are good in different ways. The Bramleys are much bigger (so fewer are needed) and are less prone to holding their shape. Time the cooking just right and they have a fantastic texture, soft on the outside and firm yet still cooked in the centre, but even if they tip over into fluff, their flavour is still wonderful, especially if you’ve used either light or dark brown sugar. Eating apples hold their shape much better and are a great contrast against the crisp bread and creamy custard. Personally, I prefer to use Bramley apples – their sharpness is a great contrast against the sweetness of the toasted buns and cream.
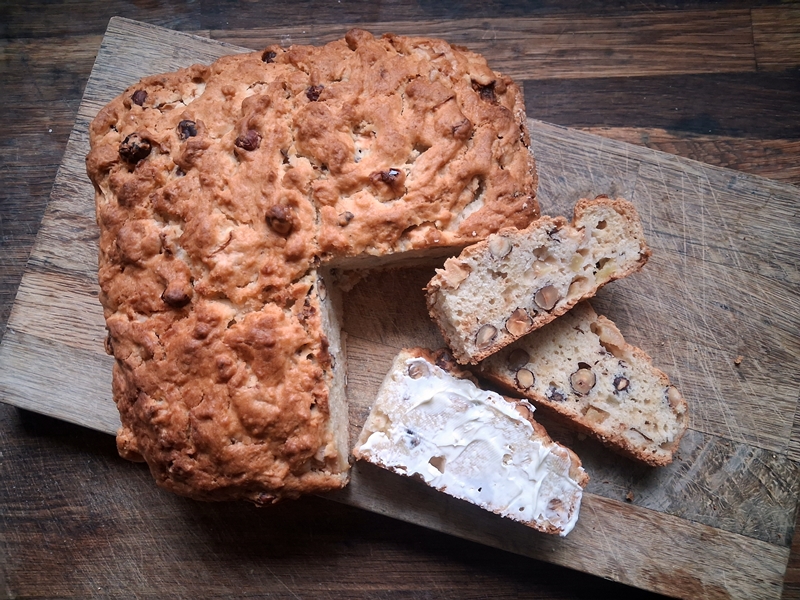
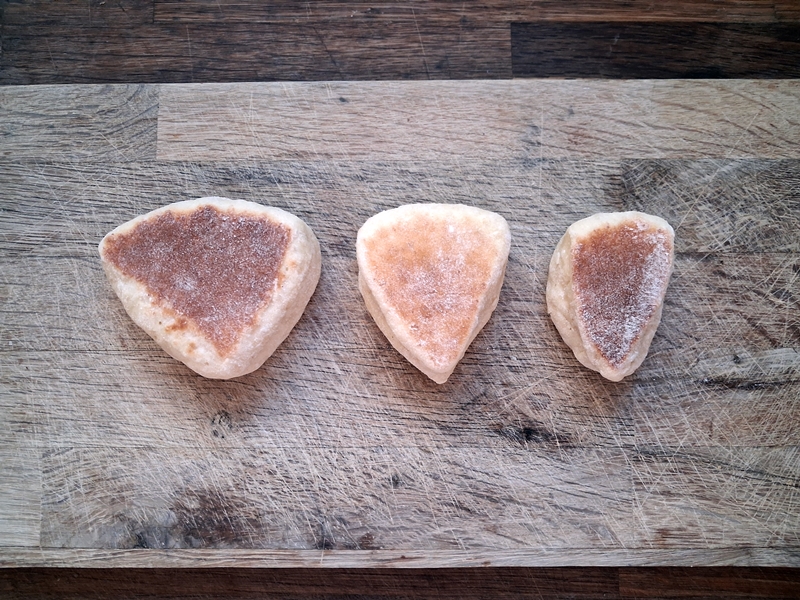
- Bread: the original recipe just calls for ‘slices of bread’ to act as a base, but this didn’t seem to offer much, especially not in texture. I recently read a recipe for a trifle that had the bread toasted, and I thought that sounded much more exciting (yes, dearest gentle reader, I really did just admit to toast sounding exciting. Hey, I live in the wilds of the countryside, we gotta take our entertainment where we can!). You can tinker with this recipe merely by changing the bread you choose – airy sourdough, an enriched brioche, even dark rye bread or malt loaf. I chose to go with spiced hot cross buns, as a nod to the Easter season in general, and I can highly recommend this option.
- Cream/Custard: despite the title, the cream proved to be a rich custard made with egg yolks and cream. I’m always pondering the type of cream they mean in old recipes, because here in the 21st century we’re rather spoiled for choice. But you can use the same tweaks here as for the bread option: I used single/pouring cream, but you could enrich it by switching to whipping, double, extra thick or even clotted for a real indulgence. The ‘set’ wasn’t very firm – and I liked that – but if you prefer a set to your custard cream, just add a rounded teaspoon of cornflour (mixed to a slurry with milk) to the eggs and sugar.
Apple Cream c.1725
This recipe can be customised to both your liking and your needs. I offer the following quantities as a guide to serving four people, but the quantities of each can be doubled for large appetites/extra portions.
Bramley Apples x 2 ( ½ an apple per person)
OR
Eating/Dessert Apples x 4 (1 apple per person)
4 tbs sugar – caster, light or dark brown
2 x Hot Cross Buns
300ml single cream
3 large egg yolks
1-2 tbs caster sugar – or more to your taste
flavouring – 1tsp rosewater/orange flower water/vanilla/lemon zest – or other
1 rounded tsp cornflour & milk to mix (optional)
- Cook the apples: Peel the apples and cut into halves. Remove the cores. Sprinkle over sugar to your taste. About 1tbs per half-apple.
- Add the apple halves to a pan with a lid (preferably a glass one so you can easily keep an eye on the apples as they cook.
- Sprinkle 1tsp water per apple into the pan, just to keep the sugar from scorching until the juices start to run.
- Cover the pan and turn the heat to low (4 on my hob).
- Allow the apples to poach gently until just cooked through – for Bramley Apples about 15 minutes, eating apples will be closer to 20 minutes.
- Switch off the heat and allow the apples to cool in the pan. When cold, transfer them and any juice to a dish and chill in the fridge until required.
- Toast the bread. Tear your buns/bread into small pieces and spread out on a baking sheet.
- Toast the bread under the grill until crisped and turning brown at the edges.
- Cool on the baking sheet and when cold, transfer to a ziplock bag or airtight container until needed.
- Prepare the cream. Pour the cream into a small saucepan and bring to a gentle simmer – when the edges are just bubbling.
- While the cream is heating, whisk the yolks with the sugar. If you’re using cornflour, add the slurry now.
- Pour the scalded cream onto the yolks, whisking, then return the mixture to the pan.
- Whisk the custard over medium heat until it has thickened. Take care it doesn’t boil, as it will turn the cream grainy.
- Remove from the heat, stir through your flavouring and set aside. If not assembling immediately, cover the surface with plastic wrap to prevent a skin forming.
To Assemble
You can make this recipe in a large trifle bowl, but I think individual servings are much more attractive.
- Cover the base of your dish with toasted bread/buns. If your bread has softened put it into the oven to crisp it up. Alternatively, prep and chill the cream and apples beforehand and toast the bread just before serving.
- Arrange your cooked apples (or apple fluff if your Bramleys went a bit too far) over the toast. Drizzle any juices over as well.
- Spoon your custard cream over the apples. I like to leave gaps here and there to allow the other ingredients to peep through.
- Top with chopped/flaked nuts, sugar crystals, candied fruit or whipped cream as liked.


