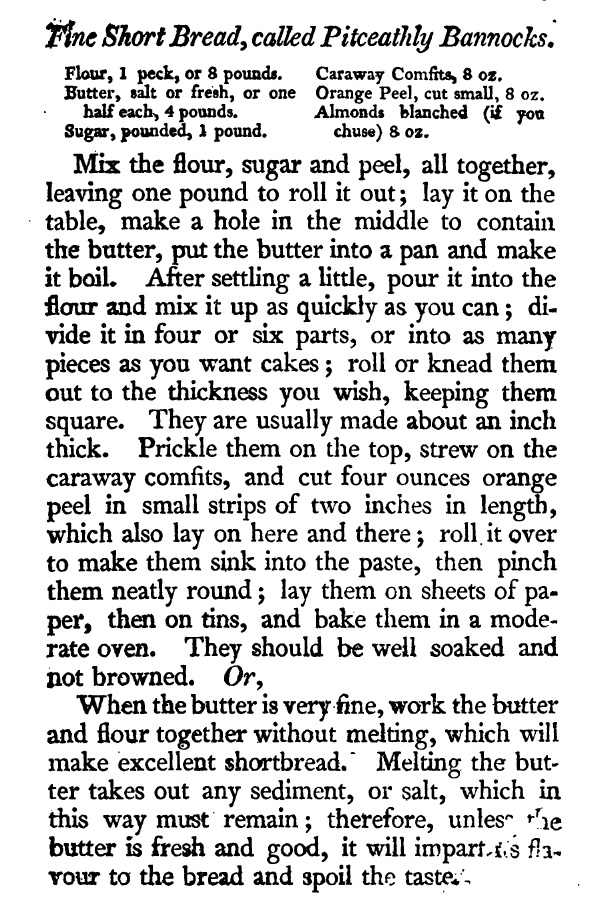
Colcannon

There are many traditional foods associated with All Hallow’s Eve/Hallowe’en, November Night, but one which might be new (and deliciously simple to prepare), is the Irish potato dish of Colcannon.

Back in the beforetimes, when cakes of bairín breac were considered a luxury, people used to celebrate All Hallow’s Eve with a big pot of Colcannon. A ring was hidden in the depths of the creamy, mashed potatoes, and whoever ended up with it on their spoon, was said to be going to be the first to marry, within the next 12 months.

There aren’t many Irish cookery books of this time, so my favourite place to find accounts of the Irish food actually eaten by the population (as opposed to some publisher’s imagined scenario), is The School’s Collection at the National Folklore Collection, held at University College, Dublin. The Schools Project was an ambitious and wide-ranging collection of everything to do with Irish Folklore and Culture, gathered and recorded by school pupils between 1937 and 1939. More information about the project can be found here.

With information gathered from all across the country, it is fascinating to see both the common threads that bind the Irish people together, as well as discover the little differences that make each community unique. For instance, you might be aware of the popular Irish potato dish of Boxty, you might also be aware that it can be served in three different ways (loaf, dumplings, pan), but you might be surprised to learn that The Schools Collection contains over 150 different ways of making Boxty. I recently wrote a paper about this, the appendices of which, including the list of 150+ different ways of making Boxty, you can access here.

So it is, to a certain extent, with Colcannon. It also appears under the names Brúitín, Brúchin, Champ and Poundies, to name but a few. “No, no no!” I hear you exclaim, “Champ is its own thing! It’s made with spring onions!”

Well yes, but actually no.

It might actually be a Stampy/Boxty situation, where the same dish has different names, depending on the part of the country you come from. I shall be looking into this more soon.

Similarly, there can be interpretation as to what exactly the dish comprises. At it’s simplest, it is cooked potatoes, mashed with a little milk, pepper and salt, and served in a mound with a lump of butter in the middle. It is eaten by scooping some potato from around the edge and then dipping it in the growing pool of melted butter in the middle before consuming.

Many accounts of Colcannon have additional items of flavouring added. “A bit of greenery” is probably the easiest way to describe a large proportion of them, which include young (spring) onion, chives, nettles, leeks, shredded cooked cabbage or kale, parsley, regular onions.

The accompaniments can be anything you enjoy, but traditionally they include: sweet milk, buttermilk or sowans to drink, and crisp, crunchy oat bread (oatcakes) to use as a scoop.

I was delighted to find just how old the dish of Colcannon is: there’s mention of it back in the eighteenth century. William Ellis (1750) includes a recipe for an “Irish Country Dish” in his The Country Housewife’s Family Companion, p366.

And Welsh diarist William Bulkeley (1691-1751), whose diaries are kept at Bangor University, mentions dining on “Coel Callen” at Halloween in 1735, whilst on a trip to Ireland.

Even earlier, a poem published in Dublin in 1723, speaks of what certainly seems to be a dish of Colcannon being prepared for a wedding feast.

From “Mendico-hymen seu, tuphlo-pero-gamia. The beggar’s match. Translated from the Latin.”, W. Thompson, printed by Tho. Hume, for Jer. and Sil. Pepyat, Dublin, 1723.

Colcannon

This is more of a guideline than hard-and-fast recipe. Use quantities to your own personal needs and taste.

potatoes
greenery 
milk
salt & pepper
butter

ring (optional)

  • Cook your potatoes. The method doesn’t really matter: boil or bake. The important detail is to mash them smooth whilst hot. I use a ricer to make sure all lumps have been dealt with, but you can also press them through a coarse sieve or use some elbow grease and a masher utensil.
  • Smooth out the mixture by adding milk. NB Use hot milk, otherwise you run the risk of cooling down your potatoes too much. If you’re using any kind of onion, you might like to simmer them in milk for 10 minutes to both flavour the milk and reduce the harshness of the onions themselves. Strain out the onions, keeping the warm milk for mixing, and chop the onions finely – or to your taste. Cover and keep hot while the greens are prepared.
  • Add your greens – this may be in the form of herbs (chives/parsley) green onions/spring onions/cibol/leeks, Savoy cabbage, spring greens, kale, sweetheart cabbage, white cabbage, Brussels sprouts, spinach, nettles, etc. The cabbage and/or leeks should be shredded to your liking (fine/coarse) and blanched/steamed for five minutes. Add sufficient to your own personal taste.
  • When everything is piping hot, serve your Colcannon in a large communal dish, with a generous amount of butter in a hollow in the centre, and hand round spoons for all. Don’t forget to pop a ring  into the mix before serving, if matrimony is in your plans.

Shortbread Variations

This week’s recipe subject came about, as it increasingly does of late, with a casual thought when looking for something else.

Behold this recipe from Mary Jewry, editor of Warne’s Model Cookery and Housekeeping Book (1868). The first thing that caught my eye, and got me thinking, was the proportions of the ingredients. Nowadays, a proportion of 1:2:3 (of sugar, butter and flour) is touted by many as traditional, but here was a proportion of 1:2:4. Also of interest was the addition of ground almonds to add texture, whereas modern purist recipes staunchly abide by the ‘rule of three’ (i.e. no additions, especially not caraway comfits and citron). Lastly, there was the cooking temperature – a slow oven – which is different to the short sharp bake at high temperature in use today.

I resolved to put these variations to the test, but then the addition of the almonds got me thinking some more: what else has been added to traditional shortbread, and to what end? The answer turned out to be: quite a bit. I ended up baking twelve batches of 1:2:4 shortbread, each with a different ingredient making up 1/4 of the flour component, and performing a giant taste test to see which was, for me, the ultimate combination. And here’s a key point: it’s all down to personal taste. What I might find delightful, others may find not to their taste. I’m hoping that by presenting a wide range of options, you too may find your ultimate shortbread recipe.

Here are the choices I made:

  • Sugar: I chose to use soft light brown. This was to give a more rounded flavour to the shortbread. White caster (superfine) sugar is sweet, but only that – rather one note.
  • Butter: unsalted, but with a small quantity of salt added. I had made some shortbread recently, and used salted butter, and the shortbread was delicious, but the finishing lick of saltiness might be an acquired taste. I tried another batch with unsalted butter, and this proved less popular, so for the run of test batches I resolved to split the difference and use unsalted butter, with just a quarter teaspoon of salt.
  • Flour: regular, unbranded white plain flour. After baking a control batch using 100% flour, the remaining batches each had 1 part of the flour component as a different ingredient. These comprised: ground almonds, rice flour, ground rice, cornflour, ground almonds, semolina, fine cornmeal and coarse cornmeal (caveat: I was unable to find any coarse cornmeal, and used polenta instead).

The Results

There are several outcomes from this mammoth bake and taste test. (Top image, Shortbread Variations: From the left, classic (butter, sugar, flour), then baked with: cornflour, rice flour, semolina, ground rice, ground almonds, polenta).

  • The ‘flours’ – these can be divided into two groups, the powders and the granules. Both affect the texture of the finished shortbread.
    • The powders include cornflour, rice flour, fine cornmeal (and possibly by extension, arrowroot, potato starch). The effects of using these powder-fine flours is to make the texture of the shortbread crisp and ‘melt in the mouth’.
    • The granules include ground almonds, ground rice, semolina, coarse cornmeal, polenta. The  effects of using these granules is to make the shortbread both crisp and crumbly. They create a thin, outside ‘crust’ and inside deliciously friable and crumbly. Ground almonds obviously bring a nuttiness to the cooked shortbread, which, if it’s your favourite, could be intensified by using ground hazelnuts. The polenta/cornmeal versions also baked to a gorgeous golden colour.
  • The long, slow baking allows the shortbread to cook though thoroughly. Sometimes I have had shortbread where the outsides are cooked, but the insides moist, dense and almost doughy. This method of cooking eliminates that.
  • To further improve the texture of the shortbread, it was returned to the oven to cool, to ensure all moisture is eliminated. The shortbread should not be stored until completely cold.
  • A number of gluten-free batches were made, although fewer that those using regular flour. I have always had good results by substituting Doves Farm gluten-free flour on a 1-for-1 basis, and so it proved here. NB Gluten-free shortbread is extremely delicate when freshly baked, and will need a very careful approach (see below). However, if my advice is followed, once cooled they will be much more sturdy.

Gluten-free shortbread variations: classic, ground rice, fine cornmeal, polenta

To summarise: All the shortbread versions were delicious, and unless you line them up side by side like I did, it is unlikely that you would be able to rate one over another, It’s really almost splitting hairs to rank them – everyone’s personal taste is different – so I won’t. One observation of mine, which you are free to discard, is that, for my tastes, the shortbreads were a little sweet, so in my perfect recipe (below), I reduced the amount of sugar to just 45g – it’s practically health food! With the sprinkling of sugar on the top, it made for the perfect amount of sweetness.

People with gluten sensitivity: At the risk of stating the obvious, almost all of the flours can be enjoyed – rice flour, corn flour, ground rice, fine corn meal, coarse cornmeal/polenta, ground almonds, ground hazelnuts – and as already mentioned, probably arrowroot and potato starch as well. A gentle reminder that the one exception is semolina. SEMOLINA is made from durum wheat and is NOT GLUTEN-FREE.

The Recipe

60g soft brown sugar
120g unsalted butter, chilled
180g plain flour – or gluten-free flour
60g your choice of additional flour
¼ tsp salt
a little caster sugar for sprinkling

  • Line a small baking tin (18cm x 25cm) with baking parchment. Leave extra parchment overlapping the sides, to assist in moving the baked shortbread.
  • Heat the oven to 160°C, 140°C Fan.
  • Cut the butter into cubes and add to the bowl of a food processor fitted with a blade.
  • Add the remaining ingredients to the butter and pulse briefly until the mixture resembles breadcrumbs.
  • Tip the mixture onto the parchment, and press into an even layer.
  • Use a round skewer to poke holes all over the surface of the slab of shortbread.
  • Use the tines of a fork to mark the shortbread along the long edges of the tin.
  • Bake the shortbread for 30 minutes, turning the tin around after 15 minutes to ensure even baking.
  • Once the shortbread is baked, there are additional steps you need to take in order to make your shortbread the very best,
    • Remove the shortbread from the oven. Keep the oven on.
    • Sprinkle the surface of the shortbread with a little caster sugar.
    • Using a very thin bladed knife or (ideally, in my opinion, a metal dough scraper), cut the shortbread into pieces. I cut mine lengthwise in half, then across into fingers 3cm wide.
    • Allow to cool in the tin for 15 minutes.
    • Gently slide the parchment out of the tin and onto a baking sheet. Smooth out the parchment.
    • Using the dough scraper (or palette knife turned sideways), ease the shortbread pieces apart to leave a 5mm gap in-between. You want to gently push them apart, not try and slide anything underneath, because the shortbread will break. NB The gluten-free shortbread will be EXTREMELY delicate, take extra care at this point.
    • Return the shortbread to the oven, switch the oven off and leave to cool until both oven and shortbread are completely cold. I baked most batches in the evening and let the shortbread cool overnight. If baking during the day, it will take between 3-4 hours.
    • When completely cold, transfer the shortbread to an airtight container to store.

Bonus

On a personal level, I discovered that I much preferred the gluten-free shortbread made with the grains, specifically cornmeal, the texture being surprisingly moreish. I think the natural sweetness of maize and the greatness of the flavour when pairing with butter is a significant contribution. To this end, I decided to make one more batch, with cornmeal, and some raw butter (made from unpasteurised milk). In the 19th century all butter was raw butter, so I reasoned that this would be even more authentic (I had brought some raw butter back from France this summer). To cut a long, rambling story short – it was amazing. If you have the opportunity to get your hands on some raw butter made from unpasteurized milk, do it, and then make shortbread. It’s sublime. It is possible to get raw butter in the UK, but it is more expensive than regular, and in the current cost of living crunch, it might not be your number one priority. However, if you fancy treating yourself, then Sainsbury’s stocks Isigny Sainte-Mère salted raw butter, whilst Ocado has both salted and unsalted (doux).

My Perfect Shortbread

45g soft brown sugar
120g raw butter made from unpasteurized milk, chilled
180g plain white gluten-free flour
60g coarse cornmeal
¼ tsp salt
a little caster sugar for sprinkling

Make and bake as above.

Improving Strawberries

On a recent holiday in France I had some wonderful strawberries: heady, aromatic and bursting with flavour.¹

Still a bit mesmerised, two punnets of strawberries were one of the first things I bought when we got back. Alas, compared to the French ones, they were decidedly underwhelming. I know it’s late in the season for strawberries, but even so, a great disappointment.

Since we now have the luxury of strawberries year-round, I thought I’d bring you this method of not only rescuing below-par strawberries, but also demonstrating how you can use them in a couple of recipes, as well as enjoying them in their new and improved, glow-up form.

The method is very simple, too. Cut up your strawberries and sprinkle them with a little sugar – NOT icing sugar, because it contains an anti-caking agent. Use white caster or granulated. The sugar will gradually draw out the juices from the strawberries, which will in turn absorb some of the sugar.

You can enjoy them as is, and luxuriate in their much improved flavour, or you can use them in other things. Below I have two suggestions – a strawberry scone and in a mille feuille made from stale croissants.

To Confit strawberries

I’ve gone back and forth quite a bit to come up with a term for this method and, to be honest, I’m not entirely happy with ‘confit’, because to confit something generally involves the use of heat to cook the items, which this patently doesn’t. However ‘macerating’ wasn’y really suitable either, because that involves adding liquid, and here the liquid comes from the fruit itself. If someone can find a word that fits better, do please leave a comment.

strawberries
caster or granulated sugar – 1tbs per 100g strawberries

  • Remove the green stalks and leaves from the strawberries and cut each one into 6-8 pieces, depending on size.
  • Put the cut strawberries into a bowl and sprinkle over the sugar.
  • Turn the berries over gently so that the sugar is distributed evenly.
  • Cover with plastic and set somewhere cool. I prefer to keep them at room temperature rather than chilled, at least in the initial stages as I believe it produces a better overall flavour, but keep in the fridge if you prefer.
  • Gently stir occasionally.
  • Allow your strawberries to macerate for up to 24 hours. The longer you leave them, the more juice will be drawn out. After about 24 hours, the  strawberries will be practically floating in a light syrup and their flavour will be deliciously intense.
  • You can choose when to eat/use your strawberries. For the two recipes below I used berries that had been macerating for 24 hours.

Strawberry Scones

Fresh strawberries release too much juice to be included in regular scones, but by using confit strawberries, you can get all the concentrated flavour and still maintain the integrity of your scones. This recipe is based on that of Mrs McNab (19thC farmer’s wife from Ballater, Scotland – see Great British Bakes). It makes 8 scones. It is deliberately unsweetened, as I believe the plainness of the scone dough highlights the flavour of the strawberry pieces much better than a sweet dough. You might disagree, and that’s fine. You can add 30g of sugar to the mixture before baking if you like, or sprinkle some sugar over the hot scones after baking (as in the picture).

225g plain flour
2tsp baking powder, or 1 tsp cream of tartar, ½ tsp bicarbonate of soda.
½ tsp salt
30g unsalted butter
1 large egg
60ml plain yogurt
60ml milk

100g drained, confit strawberries.

Milk for glazing
sugar to sprinkle (optional)

  • Heat the oven to 220°C, 200°C Fan.
  • Put the flour, powder(s), salt, butter, sugar if using, and egg into the bowl of a food processor fitted with a blade and blitz until the mixture resembles breadcrumbs.
  • Tip the mixture into a bowl.
  • Add the drained strawberries and fold in.
  • Mix the yogurt and milk together until smooth.
  • Fold in the yogurt mixture little by little, ideally with a round-ended knife. NB Do NOT slosh it in all at once. You may not need all of the liquid, especially if the strawberries are juicy. You want just enough liquid to bring the dough together.
  • NB The faster you do the shaping/cutting/getting the scones in the oven, the more they will rise.
  • Turn the dough out onto a floured surface and pat into a circle about 4cm thick. NB Don’t roll it with a rolling pin, you’ll just squash out all the lift from the raising agents.
  • Using a dough scraper or thin-bladed knife, cut the disk of dough into eight triangles. They will look small, but they will rise splendidly in the oven.
  • Transfer the triangles to a parchment covered baking sheet and brush over with milk to glaze.
  • Bake for 15 minutes, turning the baking sheet around after 10 minutes to ensure even colouring.
  • Remove from the oven and sprinkle caster sugar over the hot scones if liked.
  • Transfer to a wire rack to cool.
  • Enjoy warm as is, or with butter or cream.

Strawberry Croissant Mille Feuille

You know when you have stale croissants lying around?

*crickets*

Of course not. No-one does.

HOWEVER!

The thought “What if…” did cross my mind over the aforementioned holidays, and that led me to thinking about how they might be used in a new and exciting way. The idea is related to the puff pastry more traditionally used insofar as I brought back some delicious French butter with the intention of making a batch, and now I’m procrastinating like mad because, although delicious, it’s SUCH A FAFF™! Bonus: You can use gluten-free croissants (Schar is one brand I have tried – find them in the freezer section of your local supermarket).

Using a croissant reduces the Faff to almost non-existant levels and provides another opportunity to use the strawberries prepares above – this time using the juice as well. Slicing, toasting and then bruléeing the croissants will give both crunch and shine. The last two things needed for our croissant mille feuille are Brulée Sugar and some whipped cream.

To thicken liquid with Arrowroot

Why arrowroot, you may be asking? Well, it thickens and turns clear when heated, but unlike cornflour, when cooled it does not go ‘gloopy’ as such, rather it forms a loose jelly-like texture that clings wonderfully to the fruit (see top photo) making it bright and glossy, and doesn’t form a skin.

For each 80ml of liquid/syrup, use 1tsp arrowroot, or 1 tablespoon per 250ml.

  • Mix your arrowroot with an equal quantity of cold water until smooth.
  • Add the arrowroot slurry to your syrup and heat gently, stirring all the while.
  • NB Do not boil the mixture. High heat will break down the thickening properties. Remove from the heat when thickened and clear.
  • Stir in your strawberries and chill until required.

To Assemble

  • Slice your croissant(s) into three, horizontally.
  • Toast the slices lightly on both sides. Be careful, they will take less time to toast than regular bread, due to the higher fat content.
  • Dust the slices thickly with brulée sugar, then either grill them or use a blow torch to melt the sugar. The sugar will melt quickly, so keep an eye. Allow to cool, so that the sugar hardens.

  • To serve: pipe a rim of cream around the edge of the bottom two layers, and fill the middle with your strawberries in thickened juice.

  • Stack the layers together and serve.

¹ From the Calais Cité Europe Carrefour near the Tunnel, which I can highly recommend for all those last minute foodie purchases on your way home. If you’re interested in growing your own, the variety I recommend is Charlotte.

Russian Toffee

This is a recipe that I’ve had on my ‘To Do’ list for years. I first came across it in an old, spiral-bound, Women’s Institute cookery book. Over the years I’ve seen many different versions, some with sour cream, some from the 19th century are made with “Swiss Milk” (the equivalent of modern condensed milk – although just to be confusing, some recipes sometimes list “unsweetened Swiss Milk”, thus making it equivalent to evaporated milk). It would be interesting to see how these recipes compare in texture to the classic fudge recipe posted elsewhere on this site.

But anyhoo…

From “The Art of Sweetmaking” by Beatrice Manders, L. Thorne & Co., London, 1901, pp31/2

This version, from 1901,  uses red currant jelly, which gives the toffee a lovely reddish tinge and a delicious tang of sharpness against the sweetness from all the sugar. Redcurrants are about to come into season, and this recipe might be useful to either use up last year’s jelly or make use of this year’s fresh batch. Alternately, you can just buy red currant jelly in the supermarket.

I deliberately chose this version because it dates to the height of Russian Toffee popularity, and I find it funny that the writer sees fit to include finger-wagging admonishment to take care to make it properly and not over-cook it, all the while failing to give proper instructions on how to do just that.

So! Let us talk about the intricacies of toffee making.

In short, there aren’t any. It is fundamentally about heating your sugar mixture to a particular temperature point in order to achieve a certain texture when it cools down. This is done by heating until sufficient moisture has evaporated, which will result in the sugar reaching a high-enough temperature.

The difficulty for our Victorian ancestors and earlier was, a lack of sufficiently detailed thermometers with which to aid their efforts. That’s not to say that sugar confectionery was unheard of in earlier times. Quite the opposite, in fact. Confectioners in Times of Yore™ devised a visual scale to judge the heat of the sugar solution, and divided it into six levels, each with their own particular uses: smooth, pearled, blown, feathered, cracked and caramel. Francis Massialot’s “The Court and Country Cook” (1702) goes into detail across several pages describing the physical and visual cues of each stage.

Luckily for modern cooks, there are digital thermometers which can eliminate much of the guesswork. The difficulty lies in ensuring that the whole of your batch of boiling sugar has reached the correct temperature, hence the need to keep your mixture well stirred. Care must also be taken, if using a probe thermometer, not to accidentally touch the tip against the bottom of the pan, which will register as several degrees higher than the sugar itself.

All that remains is to decide on the consistency you wish to enjoy your toffee. You can take it to whatever degree you prefer. I have made this specific recipe four times, taking each batch to a different temperature and each has its pluses and minuses. Its up to you which you choose.

  • 120°C – toffee is soft and chewy at room temperature.
  • 130°C – toffee is firmer but still chewy. Thin sheets will bend easily.
  • 140°C – toffee is hard at room temperature, but will soften in the mouth and become chewy.
  • 150°C – toffee is brittle at room temperature, will eventually soften in the mouth and become chewy.

Personally, I prefer the last two: for toffee to consume as is I like to take it to 150°C; for toffee to use in other recipes, since it will have further heating in the oven, I prefer to take it to just 140°C.

One final point, toffee is hygroscopic. It loves to absorb moisture. As soon as it is cooled, you should pack it in an airtight container. A plastic ziplock bag might lack visual appeal, but it is marvellous for keeping your toffee shiny and free of stickiness for days on end. Alternatively, you can choose to either wrap your toffee pieces in waxed paper or cover your toffee in chocolate to prolong its shelf life.

Russian Toffee

This is just a half batch of the original recipe, and still makes a sizeable slab. I have elected to interpret ‘loaf sugar’ as soft, light brown sugar, for added flavour. After a few trial runs, I opted to omit the vanilla as it wasn’t adding anything to the flavour, and actually impairing the redcurrant flavour coming through. You could vary this recipe by using similar quantities of other sharp fruit jellies such as cranberry, black currant, quince or apple.

225g soft light brown sugar
115g unsalted butter
100g red currant jelly
150g double cream

200g dark chocolate (optional)

  • Line an edged baking pan with baking parchment. I used a pan 30cm x 22cm and it was more than large enough.
  • Add all ingredients to a pan and heat gently until the butter and jelly have melted and the sugar dissolved. A wide pan (like a frying pan) is better than a tall (saucepan) pan, as the greater surface area facilitates evaporation.
  • Increase the heat slightly (I suggest level 6 on a 1-9 scale) and stir gently but continuously until the mixture boiled for several minutes and has thickened slightly.
  • Check with a thermometer (if using a frying pan, you may need to tilt it in order to get an accurate reading of the sugar mixture temperature), and remove from the heat when your sugar mixture has reached your chosen temperature.
  • Pour the mixture onto the baking parchment in your prepared pan and allow to cool. NB If you wish to mark out your toffee into squares like in the top picture, don’t let it cool longer than 8 minutes before doing so, otherwise it will have set too firmly.
  • To mark out your toffee, lightly butter the blade of a long, straight-bladed knife and press down firmly into the toffee. About 1.5cm squares is a good size. The knife won’t easily cut all the way through, but will make strong enough marks so that it is easy to break into pieces when cooled.
  • After 20 minutes of cooling, cover the pan with cling film, or slide the whole thing, pan and all, into a large ziplock bag, and leave to cool completely (both Sainsbury’s & Tesco sell XL ziplock bags that are ideal for this).
  • If you’re planning to enjoy your toffee as is, then, once completely cold, you can give it a sharp tap on the counter and it should break into pieces quite easily. Be sure to transfer it to an airtight container to keep it free of stickiness.
  • If you’d like to cover it with chocolate, you can temper it relatively quickly and easily by using the seeding method and 200g of the chocolate of choice. I used dark chocolate. Also, Instead of dipping pieces individually, which is a Faff™, I opted to brush the tempered chocolate over the whole sheet, on both sides, then break into pieces once the chocolate had set and cooled. It doesn’t cover the toffee completely, but enough to keep it from dissolving into a sticky mess, and the contrast between the bitterness of the chocolate with the sweetness of the toffee and the tang of the redcurrants is delightful.

Petticoat Tails and Pitcaithly Bannock

This might seem like a double recipe post, but it is more of a ‘two for one’ in that the same ingredients can be presented in different ways, depending on your inclination and the effort you wish to put in.

So… Petticoat Tails.

Much has already been made of the contortion of ‘petites gatelles’ into ‘petticoat tails’, as well as other origins,  so I’m going to dwell no more upon it.

No, what I’ve been looking at/obsessing over of late is the early recipes. Late eighteenth/early nineteenth century recipes.

Mrs Frazer’s 1806 recipe for “Petticoat Tails For Tea” caught my eye, as it seems to be the earliest recipe in print.

Two interesting details about this recipe are the inclusion of caraway seeds and the first (to date) description of the now iconic Petticoat Tails shape. There’s also oblique reference to the Scottish weights and measures system, which is significantly different to the English one at the time. This factor was the source of much head-scratching until I eventually managed to get the ingredients scaled accurately. It is a much less rich version than that which is popular today, and while I will concede that caraways aren’t a regular sweet spice these days, they are strangely compelling and I can heartily recommend them if you’ve not tried them before in a sweet context.

The next recipe I spotted comes from John Caird (1809) as something of a post-script to his recipe for “Fine Short Bread, called Pitcaithly Bannocks”.

From “The Complete Confectioner and Family Cook” by John Caird, 1809

So it would seem that Petticoat Tails are just a thin version of rich shortbread or Pitcaithly Bannocks. It certainly makes Petticoat Tails a lot more interesting than the pale and unadorned recipes we have today. I must take issue, however, with the size of Mr Caird’s Petticoat Tails – they’re enormous! Eighteen inches in diameter? What on earth is he cutting round – a cartwheel? I used a dinner plate and a pastry ring to cut the two circle in the photo at the top of the page, and doubled the number of slices to sixteen to make the portions reasonable and not too slab-like, because in the first test batch of eight portions (using a dinner plate –  see below) they were so massive I could only fit four pieces on my cutting board. Mr Caird only suggests cutting his cartwheel of shortbread into eight pieces, so I am puzzled as to how it was then served: broken into smaller pieces by hand, perhaps? Seems odd to go to the trouble of observing the format outlined by Mrs Frazer, but insisting on them being of giant size.

The other challenge was the sticky issue of caraway comfits. These were popular confections of caraway seeds coated in several layers of sugar and often enjoyed at the end of a meal, or in sweetened, baked goods, as an aid to digestion. No-one makes caraway comfits these days, that I have been able to find, at least – and the process of making them is very time-consuming, even with the correct equipment (which I don’t have). Thus I have come up with an adaptation which mimics bith the flavour and texture, but without all the Faff™ of having to make them yourself. Adding caraway seeds to the dough, then scattering sugar nibs ensures both the added sweetness and the caraway flavouring can be enjoyed together, as well as the textural crunch. Just scattering seeds over the surface of the shortbread doesn’t work, as they tend to fall off, even when they have been vigorously rolled in.

So here we have a recipe that can be shaped in two separate ways – thick and chunky or thin and ladylike. Whichever way you decide to make it, with the candied peel and the caraway seeds and the rich buttery taste, it is going to pack a real punch in terms of flavour. Enjoy!

Petticoat Tails and Pitcaithly Bannock, 1809

After persevering for several batches, I made the decision to change the method slightly, as the recipe as written just wasn’t working out very well, being very dry and crumbly. I suspect that the butter of times past might have had a higher water content than modern butters. It is still prone to crumbling, and so if it’s not coming together for you, try adding a little cream to help things along.

225g room temperature best butter*
60g caster sugar
390g plain flour
2 tsp caraway seeds
60g sliced, blanched almonds
60g orange peel, cut small
a little double cream (optional)

To decorate
30g sugar nibs
sliced candied orange peel to taste

  • Decide how you want to bake your shortbread. If its the traditional shape, line a baking sheet with parchment. If you prefer to bake a slab, line a suitably sized baking tin with parchment. I suggest 20cm x 30cm or similar. A third alternative is to bake individual portions. In the top photograph, I have included a couple of thick, square servings. I made them with the offcuts of the circle of shortbread, and shaped them in a brownie pan with square holes, before baking them ‘free-standing’.
  • Cream the butter and sugar together until light and fluffy.
  • Add the caraway seeds.
  • Gradually add in the flour, almonds and peel and mix until incorporated. Add a little cream if necessary.
  • Tip out the dough onto whatever you are baking it on/in.
  • If making thin Petticoat Tails,
    • Roll out to 1cm thick.
    • Scatter over sugar nibs and orange peel to taste. Use the rolling pin to roll over and press them into the dough.
    • Use a skewer to poke holes all over the surface of the dough.
    • Use a dining plate to cut out a circle, and a large, plain pastry cutter to cut the centre circle.
    • Pinch the edges of the outer circle between finger and thumb to decorate.
    • With a thin, bladed knife or pastry scraper, cut the outer circle into 16 wedges.
  • If making thick Pitcaithly Bannock,
    • Press the dough evenly into your baking tin.
    • Scatter over sugar nibs and orange peel to taste. Use the rolling pin to roll over and press them into the dough.
    • Use a skewer to poke holes all over the surface of the dough.
    • Use the tines of a fork to mark a border around the edges.
    • With a thin, bladed knife or pastry scraper, cut your dough into serving size pieces – squares or fingers.
  • Chill the dough for an hour or until ready to bake.
  • Heat the oven to 150°C, 130°C Fan.
  • Bake for 45-50 minutes, until pale but still cooked through. Turn the baking tin/sheet around half-way through, to ensure even baking. Yes, it is the same baking time whether it be thick chunks or broad but thin Petticoat Tails. The colour will darken only very slightly.
  • When baked, remove from the oven. Using the same thin-bladed knife/dough scraper to refresh the cuts in the dough, but do not lift out.
  • Allow to cool in/on the tin.
  • Store in an airtight container.

* Salted or unsalted, as you like. I used Isigny Sainte-Mère Unpasteurised Salted Butter, because it has a wonderful flavour and might actually be close in flavour to the best butter of old.

Ouse Bridge Cakes

I love coming across a geographically-named recipe. It gives a place and time in which to ground the dish: Grasmere Gingerbread, Cornish Pasties, Chelsea Buns.

Almost better yet, is discovering a recipe that is also unknown today, having gone out of fashion or due to some other circumstance. Such is Ouse Bridge Cakes.

There’s practically no information available about these bakes. In “The Gentlewoman’s Kitchen” (1984), Peter Brears suggests Ouse Bridge Cakes are a yeast dough flavoured with mace, cloves and nutmeg and mixed with sugar and milk. In his book “Secret York” (2014), author Paul Chrystal writes:

“Ouse Bridge Cakes, known in the eighteenth century, a type of Yorkshire tea cake.”

And that’s pretty much it. Not much to go on at all.

Luckily, in my scouring of old manuscripts, I have turned up five, different, eighteenth-century Ouse Bridge Cake recipes. I reasoned that, within their pages lay an understanding of what constituted the original Ouse Bridge Cakes.

But first, a little history. The bridge over the River Ouse that this recipe refers refers to is in the city of York. Although there have been many bridges over the centuries, it is the fourth Ouse Bridge (1565–1810) which has been commemorated in these buns.

Old Ouse Bridge from the South. T.Taylor, 1806.

Just as with many city bridges of the time, the Ouse bridge was heavily built-up, its five arches supporting substantial buildings on both sides of it’s towering centre arch.

Old Ouse Bridge from the North. Attrib. Henry Cave (British 1779-1836)

With all this busyness on the bridge, it is likely that there were businesses too, and if not a baker’s shop, then almost certainly a stall or street hawkers. Just as Wood Street Cake (see Great British Bakes) took its name from the London street where it was made, Ouse Bridge Cakes take theirs from the place where they could be bought, if not actually baked.

As already mentioned, Ouse Bridge cakes were a spiced bun. But seeing as Yorkshire has quite a reputation for similar items – the most well-known being the Yorkshire Teacake (as with all tea cakes, best eaten toasted and buttered) – it occurred to me that there must be something to distinguish the Ouse Bridge cake from a host of other buns, and that something was probably its shape. A bun of a particular shape is instantly recognisabe – just look at modern Chelsea Buns and their square, spiralled form (which isn’t the original shape – but don’t get me started, see Great British Bakes (again)).

Luckily, there were two of the five recipes (yes, remember them? Back before the detour?) that held clues. The first was in a manuscrpt dating from the mid-eighteenth century, which suggested the dough be weighed out into 8oz (225g) pieces before being shaped.

Ouse Bridge Cakes recipe, MS3498, (1750-1900) Wellcome Collection.

The second piece of information was from a manuscript dated 1750, the last line of which reads “make it up round in ye middle”.

Ouse Bridge Cakes recipe from MS4645, (1750-1853), Wellcome Collection.

I spent a lot of time thinking about this, and decided it meant to shape it like a bagel/ring donut. I also asked online, and the feedback was that it might mean something cottage-loaf-esque, so I experimented with both shapes. I still think the ‘hole in the middle’ is a better fit for the description, but until more recipes are rediscovered, the jury will have to remain resolutely out.

Of course, it might well be that none of these five recipes are the definitive, perfect Ouse Bridge Cakes. Back in the day, even the moderately wealthy (such as the authors of these manuscripts) didn’t necessarily bake for themselves: practically everyone bought their bread from a baker. The recipes that we find in manuscripts are attempts to copy, on a smaller scale, something enjoyed elsewhere, so that they can be enjoyed in their own homes. The five recipes in the manuscripts were all different, yet there were some uniting features, as each author tried to recreate something they had only tasted. Firstly, all of them had currants, ranging from a spartan few ounces to almost half the total weight of the ingredients. All of them were flavoured with spices (nutmeg, cinnamon, cloves, ginger, mace),  but nutmeg was a common denominator amongst all five. All of them were enriched with milk and either butter or cream, and most had added sugar.

The recipe below is very much a Goldilocks version of them all. Neither too much nor too little of everything, because recipe testing revealed certain flaws in the versions that veered towards the extreme. The overly-fruited buns were heavy and close textured, and those buns with generous/excessive additions of butter and cream were reluctant to rise, with a rather greasy taste.

This version is moderately fruited, moderatly enriched and moderately spiced. Delicious warm from the oven, and even more so toasted, with slabs of cold, mature Cheddar cheese (it’s a taste sensation!).

Ouse Bridge Cakes

Each bun is formed from a generous 75g of dough, and I have scaled the quantities down to make a very modest seven buns per batch. Feel free to double the recipe as you see fit. The spicing is just a suggestion: change things up if you have a favourite mix.

225g flour
1 sachet fast-action yeast.
180ml milk
15g sugar
30g unsalted butter
60g currants
1 tsp ground ginger
1 tsp ground nutmeg
½ tsp ground cloves
½ tsp ground mace
1 large egg for glazing

  • Put the milk, sugar and butter in a pan and scald. IMPORTANT Scalding is when the milk almost boils, but not quite. Heat it until it bubbles around the edges (or in the middle if you have an induction hob), then remove from the heat and allow to cool down. Scalding milk breaks down the proteins, which will allow your buns to remain soft and yielding, even when cold. Using 100% unscalded milk in a dough recipe can lead to heaviness.
  • When the milk mixture has cooled to blood temperature, pour it into your mixing bowl.
  • Sift the flour, yeast and spices together and add to the milk mixture.
  • Knead the mixture by hand or on the lowest possible speed on your stand mixer for 10 minutes. increase speed to high for up to 2 minutes, or until the mixture comes together in a clean ball.
  • Add the currants and fold them in.
  • Cover the bowl with cling film. The milk, butter and sugar will make the dough slower to rise that a regular dough, so allow at least 90 minutes or until the dough has doubled in size.
  • Tip out the dough and divide into seven pieces, each of roughly 75 grams. There’s no need to get all aggressive and start punching it: it will naturally deflate with the turning out.
  • Shape the dough as you see fit. In addition to the two shapes mentioned above, you can also shape them into a regular teacake shape. NB: If you’re going for the cottage loaf shape, I recommend baking the shaped dough in cupcake tins, which really lets the dough ‘sit up’ and hold it’s shape. I used silicone baking trays rather than metal, to keep the dough from forming too crusty an outside.
  • Set aside to rise for 40 minutes.
  • When the dough has risen, whisk the egg and brush over the buns with a pastry brush.
  • Heat the oven to 180°C, 160°C Fan.
  • Bake the buns for 20 minutes, turning the baking trays/sheets after 10 minutes to ensure even baking.
  • When cooked and golden brown, transfer to a wire rack to cool.
  • Store in an airtight container at room temperature.

Dairy-Free Cream

Here is very useful recipe for those looking to avoid dairy products or even to just reduce the amount of fat in their diet. By whisking together some smooth jam and a couple of egg-whites, a deliciously light and frothy ‘cream’ can be created, for use as a finishing touch to trifles, puddings and pastries, or to enjoy by itself. The cream will be influenced by whatever flavour of jam you choose to use, but it doesn’t dominate at all. The above was made using seedless raspberry jam, and the subtlty of colour reflects the subtlty of flavour – a mere whisper on the palate. For an almost white ‘cream’ with a very faint flavour (if that suits your needs best), I can recommend making and using Christine Ferber’s Green Apple Jelly.

It is a surprisingly elegant solution for anyone with dietary restrictions, and dates from the cusp of the 17th and 18th centuries (circa 1700).

This particular recipe I found in a manuscript held by the Wellcome Collection in London, but I have also read variations in other manuscripts and locations. I am surprised tht it has fallen out of favour, for it is one of the simplest and easiest recipes I have adapted.

Well, I say adapted. In fact I have changed very little from the original instructions.

To Make Cream Without Milk, MS1804, dated circa 1700, Wellcome Collection.

The one detail I did change was to reduce the number of egg-whites from three to two, reasoning that the eggs we have nowadays are much larger than those of three hundred years ago.

Thanks to modern technology, we are also spared the two hours of hand whisking (with a spoon of all things!) required in order to achieve the light and fluffy outcome pictured above, and can achieve the same result with about 10 minutes of whisking with your kitchen gadget of choice.

The potential worry regarding the consumption of raw egg whites is eliminated by the convenience of being able to purchase pasteurised egg whites in a carton.

The finished whip will hold its shape for several hours, should the need arise, allowing you to prepare this well in advance of your entertaining needs. I decided to leave the whipped ‘cream’ out, to test it’s durability, and can confirm that after 5 hours, it was still (mostly) holding its shape, as can be seen below.

Dairy Free Cream after five hours

Furthermore, this recipe is customisable in that you can vary the flavour of the whip by using different jams/jellies. For the smoothest result, they should be clear and set. Alternately, you could make your own by gently warming and sieving the jam to remove the fruit pieces in the conserve or jam flavour that you require. Apple, apricot, redcurrant, cranberry, blueberry, blackcurrant, plum, damson, marmalade…the possibilities are endless!

Dairy-Free Cream

You can easily halve the recipe at first, to make a trial batch to see if you like it. However, this might be too small an amount for a stand mixer to get to grips with, so use a hand-held whisk instead.

2 large egg whites (80ml)
225g seedless raspberry jam (or smooth jam/jelly of choice)

  • Put both ingredients into a bowl and whisk using a mixer, for about 10 minutes, until the mixture is thick and glossy and holds its shape.

Turkey Salmi

This week I’d like to talk turkey and making champagne tastes on a beer budget.

Just look at that crisp, golden pastry and glossy, rich sauce covering the tender pieces of turkey!

Turkey is a staple on the festive dinner table, but the preference for the pale breast meat has seen the rise of the turkey crown. Since science has yet, one fervently hopes, to develop a limbless turkey, those extra bits don’t just disappear, but are still around to purchase and enjoy.

Actually, I have no idea what happens to the trimmed turkey wings – one of life’s great mysteries – but turkey legs are available in both drum and thigh formats, and should be snapped up whenever you see them because they are fantastic value for money, robustly flavoured and, treated properly, can make for delicious and relatively fuss-free meals.

A quick gallop around the aisles this week tells me that turkey thigh and turkey drumsticks are available in Sainsbury’s, Asda (drumstick only) and Tesco (thigh only). The Tesco thigh is the best value, at only £2.80/kg, but the Sainsbury’s drumstick (£3.30/kg) and thigh (£4.67/kg) and Asda’s drumstick (£3.71/kg) are also very budget friendly, especially when compared to other proteins.

I also took a look at what people out there on the t’Internet are doing with turkey drumsticks and thighs and long story short, not a lot. Both are almost exclusively roasted, and whilst knawing on a joint the size of your arm is certainly a look, here we’re going to be more concerned about taste, tenderness and the use of cutlery.

Rather than the harsh heat of the oven or the barbecue, the method I’m proposing is to use our old friend the slow cooker. A long, low, braise will render even the sturdiest of turkey legs tender and melt-in-the-mouth. And it is so EASY! Literally plonk in the turkey, slosh over some braising liquid, switch it on and you’re set for several hours. You can choose whatever stock you like for the braising, but the simplest and best, in my opinion, is beef stock. Using the jelly-like  beef stock pots made up to double strength (so using only half the water), gives the turkey both flavouring and seasoning in one. Being strongly flavoured, the leg meat also flavours the stock in return, to give a fantastic base for gravy or, as we have here, a sauce.

This recipe is an adaptation of the numerous game bird salmis so favoured by the Victorians. You can serve the meat in the sauce over rice, noodles or potato snow¹, but my recommendation is for a puff pastry vol-au-vent case, to add a fantastic contrast in colour and texture.

In another tip gleaned from the history books, for the vol au vents you can use just a single roll to make six, large vol-au-vent cases. I used to buy two rolls of puff pastry, and cut the bases from one and the borders from another, but this way you can get both from a single roll. Simply cut out the centre of each base and re-roll it until it is as big as the border, then slide it under the pastry border and trim neatly.

Turkey Salmi

You can start this the day before and cook the turkey overnight, else cook on High for about 5 hours to eat the same day. You can also cook the pastry cases the day before and just warm them in the oven before serving.

For the Turkey
Bone-in turkey thigh and/or drumstick – however many will fit in your slow cooker
Rich beef stock pots x 6

1 sheet ready-rolled puff pastry
1 egg for glazing

For the Sauce
30g butter
1 small onion finely chopped
1 bay leaf
3 cloves
1 blade of mace
100g streaky bacon – chopped
200ml red wine (or red grape juice/pomegranate juice/more stock)
300ml beef turkey stock
1 heaped tbs cornflour mixed with a little cold water

  • Put your turkey meat into your slow cooker.
  • Make up the beef stock with just 1.5 litres hot water. Make sure they have melted fully before adding to your slow cooker. If you need more liquid, just add water.
  • Turn the heat to LOW and cook for 8 hours-10 hours. Overnight is perfect. You can also cook on HIGH for about 5 hours if that suits your timings better.
  • When the meat is tender, lift the joints from the slow cooker (a large strainer spoon is helpful here, if you have it), and remove and discard the bones, skin, tendons and cartilage. Try and keep the meat in large pieces. Strain the stock through a sieve and set aside 300ml. Save/freeze the rest for other uses.
  • For the sauce:
    • Melt the butter in a pan and add the onion, bacon and flavourings.
    • Fry for 10 minutes over medium heat until the onions have begun to caramelise.
    • Add the red wine, if using, and simmer for five minutes.
    • Add the stock and let all simmer together for a further 10 minutes, allowing all the flavours to mingle.
    • Optional: Strain through a fine-meshed sieve and return the liquid to the pan. The sauce in the photograph has been strained, and as such gives a really shiny and glossy finish. (I had the bacon and onion in some of the sauce later, on a baked potato. It was delicious.) But there’s nothing wrong with leaving the bacon and onion in the sauce (waste not, want not and all that) – the choice is yours.
    • Taste the sauce and add salt and pepper as required.
    • Add any flavouring sauces to your own taste. These include, but are not limited to, oyster sauce, Worcester sauce, Henderson’s Relish, Soy Sauce, Mirin, Shaoxing wine, anchovy essence, Hoisin sauce, Teryaki sauce, etc.
    • When seasoned to your satisfaction, whisk in the cornflour mixture and slowly bring to the boil, stirring, until the sauce clears, thickens and becomes glossy.
    • Reduce the heat to low and add the cooked turkey pieces.
    • Serve over rice/noodles/riced potatoes, or keep warm while you bake the pastry cases.
  • For the pastry:
    • Heat the oven to 220°C, 200°C Fan.
    • Unroll the pastry and cut into 6 squares (lengthwise in half, then vertically in thirds to give 2 rows of 3)
    • Cut out the centre of each square, leaving a 2cm-ish border.
    • Roll out the middle pieces until they match the size of the borders.
    • Dampen the edges of the now very thin, centre pieces and slide the borders on top. Trim the edges neatly. Prick over the bases with a fork to help keep them from rising during baking.
    • Whisk the egg and paint it over the borders using a pastry brush. Try and keep the egg from dripping down the sides, as this will glue the layers together as it bakes and keep the pastry from rising to its fullest extent.
    • Bake for 25-30 minutes until crisped, risen and golden, turning the baking sheet around halfway through.
    • Cool on a wire rack. Once cold, store in an airtight container (if making ahead).
  • Spoon the warmed turkey and sauce into the baked pastry shell and serve.

¹ Baked or boiled potatoes put through a ricer into a bowl. The riced potato should be allowed to fall into the serving dish in a mound and then served immediately untouched by anything else, spoon or seasoning, to maintain the lightness. Great for dishes with a rich sauce or gravy such as this.

Steak and Kidney Pudding

I enjoyed reading this tweet a few weeks ago:

I feel it’s only fair to warn you: This is an “Okay, so..” post. Click here to skip to the recipe.

This post is in response to a request made over on Time To Cook Online, and I was happy to take a deep dive into this dish because of both its convenience and cheapness. This steak and kidney pudding can be made using a slow cooker and thus uses only a small amount of electricity. It also uses the cheaper cuts of beef (although it can be used with other fillings) as well as (by some) low-regarded and lowly offal. This notwithstanding, it makes for a fantastically satisfying meal that can be ready and waiting for you when you come home from work, with very little to do other than lift it out of the slow cooker and onto a plate. You can also make it ahead and reheat easily, again using the slow cooker.

This recipe goes back a long way, into the Georgian Era of the early nineteenth century, and is a development of the even older Beef Pudding. Contributors to the Wikipedia article on Steak and Kidney pudding rely on Jane Grigson’s assertion that Mrs Beeton was the first to include both steak and kidney in a suet pastry. However, there are at least two recipes in print that pre-date Beeton. One of the quirks of British recipes is that their names are rather fluid, and the same recipe can exist under numerous names. In short, you’re not going to get very far recipe hunting if you only look for ones that bear the same name as modern ones. Differences might be related to geography, or in this case, decades of time.

Anne Cobbett published the following recipe in her (undated, but generally believed to be) 1835-ish book The English Housekeeper.

From The English Housekeeper, Anne Cobbett, 1835-ish.

An even earlier recipe can be found in Alexander Murray’s The Domestic Oracle, also undated, but believed to be around 1826. where the star of the dish would appear to be the kidney, and the steaks almost an afterthought.

From The Domestic Oracle, Alexander Murray, 1826ish.

In the almost two centuries since then, as with any recipe, there have been various tweaks and adjustments made to the basic recipe. Additions that I’ve noted include oysters, oyster sauce, mushrooms, mushroom ketchup (the catsup of Anne Cobbet’s recipe), lemon pickle, mustard, beer, wine.. it really can be whatever you want to make it.

Which brings me to my next point: there are some things you should not skirt, if you want your steak and kidney pudding to taste delicious, and I’m going to take a bit of time to explain what you should do and why you should do it. If you follow these key points, you will have the knowledge to turn out a pretty darn near perfect steak and kidney pudding right from the get-go. In addition, much of it will be adaptable to other, suet pastry puddings, both sweet and savoury. If you’re already impatient to get to the recipe, you can skip ahead by clicking here.

  • Raw or Cooked Filling
    • The Old School way was to put the filling in raw. For the past 50 years or so, people have been following Jane Grigson’s advice to cook the filling first, to stop your pudding becoming soggy. This approach increases both the length of time it takes as well as the Faff Factor™ quite considerably: First you have to cook it, then you cook it again. Well, as will be demonstrated below, if you take a little care with your preparation, there’s no danger of your pudding becoming soggy, so sorry Jane Grigson, we’re going to cut out about two hours of fiddling around on the stove, and fill the pies raw.
  • The Suet Pastry: As with baked pastry crusts, people gradually realised that it didn’t need to be just an outer casing of food, it tasted pretty darn good too, infused with all the juices from the filling. These are some steps you can take to make sure your suet pastry is the crowning glory of your pudding.
    • Suet: Back in the Dayes of Yore, suet came fresh from the butcher and had to be soaked and then grated by hand. You can still find friendly butchers that will supply you with lumps of fresh suet if you ask, and it really is worth the effort in terms of the texture and flavour of the suet crust it produces. I understand not everyone has the time for such Faff,™ and luckily we have the convenience of packs of suet on the supermarket shelves. The suet in these packs has an amazingly long shelf life, because it differs from fresh suet in that it is dried. Here’s the important point for this and any old recipe you might want to try: you need to use LESS dried suet than usual. Most old suet paste recipes are pretty much ‘half fat to flour’, which is fine if you’re using fresh suet, but when using dried, it can make the pastry heavy. So when using dried suet, you should aim to use about 10% less. For example, if a recipe called for 225g of flour, I would use 115g of fresh suet, or just 100g of dried.
    • Baking powder: The original suet pastry would have been rather heavy, but with the advent of baking powder, it can now puff up to a delightfully light texture. The general rule of thumb is 1 teaspoon of baking powder for every 115g flour.
    • Breadcrumbs: You can also lighten the pastry further by incorporating some fresh breadcrumbs into your suet pastry. Again, it is proportional to your flour, so 1 part breadcrumbs to 4 parts flour (divide the weight of your flour by 4 and that’s the weight of the breadcrumbs to use).
    • Seasoning: You don’t want your suet pastry to be a lump of nothingness, so season it! The very minimum should be salt and pepper. If you’re feeling bold, add in some chopped, fresh herbs, or a bit of mustard powder or horseradish – something to give it a bit of personality.
  • The Meat – Beef
    • For all its high-falutin’ title, the very best beef for this pudding is not going to be steak. At least, not STEAK steak. You should actually pick one of the less-prime cuts, ones that are full of flavour and do well with long, slow cooking. I recommend beef cheek, if you can find it (Morrisons supermarket in the UK has an excellent meat department and has always had it in stock whenever I’ve needed some). Also excellent is beef skirt (also carried by Morrisons). Although I haven’t tried it, beef shin is another cut that benefits from long, slow cooking. Finally you could try hangar and/or flat-iron steak, both of which have the marbling to make for a very succulent filling. Cut your meat into 1.5cm dice, so they can be packed tightly into your puddings and be perfectly cooked at serving time.
  • The Meat – Kidneys
    • I appreciate that offal is very divisive, but it tends to be cheap and it is packed with valuable vitamins and nutrients. Even within the offal world, kidneys are somewhat niche. And having researched numerous recipes to prepare for this post, I can understand why people might be kidney averse, or even be in the ‘tried it once, hated it’ camp. Because I was horrified to discover that the majority of recipes fail to prepare the kidneys properly. Everyone is very gung-ho with chopping them up and throwing them in, and I am APPALLED. There are two important stages to preparing kidneys:
      • Removing the core. The core is the hard, white ‘business part’ of kidneys and should be cut away completely. It’s not nice to chew and it never gets soft, even with extended cooking. Cut the trimmed meat into 1.5cm pieces.
      • Soaking the kidney. THIS IS IMPORTANT! The function of kidneys is to filter out the waste products from the blood and send them, and excess water to the bladder. If you don’t soak the kidney in acidulated water or similar (which will draw out the bad-tasting waste products), then they will still be full of all those waste products. That’s going to make the kidney, and everything it’s cooked with, rather ‘funky’ to say the least. Now some people might like that flavour, but for those that think they hate kidney, they probably ate a dish where the kidneys had not been soaked prior to cooking. To soak your kidney, put them in a bowl of cold water to cover, with a teaspoon of salt and the juice of half a lemon (or 2 tablespoons of vinegar) added. Cover the bowl with clingfilm and place it in the fridge for 2 hours, after which drain and discard the soaking liquid and pat the meat dry with kitchen paper.
  • Flouring The Meats
    • When cooking your pudding using a raw filling, you don’t want your pudding to become soggy during cooking, so it is advisable to toss your meats in seasoned flour beforehand, so the flour can act as a thickening agent for all the juices released during cooking. What is lacking in all the recipes I’ve read is the important point that THIS SHOULD BE CORNFLOUR. This is because cornflour doesn’t stick to itself, and consequently, unike regular flour, it doesn’t clump, so there’s only ever a very light covering on the meats and no lumps. In addition, cooked cornflour is transparent, which makes for a wonderfully clear gravy inside your pudding.
  • Gravy:
    • With your puddings properly sealed, the juices from the meats (and vegetables if using) will mingle together to keep it moist. But they will need a little help. You can choose to add water to your puddings, but the better choice is to use beef stock. I use a beef-flavoured stock cube (actually it’s a pot of jelly-like stuff) to make some double strength stock, and add in a splash or two of Worcester Sauce. You can also use beer or wine instead, which can be nice but also something of a hit-and miss in that you need to guesstimate how much to put in at the very start, instead of tasting and adjusting as you go.
    • You should also have some gravy ready to serve with the meal, either on the side or to pour directly into your puddings. Raw ingredients shrink during cooking, so there will always be a gap between filling and the top of the pudding, whatever the size.
  • Add-Ins
    • As mentioned above, there are lots of little tweaks you can do to both the pastry and the filling to jazz it up. Onions are mentioned by many of the old recipes, but are only recommended in very small quantities. They don’t break down during the cooking, which some might find noticeable pieces of onion off-putting. I recommend using onion powder/granules instead, which give the flavour without distracting from the richness of the meat filling. Carrots are another popular choice, but with a raw filling, you have to either dice them rather small, or add in already cooked carrots and run the risk of them turning to mush. Personally, I’m a bit of a purist, and believe the filling should be richly and unapologetically meaty. Perfectly cooked vegetables can be served on the side. However, as can just be made out in the photos, I have taken Dorothy Hartley’s advice and added some black-gilled mushrooms to the mix. Mushrooms have a complementary ‘meaty’ texture and their juices make a flavoursome addition to the gravy, as well as darkening it to a rich brown.
  • Buttering Your Bowls
    • This is what is going to make your puddings turn out beautifully. Use REALLY softened butter and a pastry brush to paint it on. The secret to the beautiful golden colour of the suet crust in the pictures above and below? Butter and a long slow cook in the slow cooker. Taking care to ensure every part of the inside of the bowl is buttered, will ensure a perfect pudding turnout every time.
  • Covering Your Bowls
    • The water in your slow cooker needs to come at least 3/4 of the way up your bowl(s). It never boils furiously, so there’s no danger of the water splashing over the top of the bowls. The main reason for covering your puddings is to protect from the drip of condensation from the lid. Before the advent of the pudding bowl, steamed puddings used to be covered with a floured pudding cloth, but the modern method of greased and pleated parchment and foil works very well.
  • Cooking Your Puddings Long Enough
    • This is probably the main reason things go wrong with steamed puddings, sweet or savoury. All of the old recipes suggest puddings be cooked for many hours, simmering in water which must be constantly topped up to ensure the puddings don’t boil dry. Five hours is a time frequently mentioned. Using a slow cooker has the advantage of being able to, literally, set it and forget it. No need to constantly monitor the water, as the lid keeps it all inside. No need to top up or check if it’s boiling dry. It is very difficult to overcook a suet pudding in the slow cooker. What is very easy to do, is under-cook a pudding. In her column “How To Cook The Perfect Steak and Kidney Pudding”, Felicity Cloake had little complimentary to say of Constance Spry’s cook-from-raw recipe, “The raw beef … comes out gloopy with flour, and tough as a Victorian boarding school”. In Constance’s defence, she did specify beefsteak and stewing steak had been used instead, but in my opinion the main problem was probably cook time. I trialled cooking these puddings in the slow cooker on both High and Low heat settings using raw ingredients. On High, they take 5 hours – not too bad if you’re at home all day, but not really helpful in terms of having a meal ready when you get in from work. On Low I tested puddings with cooking times of 8 hours and 10 hours. Both ended up with golden fluffy pastry and meltingly cooked filling. So provided you can get up early enough to assemble your puddings and get them cooking before you leave for work, they can be ready for supper at the end of a long day. The only suggestion I would make would be to have lots of extra gravy to hand if you’re cooking your puddings 8+ hours.

Last thing I want to have a little rant about in this marathon of a blog post, is the falsehoods I found being perpetrated ‘out there’ with respect to photographs of steak and kidney puddings. The images being posted were frequently not of the recipe they appear alongside. The worst example I found was of a photograph that has been on the internet since 2009 being posted alongside a recipe from 2022. Also, do not be deceived into thinking if you cut a wedge out of your steak and kidney pudding, the meat will tumble artfully onto the plate like many of these pictures suggest. If it does, it will leave your crust rather empty. What it will also do is ruin the structural integrity of your pudding and, if it is undercooked, cause its slow and heartbreaking collapse into a heap on the plate. Setting aside the very insipid colour of some of the pastry, even if the photo is of the actual recipe, it will have been staged for maximum eye appeal, and probably had extra filling added in order to make the image seem plentiful. I am puzzled, for example, how all this filling fit inside this pudding? If your pastry is no oil painting, do not despair, you can always drown it with the gravy (that this recipe doesn’t even tell you how to make).

So in light of these criticisms, I feel compelled to admit to the shenanigans I’ve employed in the pictures on this post. This image is from another of the test puddings, made on a different day (hence the different lighting) in a slightly smaller bowl to the one in the top picture. The ‘manipulations’ I have used include removing the top of the pudding pastry to reveal the filling, and adding in some extra gravy to increase the eye appeal. No extra filling was added and this pudding is absolutely made from the recipe below.

Steak and Kidney Pudding


These quantities are sufficient for two generous puddings in bowls of diameter 12cm. You can also put everything into a large bowl and use the longer of the cooking times. You can also increase the quantities to suit your needs. As a general guide, you need 100g beef, 40g kidney, 1 large, flat mushroom per person, but you can adjust these ratios to your liking.

For the filling:
200g beef cheek/skirt/hangar/flatiron steak, in 1.5cm pieces
80g prepared and soaked beef/ox kidney (see above), in 1.5cm pieces
2 large, dark-gilled mushrooms, chopped into 1.5cm pieces
60g cornflour
½ tsp salt
¼ tsp ground black pepper
1 tsp onion powder/granules
250ml strong beef stock
2-3tsp Worcester Sauce (optional)

For the pastry:
340g plain flour
3tsp baking powder
1 tsp salt
½ tsp ground black pepper
150g dried suet (170g fresh)
85g fresh breadcrumbs

softened butter to grease the bowls

  • Butter your pudding bowls generously.
  • Tear off and butter 2 pieces of parchment to cover your puddings. The butter will help brown the pastry, and keep it from sticking. Fold a pleat across the middle of each. Set aside.
  • Tear off two pieces of foil to cover your puddings. Fold a pleat across the middle of each. Set aside.
  • Cut lengths of string to tie around the foil to keep it in place. Set aside.
  • Mix all the ingredients for the pastry.
  • Add cold water and stir gently until the mixture comes together into a soft dough.
  • Divide the dough into two. Cut off a small piece of dough to make the lid.
  • The dough is too soft to warrant using a rolling pin. Pat out the larger pieces of dough on a floured surface until about 1cm thick. Lift the dough and drop it gently into each bowl, allowing about 3cm to hang over the rim of the bowls. Be sure to patch any holes that form with extra pastry. The pastry must be ‘watertight’ to keep all the gravy from leaking out.
  • Pat out the smaller pieces of dough until 1cm thick and set aside.
  • Mix the cornflour, salt, pepper and onion powder together.
  • Toss the pieces of kidney in the seasoned cornflour . Remove any excess cornflour by tossing the pieces in a sieve over the bow. Set aside.
  • Repeat for the pieces of beef, including tossing the coated pieces in the sieve (you may need to work in batches).
  • Layer the beef, kidney and chopped mushroom until the bowls are full. The filling can be a little higher than the edge if necessary.
  • Add the Worcester sauce to the stock if using, and then pour into the puddings until the liquid is just visible below the top layer of meat.
  • Lay on the pastry lid and moisten the edges with water.
  • Fold the excess pastry over onto the lid and use a fork to seal the edges well.
  • Cover the tops of the puddings with the buttered parchment, butter side downwards.
  • Cover the parchment with foil and press closely to the sides of each bowl.
  • Tie string just under the rim of the bowls to keep the parchment/foil in place.
  • Turn your slow cooker to High or Low, depending on your schedule.
  • Place your puddings into the slow cooker.
  • Boil some water and pour carefully into the slow cooker, until the water level is ¾ of the way up the sides of the bowls.
  • Cover with the lid and cook according to your needs. On High, the puddings will take about 5 hours. On Low, they will be done in 8 hours, but can go as long as 10 hours with no deterioration in quality.
  • To serve, switch off the slow cooker and remove the puddings from the water. I find a long-handled skimmer/strainer spoon useful.
  • Cut the strings and remove the foil and parchment.
  • Place your serving dish/bowl over the puddings and turn over.
  • Lift off the bowls.
  • Serve as is with extra gravy and freshly cooked vegetables on the side, or cut the tops off the puddings and stir in some gravy to moisten before serving.
  • You can reheat the puddings by wrapping in foil (to keep from drying out) and putting into a 170°C, 150°C Fan oven, or, if using ceramic bowls, in the microwave. Alternately, keep the parchment and foil on from the original cooking, and reheat in hot water in the slow cooker on High.

Damson Ice-Cream

The autumn months are almost upon us and it truly is the season of mellow fruitfulness.

First among equals is the damson, a fruit I have been familiar with my whole life. Damsons are small, oval, wild plums with a signature ‘bloom’. They are different to bullaces, a different wild plum which is more round and apple-shaped. It was only a few years ago that I learned that damsons aren’t universally known, rather they are concentrated in just a few counties, namely Shropshire, Worcestershire, Buckinghamshire, Cheshire and Westmorland.

Damsons are really tart – there’s no possibility of enjoying them raw – and make fabulous jams and chutneys. I particularly enjoy them in sweet dishes, because their sourness and tartness are a great foil against sugar and sweetness.

And so to this recipe. This is a fabulously simple recipe which makes beautifully soft and creamy ice-cream with just two main ingredients, plus flavouring, without the need for an ice-cream maker. This last point is especially useful if, like me, you lack worktop space. There is no need to repeatedly remove it from the freezer and stir to remove ice crystals, because they never form. You can literally mix it in minutes and freeze overnight and enjoy perfectly smooth, delicious ice-cream immediately.

The ice-cream recipes over on TimeToCookOnline include salted caramel and malt, both of which can be made with storecupboard ingredients, but I fancied adapting this recipe to use fresh fruit, and my freezer provided the ingredients. I had a bag of damsons that had been languishing there for probably three years, so their time to shine was long overdue.

The method can be used for any frozen, or indeed fresh, fruit. Most importantly, it is necessary to get rid of as much water from the fruit as possible, as it will form ice-crystals when frozen and ruin the smoothness of your ice-cream. The majority of this post will be on how you can achieve this, plus a short-cut or two.

Fruit Puree Method – Damsons

The flesh of a damson clings tightly to the stone, so the best way to separate the two is by cooking. Sweetened, stewed damsons were a regular simple pudding on the table during my childhood. One had to spoon the cooked fruit into your mouth, then discretely return the stone to the spoon and lay it on the rim of your dish. For ice-cream purposes, though, a puree is what is required.

  • Put 1kg (or more if liked) of damsons, fresh and rinsed or frozen, into a saucepan.
  • Add 3-4 tablespoons of water and cover with a lid.
  • Turn the heat to low and let the fruit gently steam/stew until soft.
  • Pour the fruit into a sieve over a large bowl and stir with a wooden spoon to separate the fruit pulp from the stones and skins. Use the back of a knife to regularly scrape the pulp from the underside of the sieve. Be warned, damson juice will stain, so wear an apron and wipe up any spills promptly, especially if you have a wooden worktop.
  • When all that remains in the sieve is stones and skins (which can be discarded), measure the fruit puree and add HALF the volume of puree in granulated sugar. e.g 4 cups of juice will need 2 cups of sugar.
  • Return the puree to the pan, add the sugar and stir to dissolve.
  • Simmer over a low-medium heat until it has reduced and thickened. This may take a while, depending on the volume of puree you’re working with. There’s a lot of pectin in damsons, so if you spoon a little onto a cold plate and it sets, it’s done.
  • What you should be left with is something of the consistency of runny honey.

Sugar Absorption Method – Fresh Apricots

This method is an adaptation of a jam-making method used by ‘The Jam Fairy’ Christine Ferber. I used it with fresh apricots which I spotted recently at a bargain £1 a punnet. It takes a little longer, but preserves the fresh flavour of the fruit.

  • Slice the apricots and remove the stones.
  • Score the inner flesh with a sharp knife, being careful not to cut too deeply – the skin should remain intact.
  • Lay your apricot halves side by side in a bowl in layers, flesh-side up.
  • When you can fit no more into the layer, cover generously with granulated sugar to a depth of about 1cm.
  • Continue layering and covering with sugar until all your fruit is in the bowl.
  • Cover with plastic wrap and set aside for 8-10 hours, or overnight. The sugar will draw out the juices in the apricots and in turn be drawn into the flesh of the fruit.
  • Tip the fruit and sugar mixture into a saucepan and heat very gently until all the sugar granules have dissolved. Stir occasionally.
  • When all the sugar is dissolved, bring the syrup to a boil, turn off the heat and cover the pan. Leave to stand until cool.
  • Drain the fruit from the syrup.
  • Remove the skins of the fruit. The heat of the syrup will have softened the skins as well as separating them from the apricot flesh. If you lift up each apricot half by pinching the skin at the back, it should pull away quite easily. It is likely to remain attached at the edges, in which case you can help things along by scraping the flesh away with a teaspoon. Put the flesh into a separate bowl. Discard the skins. You can keep the apricot flavoured syrup to use as a glaze for fruit tarts, buns etc.
  • Puree the flesh.
  • Taste, and add a little lemon juice to taste to sharpen the flavour, if liked.

Storecupboard Hacks

Tinned fruit in syrup has already been processed, so you could drain some tinned apricots/peaches/pears etc and puree the fruit. The flavour won’t be quite as fresh-tasting, but it’s much quicker and you can be feet up, waiting for your ice-cream to freeze in about 15 minutes.

Even quicker, you could substitute jam for the fruit. Use a good quality brand such as Bon Maman, which has compotes and conserves in a range of delicious flavours. How much you’ll need will depend on personal preferences, but I suggest starting with 300g and seeing how that goes. Warm the compote/conserve gently, then puree. You can always stir in extra as a ‘ripple’.

Damson Ice-cream

This damson ice-cream is the best ice-cream I have ever tasted. EVER. The intense sour/tartness of the fruit is a perfect foil to the intense sweetness of the condensed milk, and the result is smooth and rich and velvety, with a huge zing of ‘rippled’ damson. Gooseberries (perhaps with a dash of elderflower cordial) and rhubarb would also work well.

Despite the title, you can use this method to make any fruit ice-cream that takes your fancy. Because it was slightly runny, but intense in flavour, I used just 350ml of damson puree in the ice-cream, and another 150ml as ‘ripple’.  The apricot puree was thicker, so I mixed in a full 500ml.

600ml chilled double cream
1 x 397g tin of sweetened condensed milk
500ml sweetened damson puree – divided

  • Put the cream and the condensed milk into the bowl of a mixer.
  • Add 350ml damson puree.
  • Whip the ingredients with a balloon whisk attachment until light and fluffy.
  • Pour into a suitable plastic container.
  • Add dollops of the remaining puree and swirl through with a knife.
  • Cover and freeze overnight.