Cheese biscuits

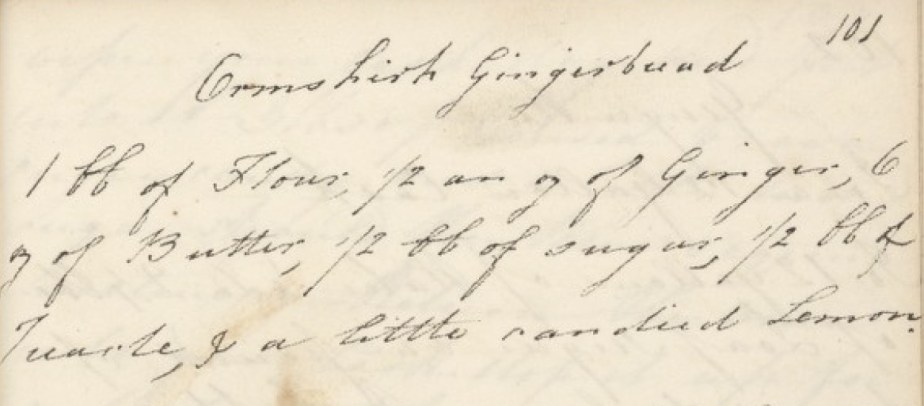
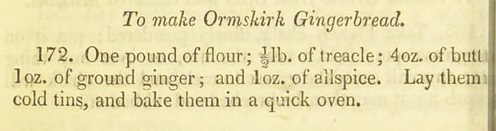
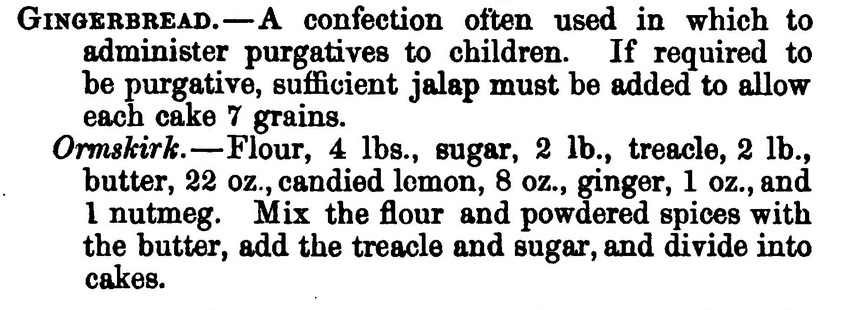
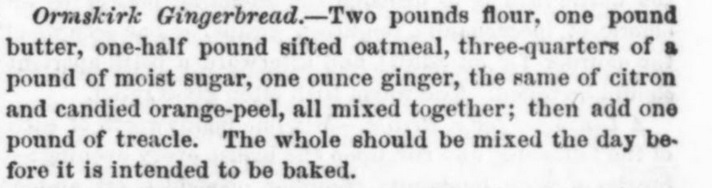
Three recipes for you this week, all originating from a single idea. I thought I’d take the opportunity to show how it is possible to play with recipes you already know and love, and adapt a favourite one to different flavourings and pairings.

I was catching up on the latest season of the Great British Bake Off the other day, and for Biscuit Week the bakers were asked to make Viennese Whirls for their signature bake. I made a similar biscuit in Season Two – except I called them Melting Moments – so I was interested to see what variations this season’s bakers would bring to the table.

The range was wide and the flavour combinations a mix of both unusual and familiar (you can read more details on the specific flavourings/pairings here), and I got to pondering what I would have made. I think I would probably have gone savoury, and what better place to start than with my original recipe, and seeing if it could be tweaked to a more salty flavouring.

Obviously, the main stumbling block is the Melting Moments I made were sweet. Messing about with other recipes I’ve found that substituting cheese for the sugar on a 1:1 basis can get you a long way down the savoury route. I didn’t want the biscuits to spread much, and I also didn’t want the cheese to clump together and produce blobs, so rather than grating fresh from a block, I chose to use already-finely-grated Parmesan cheese (still fresh, just not grated by me). Test Batch 1 (a half batch of the original quantities – another Top Tip when you’re experimenting – no need for a full batch of anything until you get it right) was a straight substitution of cheese for sugar. To compliment the cheese, I also added dry mustard and ground nutmeg, as well as salt.

The results were cheesy-ish but also a little greasy, so Test Batch 2 involved more cheese (for taste) and more cornflour (to help with the greasiness). Batch 1 also didn’t hold their shape very well, but when I was looking at the tweaked ingredient proportions, I saw they were veering close to those of the best kind of shortbread (I made so many batches the proportions are burned into my brain), and so I opted to bake the dough in a shallow-sided pan, just like the shortbread. I didn’t want to dough to blister or rise up, so I poked holes in the dough, also like shortbread. The baking was also done long and low, and the result was absolutely delicious: strong cheese flavour, with the subtle hints of the mustard and the nutmeg rounding it out. The long, slow baking had toasted the cheese particles, which now had the bonus of adding little nuggets of crunchiness to the texture. Finally, cutting the cooked dough into pieces hot from the oven, then putting the tin back in as the oven cooled, made for a gloriously toasted flavour and appearance. It was an amazingly savoury, cheesy, shortbread, but a bit far from a Viennese Whirl.

In addition, the original prompt required a filling of some sort, so I went back to the drawing board and recalled a recipe for a favourite pull-apart bread flavoured with walnuts and blue cheese. After toying with the idea of adding the nuts to the biscuit filling, I opted for adding them to the biscuit dough, and making the filling with blue cheese.

Test Batch 2 was much better in terms of crumbly texture, but the flavour of the walnuts wasn’t really there. So for what would be the final Test Batch, I reduced the Parmesan cheese to keep it savoury but not intrusive, and toasted the walnuts. I kept the amount of cornflour the same, since walnuts have their own oil and this would also need to be absorbed in order to keep the biscuit texture. The result was just what I was going for: crumbly melt in the mouth biscuit texture, robust walnut taste with just a hint of Parmesan.

The last step was to sort out the filling. I opted for Saint Agur, which is a soft and creamy, relatively mild blue cheese, and mixed it with some cream cheese to make it pipe-able. These biscuits lack the piped form of traditional Melting Moments, so adding the swirl in the filling is a neat compromise. If you’re a blue cheese fiend, then use stronger-flavoured cheeses by all means – you might have to work a little harder to get them blended with the cream cheese. I don’t usually recommend brands, but Philadelphia cream cheese has the firmness and creaminess that is just perfect here. If you use a different cream cheese and the result seems a little watery or not as dense as you would like, you can firm it up by placing it directly onto 4-6 folded layers of kitchen roll (in a sealable plastic box or similar) and chilling in the fridge overnight. The excess moisture will be drawn out into the paper towel, firming the cheese mixture up and making the mix easier to pipe. If you don’t have the time to do this, just use your cream/blue cheese mixture as a dip. There is also a Saint Agur Blue Crème product with the cream cheese already mixed in. It is very smooth indeed, but too soft to pipe. Perfect to use as a dip, though.

So there we are. Arguably three different recipes (yes, yes – I know the dip is a bit of a stretch, recipe-wise) from a single inspiration. I do hope you try them, and then have fun experimenting with tweaking your own recipe favourites.

Cheese Shortbread with blue cheese topping and dip

Cheese Shortbread

125g plain flour
50g cornflour
125g unsalted butter – chilled
½tsp salt
½tsp ground nutmeg
½tsp yellow mustard powder
50g ground Parmesan cheese

  • Heat the oven to 160°C, 140°C Fan.
  • Line a shallow baking tin with parchment. I used one of dimensions 26cm x 18cm, but a 20cm square would also work.
  • Put all of the ingredients into a food processor and blitz in brief bursts until the mixture comes together in a soft paste.
  • Press the paste into the prepared tin and smooth over. Using a skewer or a cocktail stick, poke holes evenly over the whole surface area.
  • Bake for 30 minutes, turning the tin around halfway through to ensure even baking.
  • When baked, turn off the oven, remove the shortbread and cut into pieces. I prefer to use my metal dough scraper, which is super thin, to get nice, clean, sharp cuts.
  • Put the shortbread back into the cooling oven, to finish off.
  • When cold, store in an airtight container.

Walnut & Blue Cheese Melting Moments

30g walnuts
125g plain flour
50g cornflour
125g unsalted butter – chilled
½tsp salt
30g ground Parmesan cheese

  • Toast the walnuts:
    • Heat the oven to 200°C, 180°C Fan.
    • Lay the nuts on a baking tray lined with parchment paper.
    • Bake for 8 minutes, turning the tray around halfway through to ensure even browning.
    • Set aside until cool, then chop with a knife into small pieces.
  • Put the remaining ingredients into a food processor and blitz in brief bursts until the mixture comes together in a soft paste.
  • Tip the mixture out onto a piece of parchment and knead in the chopped walnuts.
  • Lay clingfilm over the dough and roll it out thinly (5mm).
  • Slide the sheet of covered dough onto a chopping board and freeze for 20 minutes. The dough is very soft and chilling it hard will make cutting the biscuits out and transferring them to the baking sheet much easier and with no loss of shape.
  • Turn the oven to 160°C, 140°C Fan.
  • Cut the dough into biscuits using a plain 5cm round cutter. Lay the biscuits on a baking sheet covered with baking parchment. There’s little to no spreading during baking, so you can lay them as close as 1cm from each other.
  • Poke holes in the centre of your biscuits using a cocktails stick. Or not. I tried both ways, and to be honest, there wasn’t really a difference. Arguably the biscuits with the perforations, as in the photo at the top, maybe look a little more aesthetically pleasing, but not by much. You choose.
  • Bake for 30 minutes, turning the baking sheet around halfway through to ensure even baking.
  • Remove from the oven and allow to cool on the tins. The biscuits are rather friable when warm, so don’t be too eager to move them.
  • Store in an airtight container when cold.

Blue Cheese Filling/Dip

150g (1 pack) Saint Agur blue cheese
280g (1 large box) Philadelphia cream cheese

  • Remove both ingredients from the fridge and allow to come to room temperature.
  • Crumble the blue cheese into a bowl and mash with a fork or the back of a spoon until smooth.
  • Add half the cream cheese and mix thoroughly, making sure there are no lumps.
  • Add the rest of the cream cheese and mix until smooth and fully incorporated.
  • Fill a piping bag fitted with a 5mm star nozzle, and pipe onto half your biscuits.
  • Top with the remaining biscuits and arrange on a serving plate.
  • Use any remaining filling as a dip by adding a little cream/creme fraiche, yogurt until the desired consistency is reached.

Ormskirk Gingerbread

If you’d asked me only a few years ago, of my opinion of gingerbread, I would have given an indifferent shrug in response: I didn’t dislike it, but I wasn’t a fervent fan either. Ginger biscuits and the gingerbread used for gingerbread men I thought dull. Ginger cake was fine, but it would never be a first choice. Since then, I have discovered so many old recipes that have range and depth and nuance that it’s turned my head completely. And here we have another to add to the collection.

Ormskirk Gingerbread has a lot going for it, and I’d even go so far as to say it is probably one of the best-tasting gingerbreads you’ve never heard of.

It has a speckled appearance, from mixing the dry ingredients with melted butter and treacle, which is enough to bind, but not drown. There is candied peel, traditionally lemon but sometimes others, and spices, usually ginger, but frequently, additional spices as well. A major attraction, for me at least, is the texture, falling between the softness of parkin and the crispness of a biscuit. As you, quite literally, sink your teeth into a piece, you experience a dense chewiness which, with the variety of flavourings, is immensely satisfying.

Ormskirk Gingerbread (1830s) is  one of the earliest geographically-linked gingerbreads I’ve found – predated only by Wrexham Gingerbread (1828). In the 1850s, a group of five local women paid £20 per year to the East Lancashire Railway company for the privilege to sell their gingerbread to travellers passing through Ormskirk station, which must have contributed to the spread of its popularity.

I have a selection of recipes for you to try, because in all honesty, I like them all. The method is the same for all of them, so I shall be listing the scaled-down ingredients alongside each recipe, then you can scroll down to the method and cooking instructions. All quantities are for a 20cm square tin.

Ormskirk Gingerbread recipe, (1822-1841), MS4998, Wellcome Collection

This recipe is from a handwritten manuscript held at the Wellcome Collection. It might actually be older than the recipe below, but there’s no way of telling for sure. Rather unhelpfully, there are no instructions for either making or baking, but it clearly contains all the classic ingredients and is a great introduction to this type of gingerbread:

225g plain flour
115g soft, light brown sugar
7g/1tbsp ground ginger
85g butter
115g treacle
20g candied lemon peel

From: The domestic receipt-book by Joseph Worrrall, 1832, p38.

This is the earliest printed recipe I found. Unfortunately, it contains an error – the sugar is missing. Aside from this, what I found interesting was the complete omission of what appears to be a major component of other recipes, the candied lemon peel.  In  addition, there is, proportionally, a lot of spice in relation to the quantity of flour, but it is an interesting variation. In the past, I have bought dried, chipped ginger, and ground it as needed, and the flavour is bright and vibrant and, curiously, with a touch of lemon. Similarly with allspice, whose flavour really evokes a blend of spices.

225g plain flour
60g butter
115g treacle
115g soft, light brown sugar
14g ground ginger
14g allspice

From The druggist’s hand-book of practical receipts, Thomas F. Branston, 1853, p80

This recipe echoes the medicinal uses many believed gingerbread possessed in the middle ages. I find it odd that it is Ormskirk Gingerbread that is specified in particular, instead of a generic gingerbread recipe. Jalap is the ground root of a Mexican plant of the Morning Glory family, and it was used in times past for its laxative effect.

225g plain flour
115g soft, light brown sugar
115g treacle
80g butter
30g candied lemon peel
2 tsp ground ginger
1½ tsp ground nutmeg

Peterson Magazine 1861-01: Vol 39 Iss 1, p93

This last recipe is a full-on, all the bells and whistles version. There’s no candied lemon peel – instead there’s candied orange and candied citron and, aside from the ginger, no other spices. There’s a higher than usual farinaceous component, with the addition of some oatmeal flour (which you can make yourself by putting rolled oats into a blender/spice mill). Finally, there’s the instruction to mix it a full day before you want to bake it. Many old gingerbread recipes have this added time requirement, because they’d also use alum and potash as raising agents, and these worked slowly, so a mix for gingerbread could be sitting in a tub for days if not weeks. There’s no raising agent included in this recipe, so I was curious whether there would be any difference to the other batches. Verdict: There was, and the resulting gingerbread was definitely veering towards cakey, although this might have been due to the added oatmeal – if that’s your preferred texture, have at it. The next time I make this I probably wouldn’t wait the 24 hours, but that’s just me being impatient.

225g plain flour
115g butter
60g sifted oatmeal flour
80g soft, light brown sugar
115g treacle
15g candied orange peel
15g candied citron peel
7g ground ginger

As I said at the top, all these recipes are delicious.

Ormskirk Gingerbread

Another reason to choose to make this gingerbread is that it can be made gluten-free, using gluten-free flour (I used Doves Farm) and gluten-free oats (Morrisons have the nicest looking GF oats – they’re like steel-rolled ones!).

It can also be made vegan, if you swap out the butter for either coconut oil or some other fat that is solid at room temperature.

Finally, there’s two slight variations in method, and it relates to how you handle the butter. The traditional method for gingerbread is to melt it in the treacle and then pour the mixture into the dry ingredients to mix. The other method is to blitz it with the dry ingredients in a food processor (or rub it in by hand). It doesn’t matter which method you choose, as the result is the same.

  • Choose your ingredients from one of the four recipes above.
  • Line a 20cm square tin with baking parchment.
  • Heat the oven to 160°C, 140°C Fan.
  • Mix your spices, sugar and flour(s).
  • If you’re blitzing the butter with the dried ingredients, add it now.
  • Blitz the mixture to resemble breadcrumbs.
  • Slice the candied peel thinly and then cut into 1cm pieces. Mix the peel into the dry ingredients, making sure the pieces don’t stick together.
  • Pour your treacle into a pan to warm. I use a large frying pan, as I prefer to add everything to the treacle, as opposed to pouring the treacle into the dry ingredients. Add the butter if you’ve not added it to the flour. You’re not trying to boil it, just warm it up enough that it moves freely and the butter (if using) is melted.
  • When the butter has melted and the treacle warmed, pour  the warm liquid into the dry ingredients and mix in. It doesn’t have to be evenly coloured.
  • Tip the mixture into your prepared pan and level out. I like to leave it rather roughly textured. Don’t press the mixture down hard, just even it out.
  • Bake for 40 minutes, turning the tin around after 20 minutes to ensure even baking.
  • Remove from the oven and , leaving the gingerbread in the tin, divide it into pieces. You can cut it into any shape you please – easiest with a square tin is 16 pieces (4 x 4 grid).
  • Set the pan aside to cool completely.
  • When the gingerbread is cold, store in an airtight container.

Summer Ice-creams

The brief green gooseberry season is upon us and their delicate but sharp taste is a wonderfully aromatic taste of summer. Reddish dessert gooseberries ripen later in the season, but the sharpness of the green is my preference. They’re a thorny bush, so be prepared for having multiple jabs in your hands. I picked some at a local Pick Your Own fruit farm. Top Tip: most berries conceal themselves on the undersides of branches, so always lift them up for maximum harvesting efficiency. If your local fruit farm doesn’t have PYO gooseberries (and many don’t, sadly) they can also sometimes be found in the freezer of your local Farm Shop.

After laying down a batch of my bi-annual batch of gooseberry vinegar (a doddle to make, but a year in the fermenting/clearing), I decided to make a batch of gooseberry ice-cream. As the owner of a tiny kitchen (2m x 3m), I have neither the counter/cupboard space for an ice-cream maker, nor the patience to keep stirring a semi-frozen mixture in order to break up the ice-crystals, so the ‘set it and forget it’ no-churn recipe employing sweetened condensed milk is pretty much a no-brainer in this household.

The method is practically the same as that given for Damson Ice-Cream from a couple of years ago: Mix most of a fruit puree into the cream/milk mixture, then ripple through a ribbon of the remaining puree and set in the freezer.

The means of obtaining your gooseberry puree is a little different than usual, mainly due to their water content, which will wreak icy-crystal havoc with your ice-cream if it is too high. Rather than simmer with water until they break down, the gooseberries are coddled in a closed vessel over simmering water. The result will be a clear-ish liquid (which can be poured off) and the fruit pulp, which is then used for the ice-cream. This approach preserves not only the colour, but also the flavour, as prolonged cooking and/or high heat impairs both.

The second recipe is my re-creation of an ice-cream I had several years ago in Yorkshire. It’s actually not really a summer ice-cream, because citrus isn’t really in season in July, but oranges are in the shops and marmalade is on the shelves, and I am in love with it, so here we are.

The bitterness of Seville oranges, just as the tartness of gooseberries, is the perfect pairing with this ice-cream method, because the condensed milk is SO sweet, it needs something sharp to cut through all that sugar. Interestingly, in developing this version, I did learn that there is such a thing as too much bitterness. An early version contained both the zest and juice of Seville oranges (which I keep in my freezer as frozen cubes for year-round zestiness), and while I liked the end result, it really leaned heavily into bitterness, so I had to dial it back somewhat. This version uses the zest of regular oranges and no juice, with the slivers of peel from the marmalade providing delicious pops of intense Seville bitterness, tempered with sugar.

Both of these ice-creams will need to be removed from the freezer for 20-30 minutes before serving, in order to soften.

Gooseberry Ice-Cream

I have left the gooseberries without sugar, as there is more than enough sweetness with the condensed milk. Feel free to add some sugar if you feel they need it.

500g green gooseberries

1 x 397g tin of sweetened condensed milk
600ml double cream

  • Put the gooseberries in a lidded pan without any additional water and set it inside a larger pan. Add water until the larger pan is half filled. Heat over medium high heat until the water is simmering and coddle the gooseberries until soft. if you don’t have suitable pans to do this, you can put them into a casserole with a close-fitting lid and bake in the oven at 170°C, 150°C Fan. for 20-30 minutes.
  • Tip the coddled gooseberries into a sieve over a bowl and allow the clear liquid to drain through. Set the liquid aside.
  • Rub the gooseberry pulp through the sieve until all that remains are the seeds. Discard the seeds and set the pulp aside to cool.
  • Put the condensed milk and double cream into a bowl and whisk together until light and billowly.
  • Fold through 3/4 of the gooseberry pulp until well combined.
  • Spoon the ice-cream mixture into containers and then stir through the remaining puree in a ripple.
  • Cover and freeze at least overnight before serving.
  • Waste not, want not: You can add sugar to the clear gooseberry liquid and simmer it down to a syrup to pour over your ice-cream.
  • Bonus: Add a splash of elderflower cordial to taste to the puree, but beware of adding too much liquid.

Marmalade Cheesecake Ice-Cream

There is a slight difference in the method of this ice-cream, in order to get the cream cheese fully incorporated with the other ingredients. There’s no added sugar, as the condensed milk add more than enough. The amount of marmalade you’ll need will depend very much on the whatever marmalade you are using. I used a jar of my Dundee Marmalade, which is quite peel-heavy, so I only needed one jar.  Top Tip: An efficient way to get your marmalade shreds separated from your marmalade jelly, tip your jar(s) of marmalade into a pan and warm it gently until the jelly liquefies, then pour it through a sieve over a bowl. The jelly can then be poured back into the jar(s) for use later. Cut your shreds into smaller pieces if liked.

100g of orange shreds from your favourite marmalade – about half a cup.

zest of 3 oranges
330g cream cheese, Philadelphia for preference – at room temperature
1 x 397g tin of sweetened condensed milk
600ml double cream

  • Put the orange zest and cream cheese into a bowl and whisk until smooth.
  • Pour in the condensed milk and whisk again until smooth.
  • Add the double cream and whisk until light and billowy.
  • Stir through the marmalade shreds.
  • Spoon the ice-cream mixture into containers.
  • Cover and freeze at least overnight before serving.

Serving suggestion

To emulate a regular cheesecake, serve with some crisp/crunchy biscuits – Digestive biscuits/Graham crackers are a favourite. I used amaretti in the picture because that’s what I had, and regular readers will know we don’t make special trips to the supermarket for just one ingredient.

Nankaties

Something a little different for you this week, dear Reader, and something of a surprise, perhaps.

These are Nantakies: Indian shortbread biscuits that are still enjoyed today, mainly at Christmastime.

This particular recipe comes from a book printed in 1887 in Bombay (Mumbai) at the height of the British rule in India. It is one of many Indian cookery books in English that I have collected over the years and is freely available to download at The Internet Archive.

What first drew me to this shortbread recipe was the small number of ingredients when compared to modern recipes. Also, following on from my earlier shortbread investigations, I was curious to know how using 100% ‘rolong’ (semolina) as the flour ingredient would affect the taste and texture.

Initially, testing this recipe went poorly, because I used coarse semolina. Switching to finely ground semolina (found in my local orange supermarket under the brand name Natco) was a great improvement. It was still too sweet for my tastes, so I tinkered a little with the ratios and switched out regular butter for more appropriate clarified ghee.

In the UK, ghee can be found in supermarkets and smaller shops in distinctive green and gold tins. Once opened, they don’t require refrigeration and can be stored in a drawer/cupboard. However, I must impress upon you that not all tins of ghee are the same. The very best brand, in my humble opinion, is East End.

Opening this brand especially, releases an almost perfumed aroma that immediately sends you to a more exotic and fragrant place. I have not had the same experience with other tins of ghee – purchase them at your peril!

The result of the tweaks and changes made for  a wonderfully aromatic and decadent shortbread bite, needing no further flavouring. However, if you’d like to add a hint of cardamom or rosewater, I think it would be a delicious variation. The golden colour from the ghee remained during baking in the cool oven and I have added a gold dragee to the top of each one as an exotic but restrained decoration.

You will have noticed that there are two shades of biscuit in the above photograph. Spurred on by my success with the tweaked original, I also made a gluten-free version using ground rice instead of semolina, and accented the biscuits with a silver dragee. I used up most of my ground rice in doing so and when I went to buy more I was disappointed to find that my local shops no-longer stock ground rice as a matter of course: perhaps it’s viewed as old-fashioned. I would have thought it would be readily available, given its usefulness in gluten-free baking, but there are numerous shops online that stock it, so all it requires is a little forward planning.

I wanted small, neat biscuits and having persevered with hand rolling various sizes, I eventually found the perfect ‘mould’ in my tablespoon measuring spoon. It was a little fiddly to form the biscuits one by one, but well worth it in the end result.

Nankaties – 1887, Mumbai

Makes 12-20 biscuits, depending on size.

150g finely-ground semolina or ground rice if gluten-free
75g ghee
35g icing sugar

gold/silver dragees for decoration

  • Heat the oven to 150°C, 130°C Fan if baking the biscuits immediately. Otherwise, heat the oven just before removing the chilled biscuits from the fridge.
  • Put the ingredients into a food processor and blitz until the mixture resembles breadcrumbs. It will have a texture of damp sand, and will hold together when pressed.
  • Tip out the mixture and shape your biscuits – either by hand rolling or by pressing it into a mould. If you choose the measuring tablespoon method mentioned above, I found it useful to use some plastic wrap/cling film to line the spoon, which made it very easy to remove the moulded biscuits without damaging them. Be sure to pack the mixture firmly in order for it to keep its shape during baking.
  • Arrange your biscuits on a baking sheet lined with parchment or a silpat mat.
  • Add the dragee decoration if using.
  • You can chill the biscuits in the fridge for 30 minutes before baking, if liked. It can help retain a neat shape, although I should point out that the biscuits in the photo above were not chilled before baking. If you want especially crisp edges to your biscuits, you can always neaten them once cold with a microblade grater.
  • Bake for 30-40 minutes until crisp. The colour won’t really change, due to the low temperature.
  • WARNING: the biscuits will be extremely delicate when hot. Leave them to cool on the baking sheet/tin until completely cold before moving them.
  • Store in an airtight tin.

Carnival Fruit

This recipe is such a delight. So simple, so eye-catching, and almost 400 years old.

It comes from one of my favourite manuscripts at The Wellcome Collection. Now I’ll freely admit I am very fickle with my favouritism, and I have been reminded this week of just how special this manuscript is, mainly due to a completely different manuscript I’ve been working on. I’m not going to name and shame it, but my dears… The handwriting. The spelling. Lets just say, I was sorely tested.

THIS manuscript, however, is an absolute delight. Straddling the 17th and 18th centuries, the handwriting is surprisingly modern: neat, well punctuated, with a pleasing layout, it is a joy to read, and I regularly have to remind myself just how old it actually is.

Carnival Fruit 1650-1750, MS8097, Wellcome Collection

The method used to ‘carnival’ fruit is to dip it into a clear caramel. Although I have used several different fruits in the top image, the fruit recommended in the recipe is ‘a Cheney Orange’ (China Orange), aka an eating orange (as opposed to a Seville bitter orange). Since oranges are in season during the winter months, I believe this is perfect dish to serve up during the festive season. Nowadays we have the luxury of fruit out of season, which can make for a very colourful display, however, some fruit are more suited than others. Very moist, juicy fruit such as strawberries and cherries (not pictured) will only last 2 hours before the shiny caramel coating starts to break down. Other fresh fruits such as grapes, physalis, blueberries, nuts and even dried fruit such as apricots will last 3 hours before starting to become sticky. Whilst you can do orange segments, I feel that against the scale of the other fruit, they’re a bit big, and that small orange segments (satsuma, mandarin, clementine and the like) would be more suitable.

A similar recipe in a slightly later manuscript, ‘Coromella’ 1805-1860, MS2203, Wellcome Collection

I have changed very little in this recipe: I’ve added some weights and measures, to help with getting the sugar to the correct stage and added a little liquid glucose to keep the caramel from crystallizing. I tried several times to go ‘old school’ with just sugar and water, but the caramel always crystallized too quickly to get more than just a few pieces dipped. Perhaps they used honey to help them out back then?

When choosing your fruits and nuts, it is important to consider how they are going to taste with the caramel. If you have a sweet tooth, then it gives you free rein to pick and choose almost anything. Personally, I would recommend choosing fruit that is slightly sharp, just to prevent an overload of sugar. The fruit also needs to be dry, so this rules out any fruit so large it needs to be sliced.

Choose your favourites from: green/red/black grapes, cherries, strawberries, raspberries, strings of redcurrants, blueberries, blackberries, physalis, dried apricots, walnuts, hazelnuts, pecans, almonds. If you have the patience to put individual pomegranate seeds on cocktail sticks and dip them, I think they would be delightful in both appearance and flavour.

The greatest amount of time for this recipe will involve preparing the fruits and nuts.

  • You can utilise the stalks on cherries and redcurrants, the papery coverings on physalis and the green stalks on strawberries to hold as you dip them in the caramel.
  • Most other fruits and nuts can be pierced with a wooden cocktail stick to prevent getting boiling caramel on your fingertips.
  • The recipe recommends using a thread to dip orange segments, and I must confess to not having tried this method. I opted instead to use the cocktail stick. If you can pierce the skin and avoid bursting any of the juice sacs inside, you’re onto a real winner.

To Carnival Fruit

For the caramel

400g granulated sugar
125ml water
60ml/4tbs/¼ cup glucose.

a selection of fresh fruits, berries and nuts

wooden cocktail sticks for dipping

a silicone mat or baking parchment

a sugar thermometer

  • Put the sugars and water into a small saucepan and set aside to begin dissolving while you prepare the fruit for dipping.
  • Use the wooden cocktail sticks to skewer the fruit and lay them neatly on a board or plate. If you’re using small orange segments, remove all the white pith. If you accidentally tear the skin of a segment, eat it – the juice will compromise the caramel.
  • Line a baking sheet with the silicone mat or baking parchment. This is for laying the dipped fruits on to cool. Although the dipping is straightforward, you will need to work fairly briskly in order to get all the fruit dipped before the caramel cools. If you can keep the pan on a very low heat while you dip your fruit, then this won’t be much of a problem. However, the heat will continue to cook the caramel, and it will become darker the longer it remains on the heat.
  • Arrange the prepared fruit and baking sheet so that they are easily to hand when the caramel is ready.
  • Heat the pan with the sugars in over a low heat until the granulated sugar has dissolved.
  • Increase the heat and cook until the syrup registers 150°C on a sugar thermometer. The syrup will be bubbling vigorously over the whole surface of the liquid.
  • Remove from the heat (or turn the heat down to the minimum, your choice), and begin dipping your fruits and nuts.
  • Tilt the pan so that the syrup is deep, and then one at a time, dip your fruit fully into the caramel and set on the silicone mat/parchment to cool. For fruit not on wooden sticks, be sure to keep your fingers well away from the caramel when dipping, as the caramel will burn, and stick to your skin and continue to burn, if it comes into contact.
  • The caramel needs only a minute or two to set, and then all that remains is to arrange it on your serving dish and serve. I went for a wooden board, as it’s plainness and natural material made for a great contrast against all the brightly coloured, shiny carnival fruit. To remove the wooden sticks, roll them between your thumb and forefinger – this will provide enough pressure to break the caramel surrounding them, thus making it easy to remove them.

Colcannon

There are many traditional foods associated with All Hallow’s Eve/Hallowe’en, November Night, but one which might be new (and deliciously simple to prepare), is the Irish potato dish of Colcannon.

Back in the beforetimes, when cakes of bairín breac were considered a luxury, people used to celebrate All Hallow’s Eve with a big pot of Colcannon. A ring was hidden in the depths of the creamy, mashed potatoes, and whoever ended up with it on their spoon, was said to be going to be the first to marry, within the next 12 months.

There aren’t many Irish cookery books of this time, so my favourite place to find accounts of the Irish food actually eaten by the population (as opposed to some publisher’s imagined scenario), is The School’s Collection at the National Folklore Collection, held at University College, Dublin. The Schools Project was an ambitious and wide-ranging collection of everything to do with Irish Folklore and Culture, gathered and recorded by school pupils between 1937 and 1939. More information about the project can be found here.

With information gathered from all across the country, it is fascinating to see both the common threads that bind the Irish people together, as well as discover the little differences that make each community unique. For instance, you might be aware of the popular Irish potato dish of Boxty, you might also be aware that it can be served in three different ways (loaf, dumplings, pan), but you might be surprised to learn that The Schools Collection contains over 150 different ways of making Boxty. I recently wrote a paper about this, the appendices of which, including the list of 150+ different ways of making Boxty, you can access here.

So it is, to a certain extent, with Colcannon. It also appears under the names Brúitín, Brúchin, Champ and Poundies, to name but a few. “No, no no!” I hear you exclaim, “Champ is its own thing! It’s made with spring onions!”

Well yes, but actually no.

It might actually be a Stampy/Boxty situation, where the same dish has different names, depending on the part of the country you come from. I shall be looking into this more soon.

Similarly, there can be interpretation as to what exactly the dish comprises. At it’s simplest, it is cooked potatoes, mashed with a little milk, pepper and salt, and served in a mound with a lump of butter in the middle. It is eaten by scooping some potato from around the edge and then dipping it in the growing pool of melted butter in the middle before consuming.

Many accounts of Colcannon have additional items of flavouring added. “A bit of greenery” is probably the easiest way to describe a large proportion of them, which include young (spring) onion, chives, nettles, leeks, shredded cooked cabbage or kale, parsley, regular onions.

The accompaniments can be anything you enjoy, but traditionally they include: sweet milk, buttermilk or sowans to drink, and crisp, crunchy oat bread (oatcakes) to use as a scoop.

I was delighted to find just how old the dish of Colcannon is: there’s mention of it back in the eighteenth century. William Ellis (1750) includes a recipe for an “Irish Country Dish” in his The Country Housewife’s Family Companion, p366.

And Welsh diarist William Bulkeley (1691-1751), whose diaries are kept at Bangor University, mentions dining on “Coel Callen” at Halloween in 1735, whilst on a trip to Ireland.

Even earlier, a poem published in Dublin in 1723, speaks of what certainly seems to be a dish of Colcannon being prepared for a wedding feast.

From “Mendico-hymen seu, tuphlo-pero-gamia. The beggar’s match. Translated from the Latin.”, W. Thompson, printed by Tho. Hume, for Jer. and Sil. Pepyat, Dublin, 1723.

Colcannon

This is more of a guideline than hard-and-fast recipe. Use quantities to your own personal needs and taste.

potatoes
greenery 
milk
salt & pepper
butter

ring (optional)

  • Cook your potatoes. The method doesn’t really matter: boil or bake. The important detail is to mash them smooth whilst hot. I use a ricer to make sure all lumps have been dealt with, but you can also press them through a coarse sieve or use some elbow grease and a masher utensil.
  • Smooth out the mixture by adding milk. NB Use hot milk, otherwise you run the risk of cooling down your potatoes too much. If you’re using any kind of onion, you might like to simmer them in milk for 10 minutes to both flavour the milk and reduce the harshness of the onions themselves. Strain out the onions, keeping the warm milk for mixing, and chop the onions finely – or to your taste. Cover and keep hot while the greens are prepared.
  • Add your greens – this may be in the form of herbs (chives/parsley) green onions/spring onions/cibol/leeks, Savoy cabbage, spring greens, kale, sweetheart cabbage, white cabbage, Brussels sprouts, spinach, nettles, etc. The cabbage and/or leeks should be shredded to your liking (fine/coarse) and blanched/steamed for five minutes. Add sufficient to your own personal taste.
  • When everything is piping hot, serve your Colcannon in a large communal dish, with a generous amount of butter in a hollow in the centre, and hand round spoons for all. Don’t forget to pop a ring  into the mix before serving, if matrimony is in your plans.

Improving Strawberries

On a recent holiday in France I had some wonderful strawberries: heady, aromatic and bursting with flavour.¹

Still a bit mesmerised, two punnets of strawberries were one of the first things I bought when we got back. Alas, compared to the French ones, they were decidedly underwhelming. I know it’s late in the season for strawberries, but even so, a great disappointment.

Since we now have the luxury of strawberries year-round, I thought I’d bring you this method of not only rescuing below-par strawberries, but also demonstrating how you can use them in a couple of recipes, as well as enjoying them in their new and improved, glow-up form.

The method is very simple, too. Cut up your strawberries and sprinkle them with a little sugar – NOT icing sugar, because it contains an anti-caking agent. Use white caster or granulated. The sugar will gradually draw out the juices from the strawberries, which will in turn absorb some of the sugar.

You can enjoy them as is, and luxuriate in their much improved flavour, or you can use them in other things. Below I have two suggestions – a strawberry scone and in a mille feuille made from stale croissants.

To Confit strawberries

I’ve gone back and forth quite a bit to come up with a term for this method and, to be honest, I’m not entirely happy with ‘confit’, because to confit something generally involves the use of heat to cook the items, which this patently doesn’t. However ‘macerating’ wasn’y really suitable either, because that involves adding liquid, and here the liquid comes from the fruit itself. If someone can find a word that fits better, do please leave a comment.

strawberries
caster or granulated sugar – 1tbs per 100g strawberries

  • Remove the green stalks and leaves from the strawberries and cut each one into 6-8 pieces, depending on size.
  • Put the cut strawberries into a bowl and sprinkle over the sugar.
  • Turn the berries over gently so that the sugar is distributed evenly.
  • Cover with plastic and set somewhere cool. I prefer to keep them at room temperature rather than chilled, at least in the initial stages as I believe it produces a better overall flavour, but keep in the fridge if you prefer.
  • Gently stir occasionally.
  • Allow your strawberries to macerate for up to 24 hours. The longer you leave them, the more juice will be drawn out. After about 24 hours, the  strawberries will be practically floating in a light syrup and their flavour will be deliciously intense.
  • You can choose when to eat/use your strawberries. For the two recipes below I used berries that had been macerating for 24 hours.

Strawberry Scones

Fresh strawberries release too much juice to be included in regular scones, but by using confit strawberries, you can get all the concentrated flavour and still maintain the integrity of your scones. This recipe is based on that of Mrs McNab (19thC farmer’s wife from Ballater, Scotland – see Great British Bakes). It makes 8 scones. It is deliberately unsweetened, as I believe the plainness of the scone dough highlights the flavour of the strawberry pieces much better than a sweet dough. You might disagree, and that’s fine. You can add 30g of sugar to the mixture before baking if you like, or sprinkle some sugar over the hot scones after baking (as in the picture).

225g plain flour
2tsp baking powder, or 1 tsp cream of tartar, ½ tsp bicarbonate of soda.
½ tsp salt
30g unsalted butter
1 large egg
60ml plain yogurt
60ml milk

100g drained, confit strawberries.

Milk for glazing
sugar to sprinkle (optional)

  • Heat the oven to 220°C, 200°C Fan.
  • Put the flour, powder(s), salt, butter, sugar if using, and egg into the bowl of a food processor fitted with a blade and blitz until the mixture resembles breadcrumbs.
  • Tip the mixture into a bowl.
  • Add the drained strawberries and fold in.
  • Mix the yogurt and milk together until smooth.
  • Fold in the yogurt mixture little by little, ideally with a round-ended knife. NB Do NOT slosh it in all at once. You may not need all of the liquid, especially if the strawberries are juicy. You want just enough liquid to bring the dough together.
  • NB The faster you do the shaping/cutting/getting the scones in the oven, the more they will rise.
  • Turn the dough out onto a floured surface and pat into a circle about 4cm thick. NB Don’t roll it with a rolling pin, you’ll just squash out all the lift from the raising agents.
  • Using a dough scraper or thin-bladed knife, cut the disk of dough into eight triangles. They will look small, but they will rise splendidly in the oven.
  • Transfer the triangles to a parchment covered baking sheet and brush over with milk to glaze.
  • Bake for 15 minutes, turning the baking sheet around after 10 minutes to ensure even colouring.
  • Remove from the oven and sprinkle caster sugar over the hot scones if liked.
  • Transfer to a wire rack to cool.
  • Enjoy warm as is, or with butter or cream.

Strawberry Croissant Mille Feuille

You know when you have stale croissants lying around?

*crickets*

Of course not. No-one does.

HOWEVER!

The thought “What if…” did cross my mind over the aforementioned holidays, and that led me to thinking about how they might be used in a new and exciting way. The idea is related to the puff pastry more traditionally used insofar as I brought back some delicious French butter with the intention of making a batch, and now I’m procrastinating like mad because, although delicious, it’s SUCH A FAFF™! Bonus: You can use gluten-free croissants (Schar is one brand I have tried – find them in the freezer section of your local supermarket).

Using a croissant reduces the Faff to almost non-existant levels and provides another opportunity to use the strawberries prepares above – this time using the juice as well. Slicing, toasting and then bruléeing the croissants will give both crunch and shine. The last two things needed for our croissant mille feuille are Brulée Sugar and some whipped cream.

To thicken liquid with Arrowroot

Why arrowroot, you may be asking? Well, it thickens and turns clear when heated, but unlike cornflour, when cooled it does not go ‘gloopy’ as such, rather it forms a loose jelly-like texture that clings wonderfully to the fruit (see top photo) making it bright and glossy, and doesn’t form a skin.

For each 80ml of liquid/syrup, use 1tsp arrowroot, or 1 tablespoon per 250ml.

  • Mix your arrowroot with an equal quantity of cold water until smooth.
  • Add the arrowroot slurry to your syrup and heat gently, stirring all the while.
  • NB Do not boil the mixture. High heat will break down the thickening properties. Remove from the heat when thickened and clear.
  • Stir in your strawberries and chill until required.

To Assemble

  • Slice your croissant(s) into three, horizontally.
  • Toast the slices lightly on both sides. Be careful, they will take less time to toast than regular bread, due to the higher fat content.
  • Dust the slices thickly with brulée sugar, then either grill them or use a blow torch to melt the sugar. The sugar will melt quickly, so keep an eye. Allow to cool, so that the sugar hardens.

  • To serve: pipe a rim of cream around the edge of the bottom two layers, and fill the middle with your strawberries in thickened juice.

  • Stack the layers together and serve.

¹ From the Calais Cité Europe Carrefour near the Tunnel, which I can highly recommend for all those last minute foodie purchases on your way home. If you’re interested in growing your own, the variety I recommend is Charlotte.

Ouse Bridge Cakes

I love coming across a geographically-named recipe. It gives a place and time in which to ground the dish: Grasmere Gingerbread, Cornish Pasties, Chelsea Buns.

Almost better yet, is discovering a recipe that is also unknown today, having gone out of fashion or due to some other circumstance. Such is Ouse Bridge Cakes.

There’s practically no information available about these bakes. In “The Gentlewoman’s Kitchen” (1984), Peter Brears suggests Ouse Bridge Cakes are a yeast dough flavoured with mace, cloves and nutmeg and mixed with sugar and milk. In his book “Secret York” (2014), author Paul Chrystal writes:

“Ouse Bridge Cakes, known in the eighteenth century, a type of Yorkshire tea cake.”

And that’s pretty much it. Not much to go on at all.

Luckily, in my scouring of old manuscripts, I have turned up five, different, eighteenth-century Ouse Bridge Cake recipes. I reasoned that, within their pages lay an understanding of what constituted the original Ouse Bridge Cakes.

But first, a little history. The bridge over the River Ouse that this recipe refers refers to is in the city of York. Although there have been many bridges over the centuries, it is the fourth Ouse Bridge (1565–1810) which has been commemorated in these buns.

Old Ouse Bridge from the South. T.Taylor, 1806.

Just as with many city bridges of the time, the Ouse bridge was heavily built-up, its five arches supporting substantial buildings on both sides of it’s towering centre arch.

Old Ouse Bridge from the North. Attrib. Henry Cave (British 1779-1836)

With all this busyness on the bridge, it is likely that there were businesses too, and if not a baker’s shop, then almost certainly a stall or street hawkers. Just as Wood Street Cake (see Great British Bakes) took its name from the London street where it was made, Ouse Bridge Cakes take theirs from the place where they could be bought, if not actually baked.

As already mentioned, Ouse Bridge cakes were a spiced bun. But seeing as Yorkshire has quite a reputation for similar items – the most well-known being the Yorkshire Teacake (as with all tea cakes, best eaten toasted and buttered) – it occurred to me that there must be something to distinguish the Ouse Bridge cake from a host of other buns, and that something was probably its shape. A bun of a particular shape is instantly recognisabe – just look at modern Chelsea Buns and their square, spiralled form (which isn’t the original shape – but don’t get me started, see Great British Bakes (again)).

Luckily, there were two of the five recipes (yes, remember them? Back before the detour?) that held clues. The first was in a manuscrpt dating from the mid-eighteenth century, which suggested the dough be weighed out into 8oz (225g) pieces before being shaped.

Ouse Bridge Cakes recipe, MS3498, (1750-1900) Wellcome Collection.

The second piece of information was from a manuscript dated 1750, the last line of which reads “make it up round in ye middle”.

Ouse Bridge Cakes recipe from MS4645, (1750-1853), Wellcome Collection.

I spent a lot of time thinking about this, and decided it meant to shape it like a bagel/ring donut. I also asked online, and the feedback was that it might mean something cottage-loaf-esque, so I experimented with both shapes. I still think the ‘hole in the middle’ is a better fit for the description, but until more recipes are rediscovered, the jury will have to remain resolutely out.

Of course, it might well be that none of these five recipes are the definitive, perfect Ouse Bridge Cakes. Back in the day, even the moderately wealthy (such as the authors of these manuscripts) didn’t necessarily bake for themselves: practically everyone bought their bread from a baker. The recipes that we find in manuscripts are attempts to copy, on a smaller scale, something enjoyed elsewhere, so that they can be enjoyed in their own homes. The five recipes in the manuscripts were all different, yet there were some uniting features, as each author tried to recreate something they had only tasted. Firstly, all of them had currants, ranging from a spartan few ounces to almost half the total weight of the ingredients. All of them were flavoured with spices (nutmeg, cinnamon, cloves, ginger, mace),  but nutmeg was a common denominator amongst all five. All of them were enriched with milk and either butter or cream, and most had added sugar.

The recipe below is very much a Goldilocks version of them all. Neither too much nor too little of everything, because recipe testing revealed certain flaws in the versions that veered towards the extreme. The overly-fruited buns were heavy and close textured, and those buns with generous/excessive additions of butter and cream were reluctant to rise, with a rather greasy taste.

This version is moderately fruited, moderatly enriched and moderately spiced. Delicious warm from the oven, and even more so toasted, with slabs of cold, mature Cheddar cheese (it’s a taste sensation!).

Ouse Bridge Cakes

Each bun is formed from a generous 75g of dough, and I have scaled the quantities down to make a very modest seven buns per batch. Feel free to double the recipe as you see fit. The spicing is just a suggestion: change things up if you have a favourite mix.

225g flour
1 sachet fast-action yeast.
180ml milk
15g sugar
30g unsalted butter
60g currants
1 tsp ground ginger
1 tsp ground nutmeg
½ tsp ground cloves
½ tsp ground mace
1 large egg for glazing

  • Put the milk, sugar and butter in a pan and scald. IMPORTANT Scalding is when the milk almost boils, but not quite. Heat it until it bubbles around the edges (or in the middle if you have an induction hob), then remove from the heat and allow to cool down. Scalding milk breaks down the proteins, which will allow your buns to remain soft and yielding, even when cold. Using 100% unscalded milk in a dough recipe can lead to heaviness.
  • When the milk mixture has cooled to blood temperature, pour it into your mixing bowl.
  • Sift the flour, yeast and spices together and add to the milk mixture.
  • Knead the mixture by hand or on the lowest possible speed on your stand mixer for 10 minutes. increase speed to high for up to 2 minutes, or until the mixture comes together in a clean ball.
  • Add the currants and fold them in.
  • Cover the bowl with cling film. The milk, butter and sugar will make the dough slower to rise that a regular dough, so allow at least 90 minutes or until the dough has doubled in size.
  • Tip out the dough and divide into seven pieces, each of roughly 75 grams. There’s no need to get all aggressive and start punching it: it will naturally deflate with the turning out.
  • Shape the dough as you see fit. In addition to the two shapes mentioned above, you can also shape them into a regular teacake shape. NB: If you’re going for the cottage loaf shape, I recommend baking the shaped dough in cupcake tins, which really lets the dough ‘sit up’ and hold it’s shape. I used silicone baking trays rather than metal, to keep the dough from forming too crusty an outside.
  • Set aside to rise for 40 minutes.
  • When the dough has risen, whisk the egg and brush over the buns with a pastry brush.
  • Heat the oven to 180°C, 160°C Fan.
  • Bake the buns for 20 minutes, turning the baking trays/sheets after 10 minutes to ensure even baking.
  • When cooked and golden brown, transfer to a wire rack to cool.
  • Store in an airtight container at room temperature.

Dairy-Free Cream

Here is very useful recipe for those looking to avoid dairy products or even to just reduce the amount of fat in their diet. By whisking together some smooth jam and a couple of egg-whites, a deliciously light and frothy ‘cream’ can be created, for use as a finishing touch to trifles, puddings and pastries, or to enjoy by itself. The cream will be influenced by whatever flavour of jam you choose to use, but it doesn’t dominate at all. The above was made using seedless raspberry jam, and the subtlty of colour reflects the subtlty of flavour – a mere whisper on the palate. For an almost white ‘cream’ with a very faint flavour (if that suits your needs best), I can recommend making and using Christine Ferber’s Green Apple Jelly.

It is a surprisingly elegant solution for anyone with dietary restrictions, and dates from the cusp of the 17th and 18th centuries (circa 1700).

This particular recipe I found in a manuscript held by the Wellcome Collection in London, but I have also read variations in other manuscripts and locations. I am surprised tht it has fallen out of favour, for it is one of the simplest and easiest recipes I have adapted.

Well, I say adapted. In fact I have changed very little from the original instructions.

To Make Cream Without Milk, MS1804, dated circa 1700, Wellcome Collection.

The one detail I did change was to reduce the number of egg-whites from three to two, reasoning that the eggs we have nowadays are much larger than those of three hundred years ago.

Thanks to modern technology, we are also spared the two hours of hand whisking (with a spoon of all things!) required in order to achieve the light and fluffy outcome pictured above, and can achieve the same result with about 10 minutes of whisking with your kitchen gadget of choice.

The potential worry regarding the consumption of raw egg whites is eliminated by the convenience of being able to purchase pasteurised egg whites in a carton.

The finished whip will hold its shape for several hours, should the need arise, allowing you to prepare this well in advance of your entertaining needs. I decided to leave the whipped ‘cream’ out, to test it’s durability, and can confirm that after 5 hours, it was still (mostly) holding its shape, as can be seen below.

Dairy Free Cream after five hours

Furthermore, this recipe is customisable in that you can vary the flavour of the whip by using different jams/jellies. For the smoothest result, they should be clear and set. Alternately, you could make your own by gently warming and sieving the jam to remove the fruit pieces in the conserve or jam flavour that you require. Apple, apricot, redcurrant, cranberry, blueberry, blackcurrant, plum, damson, marmalade…the possibilities are endless!

Dairy-Free Cream

You can easily halve the recipe at first, to make a trial batch to see if you like it. However, this might be too small an amount for a stand mixer to get to grips with, so use a hand-held whisk instead.

2 large egg whites (80ml)
225g seedless raspberry jam (or smooth jam/jelly of choice)

  • Put both ingredients into a bowl and whisk using a mixer, for about 10 minutes, until the mixture is thick and glossy and holds its shape.

Turkey Salmi

This week I’d like to talk turkey and making champagne tastes on a beer budget.

Just look at that crisp, golden pastry and glossy, rich sauce covering the tender pieces of turkey!

Turkey is a staple on the festive dinner table, but the preference for the pale breast meat has seen the rise of the turkey crown. Since science has yet, one fervently hopes, to develop a limbless turkey, those extra bits don’t just disappear, but are still around to purchase and enjoy.

Actually, I have no idea what happens to the trimmed turkey wings – one of life’s great mysteries – but turkey legs are available in both drum and thigh formats, and should be snapped up whenever you see them because they are fantastic value for money, robustly flavoured and, treated properly, can make for delicious and relatively fuss-free meals.

A quick gallop around the aisles this week tells me that turkey thigh and turkey drumsticks are available in Sainsbury’s, Asda (drumstick only) and Tesco (thigh only). The Tesco thigh is the best value, at only £2.80/kg, but the Sainsbury’s drumstick (£3.30/kg) and thigh (£4.67/kg) and Asda’s drumstick (£3.71/kg) are also very budget friendly, especially when compared to other proteins.

I also took a look at what people out there on the t’Internet are doing with turkey drumsticks and thighs and long story short, not a lot. Both are almost exclusively roasted, and whilst knawing on a joint the size of your arm is certainly a look, here we’re going to be more concerned about taste, tenderness and the use of cutlery.

Rather than the harsh heat of the oven or the barbecue, the method I’m proposing is to use our old friend the slow cooker. A long, low, braise will render even the sturdiest of turkey legs tender and melt-in-the-mouth. And it is so EASY! Literally plonk in the turkey, slosh over some braising liquid, switch it on and you’re set for several hours. You can choose whatever stock you like for the braising, but the simplest and best, in my opinion, is beef stock. Using the jelly-like  beef stock pots made up to double strength (so using only half the water), gives the turkey both flavouring and seasoning in one. Being strongly flavoured, the leg meat also flavours the stock in return, to give a fantastic base for gravy or, as we have here, a sauce.

This recipe is an adaptation of the numerous game bird salmis so favoured by the Victorians. You can serve the meat in the sauce over rice, noodles or potato snow¹, but my recommendation is for a puff pastry vol-au-vent case, to add a fantastic contrast in colour and texture.

In another tip gleaned from the history books, for the vol au vents you can use just a single roll to make six, large vol-au-vent cases. I used to buy two rolls of puff pastry, and cut the bases from one and the borders from another, but this way you can get both from a single roll. Simply cut out the centre of each base and re-roll it until it is as big as the border, then slide it under the pastry border and trim neatly.

Turkey Salmi

You can start this the day before and cook the turkey overnight, else cook on High for about 5 hours to eat the same day. You can also cook the pastry cases the day before and just warm them in the oven before serving.

For the Turkey
Bone-in turkey thigh and/or drumstick – however many will fit in your slow cooker
Rich beef stock pots x 6

1 sheet ready-rolled puff pastry
1 egg for glazing

For the Sauce
30g butter
1 small onion finely chopped
1 bay leaf
3 cloves
1 blade of mace
100g streaky bacon – chopped
200ml red wine (or red grape juice/pomegranate juice/more stock)
300ml beef turkey stock
1 heaped tbs cornflour mixed with a little cold water

  • Put your turkey meat into your slow cooker.
  • Make up the beef stock with just 1.5 litres hot water. Make sure they have melted fully before adding to your slow cooker. If you need more liquid, just add water.
  • Turn the heat to LOW and cook for 8 hours-10 hours. Overnight is perfect. You can also cook on HIGH for about 5 hours if that suits your timings better.
  • When the meat is tender, lift the joints from the slow cooker (a large strainer spoon is helpful here, if you have it), and remove and discard the bones, skin, tendons and cartilage. Try and keep the meat in large pieces. Strain the stock through a sieve and set aside 300ml. Save/freeze the rest for other uses.
  • For the sauce:
    • Melt the butter in a pan and add the onion, bacon and flavourings.
    • Fry for 10 minutes over medium heat until the onions have begun to caramelise.
    • Add the red wine, if using, and simmer for five minutes.
    • Add the stock and let all simmer together for a further 10 minutes, allowing all the flavours to mingle.
    • Optional: Strain through a fine-meshed sieve and return the liquid to the pan. The sauce in the photograph has been strained, and as such gives a really shiny and glossy finish. (I had the bacon and onion in some of the sauce later, on a baked potato. It was delicious.) But there’s nothing wrong with leaving the bacon and onion in the sauce (waste not, want not and all that) – the choice is yours.
    • Taste the sauce and add salt and pepper as required.
    • Add any flavouring sauces to your own taste. These include, but are not limited to, oyster sauce, Worcester sauce, Henderson’s Relish, Soy Sauce, Mirin, Shaoxing wine, anchovy essence, Hoisin sauce, Teryaki sauce, etc.
    • When seasoned to your satisfaction, whisk in the cornflour mixture and slowly bring to the boil, stirring, until the sauce clears, thickens and becomes glossy.
    • Reduce the heat to low and add the cooked turkey pieces.
    • Serve over rice/noodles/riced potatoes, or keep warm while you bake the pastry cases.
  • For the pastry:
    • Heat the oven to 220°C, 200°C Fan.
    • Unroll the pastry and cut into 6 squares (lengthwise in half, then vertically in thirds to give 2 rows of 3)
    • Cut out the centre of each square, leaving a 2cm-ish border.
    • Roll out the middle pieces until they match the size of the borders.
    • Dampen the edges of the now very thin, centre pieces and slide the borders on top. Trim the edges neatly. Prick over the bases with a fork to help keep them from rising during baking.
    • Whisk the egg and paint it over the borders using a pastry brush. Try and keep the egg from dripping down the sides, as this will glue the layers together as it bakes and keep the pastry from rising to its fullest extent.
    • Bake for 25-30 minutes until crisped, risen and golden, turning the baking sheet around halfway through.
    • Cool on a wire rack. Once cold, store in an airtight container (if making ahead).
  • Spoon the warmed turkey and sauce into the baked pastry shell and serve.

¹ Baked or boiled potatoes put through a ricer into a bowl. The riced potato should be allowed to fall into the serving dish in a mound and then served immediately untouched by anything else, spoon or seasoning, to maintain the lightness. Great for dishes with a rich sauce or gravy such as this.