Irish Halloween Treats

There are several Halloween traditions around these isles, but arguably the strongest traditions abide in Ireland.

Several years ago, I discovered online a trove of fascinating Irish social history at the National Folklore Collection. This project is the digitisation of thousands of essays written by Irish schoolchildren and teachers from over 5000 primary schools in the Irish Free State, between the years 1937-1939. These social history essays contain information gleaned from parents and grandparents, and give a fascinating insight into hearth and home stretching back to famine times in the nineteenth century. This amazing resource is searchable on an abundance subjects, but of course the food essays are going to be my main interest.

If you’d like a deep-dive into just how much information is available to explore, my paper “The Boxty Paradox: Everything, Everywhere, All At Once” can be downloaded from the Books and Writing page. One thing that became aparrent during the research of that paper was just how bleak the food choices of so many families were. Consequently, the celebratory foods might seem to us rather plain. However, they can also demonstrate an appreciation for, if not the finer things in life, then life’s simple pleasures.

“Hallowe’en was a great night among the Irish people long ago and they looked forward to it for many weeks. All the boys and girls would gather together in one house and they would have great feasting & merrymaking.”

Collected by Annie Fallon from Mr John Harley, Farmhill, Co. Mayo1

The Halloween/November’s Night/Oidhche Shamhna foods most mentioned are barn brack/bairín breac – a ‘speckled loaf’ originally of caraway seeds, but more recently dried fruit – boxty, apples and nuts.

“In this locality the popular food at Halloween are apples, nuts, and boxty, also dumplings of many kinds.”

Collected by Mrs A. Montgomery from Mrs Kelly, Corr, Co. Cavan2

According to many accounts, the Halloween barn brack was saved up for and bought from a bakery. These cakes were baked containing a ring, and whoever got the piece of cake with the ring was supposed to get married within a year.

“Halloweve night falls on the last night of October. On that day my mother goes to town and she buys apples, nuts and a barn-brack. “

Collected by Jerard Jordan from Mrs Gara, Tivannagh, Co. Roscommon.3

Alternately, during hard times, a soda cake would be baked at home either on the griddle or inside a bastible (lidded pot). The most coveted cake was baked with sour cream, but apples and hazelnuts could also be added.

“apples are put in cakes for November night.”

Collected by Tommy Kelleher from Mrs Margaret Kelleher, Mullaghroe South, Co. Cork4

The cream cake was a soda cake with plenty of cream in it and baked in the griddle.”

Collected by Beití Ní Dhomhnaill from Mrs Ashe, teacher, Dún Beag5

“On special occasions … a cream cake was made. Cream was mixed through the milk when mixing the dough. Currants, sugar and raisins were also put in the cream cake to make it rich and sweet.”

Collected by Seamus Daly, Kilclooney, Co. Waterford6

“On festive occasions a special cake was baked of such ingredients as flour, eggs, sour cream and a little sugar.”

Collected by Mary Jones from Mr M. Jones, Bruree, Co. Limerick7

“… cream cakes were made. These were made thin, but otherwise were made in the same way as ordinary soda cake.”

Collected by Michael Collins, Woodcock Hill, Co. Clare8

The recipes this week are two versions of soda cake mentioned in accounts in The Schools Collection: the cream cake and a fruit cake. According to the written accounts, the cream cake was considered the pinnacle of social delicacies, in numerous accounts warranting special mention. The fruit soda cake has more oblique mentions, but is absolutely symbolic of the foods enjoyed at Halloween. You can, of course, choose to add apples and nuts to the cream cake, if liked.

 Cream Cake

In the 19th century in Ireland, white flour was expensive, so if wheat flour was used at all, in most households it was wholemeal. I’ve opted for a less dense mixture of white and brown. Choose your own variation.

If you’d like to add apples and nuts to your cream cake, use the proportions in the recipe below, and reduce the sugar to 50g.

450g plain flour/wholemeal/brown/mixture
1tsp bicarbonate of soda
1 tsp salt
2 large eggs
85g sugar – caster, light/dark brown – your choice
300ml sour cream
100ml milk

  • Prepare your baking tin(s). You can, of course, bake your soda cake freeform, but a tin is also fine. My tin of preference is a 24cm shallow square tin, but you can also choose smaller tins or indeed choose to bake them in a pan on the ob over medium-low heat. If using a tin, line with baking parchment.
  • Heat the oven to 200°C, 180°C Fan. If using the hob, put a non-stick pan over medium-low heat (4 on a 1-9 scale) and allow to heat thoroughly.
  • Put the flour(s), soda, salt, sugar and eggs into a food processor and blitz briefly until well combined.
  • Tip the mixture into a large bowl.
  • Mix the milk and cream together until smooth, then add to the dry ingredients bit by bit. NB You might not need all of the milk mixture, as it will depend on the amount of moisture already in the flour and eggs. You want a soft dough, so a little extra is fine, but not enough moisture will lead to a dense loaf too stiff to rise.
  • When your dough is fully combined, tip out onto a floured surface.
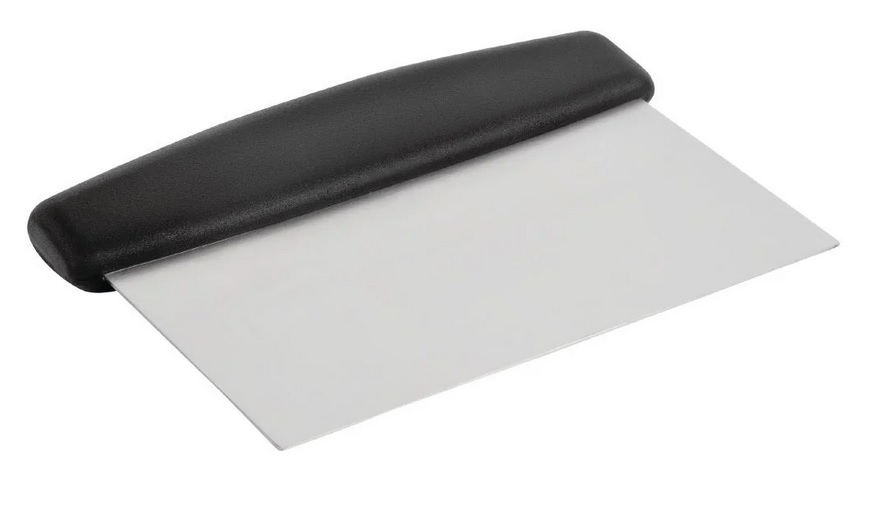
    • For soda farls to cook on the hob, divide the dough into two, and lightly shape each half into rounds. Gently pat down until 4cm in height. Using a dough scraper or similar, cut each round into six or eight triangles.
    • For a large loaf, shape into a round and transfer to your prepared tin. Cut a deep cross in the top to assist in even cooking. If you have any of the cream mixture left, you can brush it over the top of your loaf as a glaze.
  • To cook your cream cake(s)
    • For a large loaf, bake for 45-50 minutes, turning the oven half-way through to ensure even baking.
    • For cream farls, bake gently in your pan for around 10 minutes each side, turning carefully when the first side is toasted and lightly browned.
  • Cool briefy on a wire rack and serve warm with plenty of good butter.

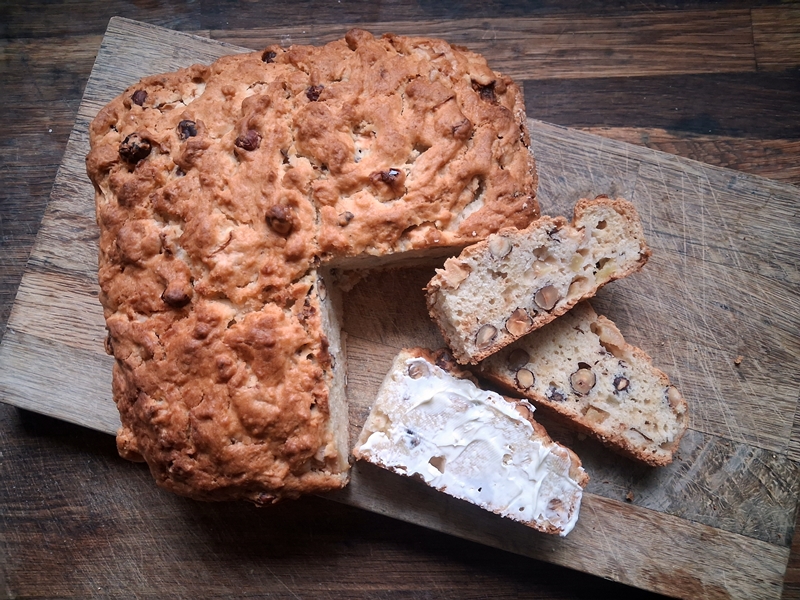
Apple and Hazelnut Soda Cake

Apples and nuts were central to the feasting at Halloween and this sweet soda cake is rich with both kinds of autumnal bounty. Enjoy warm from the oven or toasted, with a generous spreading of good butter. I’ve chosen to use Bramley cooking apples, as they break down into fluff when cooked.

100g whole unblanched hazelnuts
450g plain flour
1tsp bicarbonate of soda
1 tsp salt
50g sugar – caster, granulated, Demerera, light/dark brown – your choice
2 Bramley Apples – or 500-600g of similar cooking/sharp apples
200ml plain yogurt
200ml whole milk

  • Prepare your baking tin. My tin of preference is a 24cm shallow square tin. Line with baking parchment.
  • Heat the oven to 200°C, 180°C Fan.
  • Put the hazelnuts onto a baking tin and bake for 10 minutes until lightly browned and toasty. You can remove the skins by rubbing the nuts in a clean cloth, but I prefer to leave them as is.
  • Put the flour, salt, sugar and soda into a bowl and whisk together.
  • Peel and core your apples, and chop into 2cm pieces. Add the chopped apple and nuts to your dry ingredients and mix.
  • Whisk together the yogurt and milk, then gradually add to the rest of the ingredients. I find it best to stir the liquid through with a round-ended knife, which is less rough than a larger utensil. You might not need all of the liquid as the apples will contribute to the moisture of the mix.
  • Tip out your dough and shape lightly into a round. Transfer the dough to your baking tin, and cut a deep cross in the top to facilitate even baking.
  • Bake for 50-60 minutes until risen and browned, turning the tin around after 30 minutes.
  • Cool briefly on a wire rack and enjoy warm or toasted with lots of good butter.

1 The Schools’ Collection, Volume 0096, Page 84
2The Schools’ Collection, Volume 0982, Page 233
3 The Schools’ Collection, Volume 0234, Page 307
4 The Schools’ Collection, Volume 0359, Page 144.
5 The Schools’ Collection, Volume 0626, Page 350.
6 The Schools’ Collection, Volume 0654, Page 447.
7The Schools’ Collection, Volume 0498, Page 131
8 The Schools’ Collection, Volume 0598, Page 249

Gossiping Cakes

I have a confession to make. I chose these recipes because I loved the idea of women baking cakes specifically for having a get-together and swapping gossip. Alas, that’s not where these cakes originate, but the truth just as interesting.

As I’ve mentioned before, I have spent quite a considerable amount of time cataloguing household manuscripts that have been digitised by various libraries around the world. Obviously, there is going to be a certain degree of repetition of the most popular recipes, but there are also those that stand out as original either by name or by ingredient, etc. Whenever I come across such a recipe, I mark it in the spreadsheet with an asterisk, so when I’m looking back over the thousands of recipes, those asterisked ones are easily highlighted as worthy of a second look. And for the other type of recipes, such as the 200+ recipes simply entitled “A cake”, I’ll get to looking at you in all your (presumed) variety  soon, but to be blunt, you’re pretty low on the ToDo list.

The first recipe I found was this one, dated early 18th century (1738), at the Wellcome Collection.

Recipe for Goseping Cakes The Best Way, from the manuscript of Rebecca Tallamy, (1738), MS4759, Wellcome Collection

It appears to be a spiced variation of shortbread, and obviously one to make in quantity, because the yield of the recipe is over 100 biscuits. It’s demonstrating one of the many interpretations of the word ‘cake’, in this case meaning small, circular biscuits. The last line also caught my eye, because it recommends using equal quantities of butter and flour to make them “very good”.

Regular listeners will have read about my shortbread variation testing a few months ago, where the ratio of butter to flour can range from 1:3 to 1:2, so the assertion that 1:1 is the best, had me intrigued.

This recipe was very much on the back burner until I came across another recipe, similarly named, while indexing the digitised manuscripts at the National Library of Scotland.

Recipe for a Gossops Cake, from MS103093966.23, (1660-1699), National Library of Scotland

This recipe is in a manuscript older by almost a century (1660-1699), and differs in that it contains fruit, and is a large yeasted cake – exceedingly large, going by the peck/14lb/9kg of flour required – the term cake being used in this instance more akin to our modern usage.

To delve deeper into this mystery, I turned to the internet, and found the following passage:

Christening cake traditions, from “Remains of Gentilisme and Judaisme 1686-87”, John Aubrey, James Britten, 1881, p65

This threw up the question: What is a Gossiping? And so I went hunting in the Oxford English Dictionary which I learned that a Gossiping is  a christening, or christening feast, derived and corrupted from “Godsibb”, which is an old English word for Godparent.

Not entirely relevant, but interesting nontheless, the oldest usage of Godshib I found was over a thousand years ago in Sermo Lupi ad Anglos, or the Sermon of the Wolf to the English, a sermon given by Wulfstan II, Bishop of Worcester and Archbishop of York (d. 1023) in 1014:

“And godsibbas and godbearn to fela man forspilde wide gynd þas þeode toeacan oðran ealles to manegan þe man unscyldgige forfor ealles to wide.”

Trans: And too many godparents and godchildren have been killed widely through-out this nation, in addition to entirely too many other innocent people who have been destroy­ed entirely too widely.”

Later usages of the word referred to a gathering of women/midwives when a woman was in labour, and hence to the modern usage.

So with a history stretching back many centuries, the account of christening traditions at Wendlebury would appear to neatly explain the differences between our two recipes: a large cake was presented to the father – presumably for all his hard work in the proceedings *eyeroll* – and the smaller cakes were shared with the guests.

So let’s get on with some gosseping!

A Gossop’s Cake

This is a fruited, lightly spiced and yeast-raised cake. If you’re British, it’s like an enriched teacake: delicious fresh, delicious toasted, and delicious either way with butter and a slab of cheese (but better with toasted). I’ve scaled the recipe down to make for a modest sized cake, but you can always double the recipe if it turns out to be a favourite.

315g plain flour
135g raisins
25g caster sugar
1tsp ground nutmeg
1tsp ground cinnamon
1tsp ground ginger
50g unsalted butter
150ml single cream
100ml water
1½tsp rosewater
1 sachet fast-acting yeast

single cream to glaze

  • Plump the raisins: put the raisins in a saucepan and cover with water. Warm gently on a low heat for 10 minutes while the dough mixes. Strain and pat dry.
  • Sift together the flour, yeast, sugar and spices.
  • Put the butter, cream, water and rosewater into a small pan and warm gently over low heat just until the butter has melted.
  • Put all ingredients except the raisins into the bowl of a stand mixer fitted with the dough hook and mix on slow until the dough comes together, then continue to knead for 10 minutes until smooth.
  • Add in the plumped raisins and mix on slow to combine.
  • Grease and line a tall, 20cm cake tin, preferably loose bottomed, with parchment.
  • Form the dough into a smooth cake and place in the prepared tin.
  • Set aside to rise until doubled in size. The enrichments to the dough (cream/sugar/fruit) will impact the rise, which is why there is only a single rise for this cake, thus taking advantage of the initial vigorousness of the yeast.
  • Heat the oven to 190°C, 170°C Fan.
  • When the cake has risen, gently brush the surface with single cream, and bake for 30-40 minutes until well risen and golden brown.
  • Cool the cake for 10 minutes in the tin, then remove and set on a wire rack to cool completely.
  • Store in an airtight container.

Goseping Cakes The Best Way

I’ve opted for the proportions where butter = flour because, contrary to my expectations, it really did taste much better that with just half the amount of butter.

250g plain flour
250g unsalted butter
125g caster sugar
1tsp ground nutmeg
1tsp ground mace
1.5tsp rosewater
1 large egg yolk
30ml white wine

1tbs caster sugar for sprinkling

  • Put the dry ingredients into the bowl of a food processor.
  • Cube the butter and add to the dry ingredients.
  • Blitz the mixture a few times until it resembles breadcrumbs.
  • Whisk together the yolk, wine and rosewater.
  • Add the wet ingredients to the dry and blitz until the mixture comes together in a soft dough.
  • Line a 20cm square tin with parchment paper.
  • Turn the dough out onto parchment paper.
  • Press the dough out evenly and smooth over.
  • Chill in the freezer for 20 minutes.
  • Heat the oven to 160°C, 140°C Fan.
  • Poke holes all over the surface with a fork or using a cocktail stick, in the manner of shortbread.
  • Bake for 30 minutes, turning the tin around after 15 minutes to ensure even baking.
  • Remove from the oven and turn off the heat. Sprinkle the caster sugar over the hot shortbread.
  • Cut the shortbread into pieces using a thin bladed knife or metal dough scraper.
  • Return the tin to the cooling oven until cold, to ‘dry out’.
  • When cold, store in an airtight container.

Carnival Fruit

This recipe is such a delight. So simple, so eye-catching, and almost 400 years old.

It comes from one of my favourite manuscripts at The Wellcome Collection. Now I’ll freely admit I am very fickle with my favouritism, and I have been reminded this week of just how special this manuscript is, mainly due to a completely different manuscript I’ve been working on. I’m not going to name and shame it, but my dears… The handwriting. The spelling. Lets just say, I was sorely tested.

THIS manuscript, however, is an absolute delight. Straddling the 17th and 18th centuries, the handwriting is surprisingly modern: neat, well punctuated, with a pleasing layout, it is a joy to read, and I regularly have to remind myself just how old it actually is.

Carnival Fruit 1650-1750, MS8097, Wellcome Collection

The method used to ‘carnival’ fruit is to dip it into a clear caramel. Although I have used several different fruits in the top image, the fruit recommended in the recipe is ‘a Cheney Orange’ (China Orange), aka an eating orange (as opposed to a Seville bitter orange). Since oranges are in season during the winter months, I believe this is perfect dish to serve up during the festive season. Nowadays we have the luxury of fruit out of season, which can make for a very colourful display, however, some fruit are more suited than others. Very moist, juicy fruit such as strawberries and cherries (not pictured) will only last 2 hours before the shiny caramel coating starts to break down. Other fresh fruits such as grapes, physalis, blueberries, nuts and even dried fruit such as apricots will last 3 hours before starting to become sticky. Whilst you can do orange segments, I feel that against the scale of the other fruit, they’re a bit big, and that small orange segments (satsuma, mandarin, clementine and the like) would be more suitable.

A similar recipe in a slightly later manuscript, ‘Coromella’ 1805-1860, MS2203, Wellcome Collection

I have changed very little in this recipe: I’ve added some weights and measures, to help with getting the sugar to the correct stage and added a little liquid glucose to keep the caramel from crystallizing. I tried several times to go ‘old school’ with just sugar and water, but the caramel always crystallized too quickly to get more than just a few pieces dipped. Perhaps they used honey to help them out back then?

When choosing your fruits and nuts, it is important to consider how they are going to taste with the caramel. If you have a sweet tooth, then it gives you free rein to pick and choose almost anything. Personally, I would recommend choosing fruit that is slightly sharp, just to prevent an overload of sugar. The fruit also needs to be dry, so this rules out any fruit so large it needs to be sliced.

Choose your favourites from: green/red/black grapes, cherries, strawberries, raspberries, strings of redcurrants, blueberries, blackberries, physalis, dried apricots, walnuts, hazelnuts, pecans, almonds. If you have the patience to put individual pomegranate seeds on cocktail sticks and dip them, I think they would be delightful in both appearance and flavour.

The greatest amount of time for this recipe will involve preparing the fruits and nuts.

  • You can utilise the stalks on cherries and redcurrants, the papery coverings on physalis and the green stalks on strawberries to hold as you dip them in the caramel.
  • Most other fruits and nuts can be pierced with a wooden cocktail stick to prevent getting boiling caramel on your fingertips.
  • The recipe recommends using a thread to dip orange segments, and I must confess to not having tried this method. I opted instead to use the cocktail stick. If you can pierce the skin and avoid bursting any of the juice sacs inside, you’re onto a real winner.

To Carnival Fruit

For the caramel

400g granulated sugar
125ml water
60ml/4tbs/¼ cup glucose.

a selection of fresh fruits, berries and nuts

wooden cocktail sticks for dipping

a silicone mat or baking parchment

a sugar thermometer

  • Put the sugars and water into a small saucepan and set aside to begin dissolving while you prepare the fruit for dipping.
  • Use the wooden cocktail sticks to skewer the fruit and lay them neatly on a board or plate. If you’re using small orange segments, remove all the white pith. If you accidentally tear the skin of a segment, eat it – the juice will compromise the caramel.
  • Line a baking sheet with the silicone mat or baking parchment. This is for laying the dipped fruits on to cool. Although the dipping is straightforward, you will need to work fairly briskly in order to get all the fruit dipped before the caramel cools. If you can keep the pan on a very low heat while you dip your fruit, then this won’t be much of a problem. However, the heat will continue to cook the caramel, and it will become darker the longer it remains on the heat.
  • Arrange the prepared fruit and baking sheet so that they are easily to hand when the caramel is ready.
  • Heat the pan with the sugars in over a low heat until the granulated sugar has dissolved.
  • Increase the heat and cook until the syrup registers 150°C on a sugar thermometer. The syrup will be bubbling vigorously over the whole surface of the liquid.
  • Remove from the heat (or turn the heat down to the minimum, your choice), and begin dipping your fruits and nuts.
  • Tilt the pan so that the syrup is deep, and then one at a time, dip your fruit fully into the caramel and set on the silicone mat/parchment to cool. For fruit not on wooden sticks, be sure to keep your fingers well away from the caramel when dipping, as the caramel will burn, and stick to your skin and continue to burn, if it comes into contact.
  • The caramel needs only a minute or two to set, and then all that remains is to arrange it on your serving dish and serve. I went for a wooden board, as it’s plainness and natural material made for a great contrast against all the brightly coloured, shiny carnival fruit. To remove the wooden sticks, roll them between your thumb and forefinger – this will provide enough pressure to break the caramel surrounding them, thus making it easy to remove them.

Mince Pie Shortbread

I seem to be on a bit of a shortbread obsession lately, but this is the last post on it for now, promise.

Today I have for you a combination of two festive treats: Mince Pies & Shortbread.

Back in the far off days of the 1980s, I had the distinct pleasure of discovering Jocelyn Dimbleby’s “Cooking for Christmas” – a slim paperback book of recipes, produced in association with Sainsbury’s. Amongst its pages I found Deluxe Mince Pies, a version of which I have had posted over on my other blog for over 12 years now. With their orange pastry and decadent cream cheese and mincemeat filling, if you’re only going to eat one mince pie during the season, it really should be those.

However, even I will admit that they are a bit of a faff and since they are best served warm, it does limit their accessibility. So recently, whilst experimenting with the butterscotch shortbread, I got to thinking whether I could make a mincemeat version, and from there it was just a hop and a skip to re-imagining Jocelyn’s recipe.

This recipe is also an adaptation of recipes I’ve already posted on here, which I love as an example of some real Lego™ thinking, taking two different recipes and smushing them together to create something new.

The shortbread here is standing in for the mince pie pastry, so the only thing I changed was to add some orange zest. The mincemeat is an adaptation of the guilt-free mincemeat, based on Hannah Glasse’s 1747 Lenten mince pie recipe. The potential problem here was whether it would hold together on top of the shortbread, so the slight tweak I made was to increase the quantity of dates, which break down into a sweet and sticky paste during the simmering of the fruit, and firm up when cooled. I increased the spices a little, to compensate for the mincemeat being eaten cold, which tends to dull their potency. I also used an egg-white wash over the top of the shortbread, which when briefly baked forms something of a barrier to keep the moisture from the mincemeat compromising the crispness of the shortbread. Finally, I decided to top things off with white chocolate flavoured with lemon zest, to mimic the cream cheese element of the original mince pies.

Baking a slab of shortbread is a lot more straightforward than battling with pastry and filling and fretting whether the lids are sealed properly and whether the bottoms are properly cooked, etc. Bonus: you can cut your shortbread into as many pieces of whatever size you like.

Mince Pie Shortbread

The Mincemeat

You can make this several days beforehand and store in the fridge, if liked. When required, to make it easier to then spread over the shortbread, put it into a pan, cover and heat on the lowest setting. You might want to add a little more liquid (apple juice/orange juice/brandy/sherry) to help it loosen up. The additional dates add to the sweetness, so if you don’t have a sweet tooth, you might want to substitute the apple juice for the juice of an extra orange or even lemon

50g currants
50g raisins – crimson raisins look pretty
50g sultanas
200g dates – finely chopped
25g candied orange peel
25g candied lemon peel
25g candied grapefruit or citron peel
35g dried cranberries
25g slivered almonds or flaked almonds – chopped
2tbs sherry
1tbs brandy
juice & grated rind of 1 orange
¼ tsp of ground ginger
¼ tsp of nutmeg,
¼ tsp of ground cinnamon
¼ tsp of mixed spice
¼ tsp of ground cloves

60-100ml apple juice or juice of 1 orange/lemon

  • Put the dried fruits into a small saucepan.
  • Cut the candied peel into small pieces with scissors and add to the pan with the spices. NB If you’re using your home-made candied peel that has been stored in syrup, then there’s no need to soften it in the saucepan – just stir it in with the nuts once the fruit has plumped.
  • Add the orange juice and zest, brandy, sherry and 60ml of apple juice (or the extra orange/lemon juice).
  • Stir gently to combine and set pan over the lowest possible heat.
  • Cover and let the mixture stew gently until all the liquid has been absorbed.
  • If the fruit isn’t as plumped and juicy as you would like, add a little more liquid.
  • The mixture should be moist, but with no liquid visible in the bottom.
  • When you’re happy with the consistency, stir through the almonds.


The Shortbread

Make whichever shortbread variation you prefer, regular or gluten-free.

60g soft brown sugar
120g unsalted butter, chilled
180g plain flour – or gluten-free flour
60g your choice of additional flour (rice flour, cornflour, cornmeal, semolina, etc)
¼ tsp salt
zest of 1-2 oranges, depending on size

1 egg-white for glazing

  • Line a small baking tin (18cm x 25cm) with baking parchment. Leave extra parchment overlapping the sides, to assist in moving the baked shortbread.
  • Heat the oven to 160°C, 140°C Fan.
  • Cut the butter into cubes and add to the bowl of a food processor fitted with a blade.
  • Add the remaining dry ingredients and zest to the butter and pulse briefly until the mixture resembles breadcrumbs.
  • Tip the mixture onto the parchment, and press into an even layer.
  • Use a round skewer or cocktail stick to poke holes all over the surface of the slab of shortbread.
  • Bake the shortbread for 30 minutes, turning the tin around after 15 minutes to ensure even baking.
  • Once the shortbread is baked,
    • Remove the shortbread from the oven. Keep the oven on.
    • Whisk the egg white until frothy, then paint a layer onto the hot shortbread and return it to the oven for 3 minutes to set.
    • Remove the tin from the oven, switch off the heat and using a very thin bladed knife or (ideally, in my opinion) a metal dough scraper, cut the shortbread into pieces. I cut mine lengthwise in half, then across into fingers 2-3cm wide.
    • Return the tin to the cooling oven to cool.

The Topping

250g white chocolate
zest from 1 lemon

  • Break the chocolate into pieces and melt in a bowl either over simmering water, or by zapping in the microwave in short bursts.
  • Stir through the lemon zest.

To Assemble

  • Spread a layer of mincemeat over the cooled shortbread. I didn’t use all of the batch, only about 2/3, but if you’d prefer a thicker layer, have at it by all means.
  • Smooth over the top with a palette knife or similar.
  • Pour over the lemon-flavoured white chocolate and smooth over.
  • Put it in the fridge to set (optional – you can leave it on the worktop if you have the room).

To Divide

In a repeat of the instructions from Butterscotch Shortbread, here is how to ensure your slab of mince pie shortbread emerges in sharp and clean slices.

  • When you’re ready to portion it out, remove your slab of mince pie shortbread from the fridge and set it on the countertop. Leave it to come to room temperature. Trying to cut through the chocolate layer whilst chilled will just shatter it. If your shortbread cooled on the worktop, you can, if course, skip this step.
  • Take a clean cloth or a double layer of kitchen roll and lay it on top of the set chocolate.
  • Lay a cutting board on top of that, and carefully turn the whole slab over, so that once the tin and the baking parchment are removed, the shortbread is uppermost.
  • The lines from cutting the shortbread earlier should be clearly visible.
  • Slide your dough blade into the cuts in the shortbread, then press down sharply to cut through both the mincemeat and the chocolate layers in one clean movement.
  • Make sure you have cut – or rather re-cut – through all of the pieces before trying to move your mince pie shortbread.
  • Store your shortbread in an airtight container. Use a piece of parchment between layers to keep crumbs off your pristine chocolate finish.

Russian Toffee

This is a recipe that I’ve had on my ‘To Do’ list for years. I first came across it in an old, spiral-bound, Women’s Institute cookery book. Over the years I’ve seen many different versions, some with sour cream, some from the 19th century are made with “Swiss Milk” (the equivalent of modern condensed milk – although just to be confusing, some recipes sometimes list “unsweetened Swiss Milk”, thus making it equivalent to evaporated milk). It would be interesting to see how these recipes compare in texture to the classic fudge recipe posted elsewhere on this site.

But anyhoo…

From “The Art of Sweetmaking” by Beatrice Manders, L. Thorne & Co., London, 1901, pp31/2

This version, from 1901,  uses red currant jelly, which gives the toffee a lovely reddish tinge and a delicious tang of sharpness against the sweetness from all the sugar. Redcurrants are about to come into season, and this recipe might be useful to either use up last year’s jelly or make use of this year’s fresh batch. Alternately, you can just buy red currant jelly in the supermarket.

I deliberately chose this version because it dates to the height of Russian Toffee popularity, and I find it funny that the writer sees fit to include finger-wagging admonishment to take care to make it properly and not over-cook it, all the while failing to give proper instructions on how to do just that.

So! Let us talk about the intricacies of toffee making.

In short, there aren’t any. It is fundamentally about heating your sugar mixture to a particular temperature point in order to achieve a certain texture when it cools down. This is done by heating until sufficient moisture has evaporated, which will result in the sugar reaching a high-enough temperature.

The difficulty for our Victorian ancestors and earlier was, a lack of sufficiently detailed thermometers with which to aid their efforts. That’s not to say that sugar confectionery was unheard of in earlier times. Quite the opposite, in fact. Confectioners in Times of Yore™ devised a visual scale to judge the heat of the sugar solution, and divided it into six levels, each with their own particular uses: smooth, pearled, blown, feathered, cracked and caramel. Francis Massialot’s “The Court and Country Cook” (1702) goes into detail across several pages describing the physical and visual cues of each stage.

Luckily for modern cooks, there are digital thermometers which can eliminate much of the guesswork. The difficulty lies in ensuring that the whole of your batch of boiling sugar has reached the correct temperature, hence the need to keep your mixture well stirred. Care must also be taken, if using a probe thermometer, not to accidentally touch the tip against the bottom of the pan, which will register as several degrees higher than the sugar itself.

All that remains is to decide on the consistency you wish to enjoy your toffee. You can take it to whatever degree you prefer. I have made this specific recipe four times, taking each batch to a different temperature and each has its pluses and minuses. Its up to you which you choose.

  • 120°C – toffee is soft and chewy at room temperature.
  • 130°C – toffee is firmer but still chewy. Thin sheets will bend easily.
  • 140°C – toffee is hard at room temperature, but will soften in the mouth and become chewy.
  • 150°C – toffee is brittle at room temperature, will eventually soften in the mouth and become chewy.

Personally, I prefer the last two: for toffee to consume as is I like to take it to 150°C; for toffee to use in other recipes, since it will have further heating in the oven, I prefer to take it to just 140°C.

One final point, toffee is hygroscopic. It loves to absorb moisture. As soon as it is cooled, you should pack it in an airtight container. A plastic ziplock bag might lack visual appeal, but it is marvellous for keeping your toffee shiny and free of stickiness for days on end. Alternatively, you can choose to either wrap your toffee pieces in waxed paper or cover your toffee in chocolate to prolong its shelf life.

Russian Toffee

This is just a half batch of the original recipe, and still makes a sizeable slab. I have elected to interpret ‘loaf sugar’ as soft, light brown sugar, for added flavour. After a few trial runs, I opted to omit the vanilla as it wasn’t adding anything to the flavour, and actually impairing the redcurrant flavour coming through. You could vary this recipe by using similar quantities of other sharp fruit jellies such as cranberry, black currant, quince or apple.

225g soft light brown sugar
115g unsalted butter
100g red currant jelly
150g double cream

200g dark chocolate (optional)

  • Line an edged baking pan with baking parchment. I used a pan 30cm x 22cm and it was more than large enough.
  • Add all ingredients to a pan and heat gently until the butter and jelly have melted and the sugar dissolved. A wide pan (like a frying pan) is better than a tall (saucepan) pan, as the greater surface area facilitates evaporation.
  • Increase the heat slightly (I suggest level 6 on a 1-9 scale) and stir gently but continuously until the mixture boiled for several minutes and has thickened slightly.
  • Check with a thermometer (if using a frying pan, you may need to tilt it in order to get an accurate reading of the sugar mixture temperature), and remove from the heat when your sugar mixture has reached your chosen temperature.
  • Pour the mixture onto the baking parchment in your prepared pan and allow to cool. NB If you wish to mark out your toffee into squares like in the top picture, don’t let it cool longer than 8 minutes before doing so, otherwise it will have set too firmly.
  • To mark out your toffee, lightly butter the blade of a long, straight-bladed knife and press down firmly into the toffee. About 1.5cm squares is a good size. The knife won’t easily cut all the way through, but will make strong enough marks so that it is easy to break into pieces when cooled.
  • After 20 minutes of cooling, cover the pan with cling film, or slide the whole thing, pan and all, into a large ziplock bag, and leave to cool completely (both Sainsbury’s & Tesco sell XL ziplock bags that are ideal for this).
  • If you’re planning to enjoy your toffee as is, then, once completely cold, you can give it a sharp tap on the counter and it should break into pieces quite easily. Be sure to transfer it to an airtight container to keep it free of stickiness.
  • If you’d like to cover it with chocolate, you can temper it relatively quickly and easily by using the seeding method and 200g of the chocolate of choice. I used dark chocolate. Also, Instead of dipping pieces individually, which is a Faff™, I opted to brush the tempered chocolate over the whole sheet, on both sides, then break into pieces once the chocolate had set and cooled. It doesn’t cover the toffee completely, but enough to keep it from dissolving into a sticky mess, and the contrast between the bitterness of the chocolate with the sweetness of the toffee and the tang of the redcurrants is delightful.

Ouse Bridge Cakes

I love coming across a geographically-named recipe. It gives a place and time in which to ground the dish: Grasmere Gingerbread, Cornish Pasties, Chelsea Buns.

Almost better yet, is discovering a recipe that is also unknown today, having gone out of fashion or due to some other circumstance. Such is Ouse Bridge Cakes.

There’s practically no information available about these bakes. In “The Gentlewoman’s Kitchen” (1984), Peter Brears suggests Ouse Bridge Cakes are a yeast dough flavoured with mace, cloves and nutmeg and mixed with sugar and milk. In his book “Secret York” (2014), author Paul Chrystal writes:

“Ouse Bridge Cakes, known in the eighteenth century, a type of Yorkshire tea cake.”

And that’s pretty much it. Not much to go on at all.

Luckily, in my scouring of old manuscripts, I have turned up five, different, eighteenth-century Ouse Bridge Cake recipes. I reasoned that, within their pages lay an understanding of what constituted the original Ouse Bridge Cakes.

But first, a little history. The bridge over the River Ouse that this recipe refers refers to is in the city of York. Although there have been many bridges over the centuries, it is the fourth Ouse Bridge (1565–1810) which has been commemorated in these buns.

Old Ouse Bridge from the South. T.Taylor, 1806.

Just as with many city bridges of the time, the Ouse bridge was heavily built-up, its five arches supporting substantial buildings on both sides of it’s towering centre arch.

Old Ouse Bridge from the North. Attrib. Henry Cave (British 1779-1836)

With all this busyness on the bridge, it is likely that there were businesses too, and if not a baker’s shop, then almost certainly a stall or street hawkers. Just as Wood Street Cake (see Great British Bakes) took its name from the London street where it was made, Ouse Bridge Cakes take theirs from the place where they could be bought, if not actually baked.

As already mentioned, Ouse Bridge cakes were a spiced bun. But seeing as Yorkshire has quite a reputation for similar items – the most well-known being the Yorkshire Teacake (as with all tea cakes, best eaten toasted and buttered) – it occurred to me that there must be something to distinguish the Ouse Bridge cake from a host of other buns, and that something was probably its shape. A bun of a particular shape is instantly recognisabe – just look at modern Chelsea Buns and their square, spiralled form (which isn’t the original shape – but don’t get me started, see Great British Bakes (again)).

Luckily, there were two of the five recipes (yes, remember them? Back before the detour?) that held clues. The first was in a manuscrpt dating from the mid-eighteenth century, which suggested the dough be weighed out into 8oz (225g) pieces before being shaped.

Ouse Bridge Cakes recipe, MS3498, (1750-1900) Wellcome Collection.

The second piece of information was from a manuscript dated 1750, the last line of which reads “make it up round in ye middle”.

Ouse Bridge Cakes recipe from MS4645, (1750-1853), Wellcome Collection.

I spent a lot of time thinking about this, and decided it meant to shape it like a bagel/ring donut. I also asked online, and the feedback was that it might mean something cottage-loaf-esque, so I experimented with both shapes. I still think the ‘hole in the middle’ is a better fit for the description, but until more recipes are rediscovered, the jury will have to remain resolutely out.

Of course, it might well be that none of these five recipes are the definitive, perfect Ouse Bridge Cakes. Back in the day, even the moderately wealthy (such as the authors of these manuscripts) didn’t necessarily bake for themselves: practically everyone bought their bread from a baker. The recipes that we find in manuscripts are attempts to copy, on a smaller scale, something enjoyed elsewhere, so that they can be enjoyed in their own homes. The five recipes in the manuscripts were all different, yet there were some uniting features, as each author tried to recreate something they had only tasted. Firstly, all of them had currants, ranging from a spartan few ounces to almost half the total weight of the ingredients. All of them were flavoured with spices (nutmeg, cinnamon, cloves, ginger, mace),  but nutmeg was a common denominator amongst all five. All of them were enriched with milk and either butter or cream, and most had added sugar.

The recipe below is very much a Goldilocks version of them all. Neither too much nor too little of everything, because recipe testing revealed certain flaws in the versions that veered towards the extreme. The overly-fruited buns were heavy and close textured, and those buns with generous/excessive additions of butter and cream were reluctant to rise, with a rather greasy taste.

This version is moderately fruited, moderatly enriched and moderately spiced. Delicious warm from the oven, and even more so toasted, with slabs of cold, mature Cheddar cheese (it’s a taste sensation!).

Ouse Bridge Cakes

Each bun is formed from a generous 75g of dough, and I have scaled the quantities down to make a very modest seven buns per batch. Feel free to double the recipe as you see fit. The spicing is just a suggestion: change things up if you have a favourite mix.

225g flour
1 sachet fast-action yeast.
180ml milk
15g sugar
30g unsalted butter
60g currants
1 tsp ground ginger
1 tsp ground nutmeg
½ tsp ground cloves
½ tsp ground mace
1 large egg for glazing

  • Put the milk, sugar and butter in a pan and scald. IMPORTANT Scalding is when the milk almost boils, but not quite. Heat it until it bubbles around the edges (or in the middle if you have an induction hob), then remove from the heat and allow to cool down. Scalding milk breaks down the proteins, which will allow your buns to remain soft and yielding, even when cold. Using 100% unscalded milk in a dough recipe can lead to heaviness.
  • When the milk mixture has cooled to blood temperature, pour it into your mixing bowl.
  • Sift the flour, yeast and spices together and add to the milk mixture.
  • Knead the mixture by hand or on the lowest possible speed on your stand mixer for 10 minutes. increase speed to high for up to 2 minutes, or until the mixture comes together in a clean ball.
  • Add the currants and fold them in.
  • Cover the bowl with cling film. The milk, butter and sugar will make the dough slower to rise that a regular dough, so allow at least 90 minutes or until the dough has doubled in size.
  • Tip out the dough and divide into seven pieces, each of roughly 75 grams. There’s no need to get all aggressive and start punching it: it will naturally deflate with the turning out.
  • Shape the dough as you see fit. In addition to the two shapes mentioned above, you can also shape them into a regular teacake shape. NB: If you’re going for the cottage loaf shape, I recommend baking the shaped dough in cupcake tins, which really lets the dough ‘sit up’ and hold it’s shape. I used silicone baking trays rather than metal, to keep the dough from forming too crusty an outside.
  • Set aside to rise for 40 minutes.
  • When the dough has risen, whisk the egg and brush over the buns with a pastry brush.
  • Heat the oven to 180°C, 160°C Fan.
  • Bake the buns for 20 minutes, turning the baking trays/sheets after 10 minutes to ensure even baking.
  • When cooked and golden brown, transfer to a wire rack to cool.
  • Store in an airtight container at room temperature.

Dairy-Free Cream

Here is very useful recipe for those looking to avoid dairy products or even to just reduce the amount of fat in their diet. By whisking together some smooth jam and a couple of egg-whites, a deliciously light and frothy ‘cream’ can be created, for use as a finishing touch to trifles, puddings and pastries, or to enjoy by itself. The cream will be influenced by whatever flavour of jam you choose to use, but it doesn’t dominate at all. The above was made using seedless raspberry jam, and the subtlty of colour reflects the subtlty of flavour – a mere whisper on the palate. For an almost white ‘cream’ with a very faint flavour (if that suits your needs best), I can recommend making and using Christine Ferber’s Green Apple Jelly.

It is a surprisingly elegant solution for anyone with dietary restrictions, and dates from the cusp of the 17th and 18th centuries (circa 1700).

This particular recipe I found in a manuscript held by the Wellcome Collection in London, but I have also read variations in other manuscripts and locations. I am surprised tht it has fallen out of favour, for it is one of the simplest and easiest recipes I have adapted.

Well, I say adapted. In fact I have changed very little from the original instructions.

To Make Cream Without Milk, MS1804, dated circa 1700, Wellcome Collection.

The one detail I did change was to reduce the number of egg-whites from three to two, reasoning that the eggs we have nowadays are much larger than those of three hundred years ago.

Thanks to modern technology, we are also spared the two hours of hand whisking (with a spoon of all things!) required in order to achieve the light and fluffy outcome pictured above, and can achieve the same result with about 10 minutes of whisking with your kitchen gadget of choice.

The potential worry regarding the consumption of raw egg whites is eliminated by the convenience of being able to purchase pasteurised egg whites in a carton.

The finished whip will hold its shape for several hours, should the need arise, allowing you to prepare this well in advance of your entertaining needs. I decided to leave the whipped ‘cream’ out, to test it’s durability, and can confirm that after 5 hours, it was still (mostly) holding its shape, as can be seen below.

Dairy Free Cream after five hours

Furthermore, this recipe is customisable in that you can vary the flavour of the whip by using different jams/jellies. For the smoothest result, they should be clear and set. Alternately, you could make your own by gently warming and sieving the jam to remove the fruit pieces in the conserve or jam flavour that you require. Apple, apricot, redcurrant, cranberry, blueberry, blackcurrant, plum, damson, marmalade…the possibilities are endless!

Dairy-Free Cream

You can easily halve the recipe at first, to make a trial batch to see if you like it. However, this might be too small an amount for a stand mixer to get to grips with, so use a hand-held whisk instead.

2 large egg whites (80ml)
225g seedless raspberry jam (or smooth jam/jelly of choice)

  • Put both ingredients into a bowl and whisk using a mixer, for about 10 minutes, until the mixture is thick and glossy and holds its shape.

Damson Ice-Cream

The autumn months are almost upon us and it truly is the season of mellow fruitfulness.

First among equals is the damson, a fruit I have been familiar with my whole life. Damsons are small, oval, wild plums with a signature ‘bloom’. They are different to bullaces, a different wild plum which is more round and apple-shaped. It was only a few years ago that I learned that damsons aren’t universally known, rather they are concentrated in just a few counties, namely Shropshire, Worcestershire, Buckinghamshire, Cheshire and Westmorland.

Damsons are really tart – there’s no possibility of enjoying them raw – and make fabulous jams and chutneys. I particularly enjoy them in sweet dishes, because their sourness and tartness are a great foil against sugar and sweetness.

And so to this recipe. This is a fabulously simple recipe which makes beautifully soft and creamy ice-cream with just two main ingredients, plus flavouring, without the need for an ice-cream maker. This last point is especially useful if, like me, you lack worktop space. There is no need to repeatedly remove it from the freezer and stir to remove ice crystals, because they never form. You can literally mix it in minutes and freeze overnight and enjoy perfectly smooth, delicious ice-cream immediately.

The ice-cream recipes over on TimeToCookOnline include salted caramel and malt, both of which can be made with storecupboard ingredients, but I fancied adapting this recipe to use fresh fruit, and my freezer provided the ingredients. I had a bag of damsons that had been languishing there for probably three years, so their time to shine was long overdue.

The method can be used for any frozen, or indeed fresh, fruit. Most importantly, it is necessary to get rid of as much water from the fruit as possible, as it will form ice-crystals when frozen and ruin the smoothness of your ice-cream. The majority of this post will be on how you can achieve this, plus a short-cut or two.

Fruit Puree Method – Damsons

The flesh of a damson clings tightly to the stone, so the best way to separate the two is by cooking. Sweetened, stewed damsons were a regular simple pudding on the table during my childhood. One had to spoon the cooked fruit into your mouth, then discretely return the stone to the spoon and lay it on the rim of your dish. For ice-cream purposes, though, a puree is what is required.

  • Put 1kg (or more if liked) of damsons, fresh and rinsed or frozen, into a saucepan.
  • Add 3-4 tablespoons of water and cover with a lid.
  • Turn the heat to low and let the fruit gently steam/stew until soft.
  • Pour the fruit into a sieve over a large bowl and stir with a wooden spoon to separate the fruit pulp from the stones and skins. Use the back of a knife to regularly scrape the pulp from the underside of the sieve. Be warned, damson juice will stain, so wear an apron and wipe up any spills promptly, especially if you have a wooden worktop.
  • When all that remains in the sieve is stones and skins (which can be discarded), measure the fruit puree and add HALF the volume of puree in granulated sugar. e.g 4 cups of juice will need 2 cups of sugar.
  • Return the puree to the pan, add the sugar and stir to dissolve.
  • Simmer over a low-medium heat until it has reduced and thickened. This may take a while, depending on the volume of puree you’re working with. There’s a lot of pectin in damsons, so if you spoon a little onto a cold plate and it sets, it’s done.
  • What you should be left with is something of the consistency of runny honey.

Sugar Absorption Method – Fresh Apricots

This method is an adaptation of a jam-making method used by ‘The Jam Fairy’ Christine Ferber. I used it with fresh apricots which I spotted recently at a bargain £1 a punnet. It takes a little longer, but preserves the fresh flavour of the fruit.

  • Slice the apricots and remove the stones.
  • Score the inner flesh with a sharp knife, being careful not to cut too deeply – the skin should remain intact.
  • Lay your apricot halves side by side in a bowl in layers, flesh-side up.
  • When you can fit no more into the layer, cover generously with granulated sugar to a depth of about 1cm.
  • Continue layering and covering with sugar until all your fruit is in the bowl.
  • Cover with plastic wrap and set aside for 8-10 hours, or overnight. The sugar will draw out the juices in the apricots and in turn be drawn into the flesh of the fruit.
  • Tip the fruit and sugar mixture into a saucepan and heat very gently until all the sugar granules have dissolved. Stir occasionally.
  • When all the sugar is dissolved, bring the syrup to a boil, turn off the heat and cover the pan. Leave to stand until cool.
  • Drain the fruit from the syrup.
  • Remove the skins of the fruit. The heat of the syrup will have softened the skins as well as separating them from the apricot flesh. If you lift up each apricot half by pinching the skin at the back, it should pull away quite easily. It is likely to remain attached at the edges, in which case you can help things along by scraping the flesh away with a teaspoon. Put the flesh into a separate bowl. Discard the skins. You can keep the apricot flavoured syrup to use as a glaze for fruit tarts, buns etc.
  • Puree the flesh.
  • Taste, and add a little lemon juice to taste to sharpen the flavour, if liked.

Storecupboard Hacks

Tinned fruit in syrup has already been processed, so you could drain some tinned apricots/peaches/pears etc and puree the fruit. The flavour won’t be quite as fresh-tasting, but it’s much quicker and you can be feet up, waiting for your ice-cream to freeze in about 15 minutes.

Even quicker, you could substitute jam for the fruit. Use a good quality brand such as Bon Maman, which has compotes and conserves in a range of delicious flavours. How much you’ll need will depend on personal preferences, but I suggest starting with 300g and seeing how that goes. Warm the compote/conserve gently, then puree. You can always stir in extra as a ‘ripple’.

Damson Ice-cream

This damson ice-cream is the best ice-cream I have ever tasted. EVER. The intense sour/tartness of the fruit is a perfect foil to the intense sweetness of the condensed milk, and the result is smooth and rich and velvety, with a huge zing of ‘rippled’ damson. Gooseberries (perhaps with a dash of elderflower cordial) and rhubarb would also work well.

Despite the title, you can use this method to make any fruit ice-cream that takes your fancy. Because it was slightly runny, but intense in flavour, I used just 350ml of damson puree in the ice-cream, and another 150ml as ‘ripple’.  The apricot puree was thicker, so I mixed in a full 500ml.

600ml chilled double cream
1 x 397g tin of sweetened condensed milk
500ml sweetened damson puree – divided

  • Put the cream and the condensed milk into the bowl of a mixer.
  • Add 350ml damson puree.
  • Whip the ingredients with a balloon whisk attachment until light and fluffy.
  • Pour into a suitable plastic container.
  • Add dollops of the remaining puree and swirl through with a knife.
  • Cover and freeze overnight.

Harlequin Salad

It is June, and summer is upon us! It’s the time of salady goodness! And I have here a very easy salad for you which I’ve cobbled together over the years. It’s simple and fresh and delicious and exceedingly easy to make. In fact, the skill bar is set so low I’m going to sum it up in one sentence.

If you can use a knife, you can make this salad.

Yes, it’s that easy.

Like pretty much everyone, I think small is cute, especially when it comes to food. This salad embodies that notion, because all of the elements are of a similarly small size. It also addresses a perennial salad problem, that of gloopiness. Salad vegetables usually have a high water content, and when you start cutting into them, the juice starts to flow, so your salad can become somewhat waterlogged in a very short time. With just a couple of tweaks to your regular salad preparation, you can keep your ingredients crisp and fresh much longer.

Each element is neatly diced to keep the overall appearance looking clean and fresh. Cutting raw broccoli and cauliflower into miniature florets, as opposed to just chopping them, keeps the salad from becoming cluttered with stray leaves falling off. Plus mini florets look adorable.

Another advantage of this salad is how you can easily customise it to whatever you have to hand. For example, I had hoped to include radishes in the picture above, but the supermarket had not received its delivery and there were none to be had. So I just left them out. You’re only going to be limited by your imagination: if you’re a fan of fruit in salad, add in some chopped apple and pomegranate seeds, if you relish crunchy sharp flavours, add in some pickled vegetables. Just be sure to follow The Rule.

The One Rule: Everything in your salad should be roughly the same size.

Gather your ingredients and decide on the smallest item. In the salad above, it’s the sweetcorn, but it could just as easily be peas or something else. Using that as a guideline, peel and dice your salad ingredients to a similar size and mix them together.

Harlequin Salad

This salad can be scaled to your requirements – for as small a number as one, as a main course, to a family-sized bowl as a side. Undressed, it will keep in the fridge for several days. The number of ingredients is enirely up to you, but there should be roughly the same quantity of each ingredient. Here’s a brief run down of how to prep various salad ingredients. The top two are the most important to ensure your salad stays gloop-free.

  • Cucumber: Cut off a 6-8cm piece and cut it in half lengthwise. Using a teaspoon, scrape out the seeds, leaving just the green flesh. Discard the seeds.¹ Slice the rest of the cucumber lengthwise into 1cm thick strips, then cut across into 1cm dice.
  • Tomatoes: Cut in half around the middle, then slice the seed stalk as shown in the picture. Scrape the seeds into a bowl and set side (see Harlequin Salad Dressing below). Slice the tomato flesh into 1cm dice. I used mini tomatoes, which were a bit fiddly, but they had beautiful mixture of reds and yellows.

  • Celery: Wash the stalks and trim the ends. Slice into 1cm strips. Cut across into 1cm dice.
  • Carrot: Top and tail and cut lengthways into 1cm thick slices. Cut each slice into 1cm strips and then cut across into 1cm dice.
  • Raw Broccoli: Cut mini florets from the 1-2 large branches. Cut the stalk into 1cm slices, then into 1cm strips and dice.
  • Raw Cauliflower: Cut mini florets from the 1-2 large branches. Cut the stalk into 1cm slices, then into 1cm strips and dice.
  • Raw French Beans: Top and tail and cut into 1cm slices.
  • Radishes: Top and tail and cut in half. Cut each half into four. If large, you might need to cut down further.
  • Peppers – all colours: Cut in half and remove the stalk and seeds. Cut into 1cm strips, then into 1cm dice.
  • Spring onions: Remove papery outer layers and trim roots. Slice into 1cm slices.
  • Red onions/shallots: Top and tail and remove papery outer layers. Cut into 1cm slices, then across into 1cm dice.
  • Red Cabbage – raw or pickled: Cut a 1cm slice, then cut into 1cm strips and slice into 1cm dice.
  • Sweetcorn – fresh, canned or frozen: No chopping required.
  • Peas – fresh or frozen: No chopping required.
  • Pomegranate Seeds: No chopping required.
  • Apple: Have the juice of a lemon ready squeezed. Peel (or not, you choose) your apple and cut in half. Remove the core and cut each half into 1cm slices. Cut the slices into strips and then cut across into dice. Toss immediately in lemon juice to prevent browning. Drain thoroughly before adding to the rest of the ingredients.
  • Pickled silverskin onions: No chopping required.
  • Pickled cornichons: Cut in half lengthwise, then slice into 1cm pieces.
  • Olives: Cut in quarters or eighths, depending on size.

When you’ve gathered and chopped your salad ingredients, the last flourishing touch is to add the secret ingredient which makes this salad really sing:

  • at least 1 sprig fresh mint

A little goes a long way, so one sprig is probably all you’ll need, unless in a moment of madness you’ve recklessly agreed to make Harlequin Salad in catering quantities.

Strip the leaves from the sprig of mint and shred finely. Turn the shreds and chop again crossways to cut the mint into small pieces and sprinkle over your chopped vegetables. Toss gently to combine.

Harlequin Salad Dressing

The tomato seeds can be a bit irritating, and in this instance would otherwise interfere with the clean salad appearance, but the flesh around them is deliciously tart and perfect to use in a dressing.

tomato seeds from the salad
olive oil
salt and coarse-ground black pepper
a light vinegar (optional)

  • Sieve the tomato seeds over a bowl until  all that remains are the seeds.
  • Add 1tbs olive oil, salt and pepper to the tomato seed juice and mix to combine.
  • Taste and adjust the seasoning. Add more oil/vinegar as required.
  • Set aside until ready to serve the salad.

To Serve

  • Wash some lettuce leaves (I used Cos/Romaine), pat them dry with a paper towel and use them to line a serving dish.
  • Shake your dressing and pour over your chopped vegetables and toss gently to mix.
  • Spoon the dressed salad onto the leaves and serve.

¹I agonised over this, as it’s the only waste in this salad. Having thought about it for a while, my suggestion is to sieve the seeds to remove all the juice, and have a shot of cucumber water with your salad.

Hot Cross Buns

More interesting than toast, not as rich as cake, what’s not to love about a bun?  The buns traditionally served towards then end of Lent are… well now, here’s the thing. They go by many names. Most people might think, as the title above implies, that they’re Hot Cross Buns, but that’s not strictly accurate. “Hot Cross Buns!” was originally the cry of the street vendors who sold Cross Buns – hot. Recipes also appear under the name “Good Friday Buns” and “Easter Buns”.

Interestingly, Cross Buns weren’t originally fruited, only spiced – and thanks to an edict from Queen Elizabeth I, could only be sold on Good Friday, Christmas and for funerals.

“That no baker or other person or persons shall at any time or times hereafter, make,
utter or sell by retail within or without their houses, unto any the queen’s subjects,
any spice cakes, buns, bisket or other spice bread (being bread out of size, and not by
law allowed), except it be at burials, or upon the Friday before Easter, or at Christmas;
upon pain of forfeiture of all such spice bread to the poor.”

John Powell, The Assyse of Breade, 1595

Fruit gradually crept into recipes from about the middle of the 19th century, presumably as industrialization and improved transport links brought foodstuffs from far flung places to the UK cheaper and quicker, all to make for a really indulgent treat after the privations of Lent.

This recipe comes from a very favourite author of mine: Frederick T. Vine. Doyen of numerous professional books for the baker and confectioner. This is his own personal recipe, scaled down from a recipe in which quantities such as pounds and quarts were bandied about, and a full batch of which would produce almost 650 penny buns. The quantities below will make about 12 x 100g buns, more if you drop the weight down to 85 grams. This might seem a large amount, but they can be gifted to friends and family, or easily frozen to enjoy at a later date.

crossbunsrecipe

The buns are enriched with milk, butter and egg and are packed with bags of fruit and spice. The original recipe also includes malt extract, which gives a wonderfully rich flavour, but isn’t usually something you find in the supermarket, so you can improvise by adding some powdered Ovaltine to the mixing liquid if you have difficulty sourcing it. You can omit it altogether if liked.

The original recipe suggested using flavouring essences of lemon and ‘spice’. I happened to have some lemon flavouring, but no ‘spice’, so I used regular ground spices. Reading an inordinately large number of baking books as I do, I’ve noticed that the use of essences is very prevalent in commercial baking mixtures. The reason seems to be that regular ground spices darken the dough, which is assumed to be unappealing to the customer. This opinion contrasts greatly with the fact that, for example, in modern times the appearance of the seeds in vanilla-flavoured items today are celebrated – how things change! Personally, I like the authentic appearance of the dark flecks of spice, not to mention the flavour. Feel free to go with your own blend of spices, but I really like the punchiness of the quantities below. After all, no-one likes a bland spice bun – if you’re promised spice, you want to be able to taste it.

These buns have a sweetened, tinted glaze to be painted on after they are baked. It uses gelatine to give shine without the stickiness. If you’re not keen on using gelatine and don’t mind a little stickiness with your shine, then omit the gelatine, swap the water for milk and warm to dissolve the sugar.

Hot Cross Buns

I’ve gone for a mixture of spices, but it is traditional to only use allspice. If you’d prefer this flavouring, I suggest just 1½tsp ground allspice, as it is quite potent.

I’ve switched around the method a little to make for a more straightforward approach.

180ml water
90g unsalted butter, cubed
15g malt extract OR 2tbs Ovaltine
180ml milk
30ml of beaten egg, from1 large egg
135g soft brown sugar
½tsp salt
1 sachet fast-acting yeast
30g mixed orange/lemon peel, finely sliced/chopped
180g currants
1/2tsp lemon flavouring OR zest of 1 lemon
1tsp ground nutmeg
½ tsp ground mace
½tsp ground allspice
½tsp ground mixed spice
500g strong white flour

Pre-bake Glaze
30ml beaten egg(from above)
30ml milk

Post-Bake Glaze
1 sheet gelatine (or vegetarian equivalent)
100ml cold water
2tbs caster sugar
1tsp treacle

  • Heat the water, butter and malt/Ovaltine until steaming and the butter melted, then add the (cold) milk. This should bring the temperature down to just warm.
  • Whisk in the egg, sugar, salt, lemon flavouring if using, and yeast.
  • Pour the warm mixture into a bowl.
  • Sift together the flour and spices and add to the bowl.
  • Knead into a soft and supple dough, about 10 mins.
  • Knead in the currants, zest if using, and peel, cover with plastic, and set to rise. Because of the enriched nature of this dough, this will take slightly longer than usual, about 1½ hours.
  • When the dough is risen, turn out onto a floured work surface and pat to deflate.
  • Weigh off the dough into 100g pieces, and then roll and shape each into a smooth ball.
  • Line a deep-sided baking tin with parchment.
  • Place the balls of dough into the pan, pressing with the flat of the had as you do so, to flatten them into discs about 2cm thick. Place these ‘cakes’ about 1cm apart from one another. This will mean they touch as they prove, giving a soft ‘kissing crust’ on each side and a rounded sqare shape.
  • Cut a cross into each bun using a dough cutter or similar. NB Take care not to cut all the way through, just deep enough so that the dough will stay apart during baking, preserving the cross.
  • Cover lightly with a cloth to rise for 30 minutes.
  • Heat the oven to 200°C, 180°C Fan. This is a slightly hotter temperature than usual for buns (180°C, 160°C Fan), because the sides of the tin will block direct heat, and the buns will therefore need cooking a little longer.
  • Pre-bake Glaze: Whisk the remaining egg with the milk and brush over the tops of the buns.
  • Bake for 20 minutes until risen and browned. Turn the tin around after 10 minutes to ensure even baking.
  • While the buns are baking, prepare the gelatine glaze. Soak the gelatine sheet in the water until softened. Heat gently to dissolve the gelatine, then stir in the treacle and sugar. Continue stirring until the sugar is dissolved.
  • When the buns are baked, remove from the oven and brush over with the glaze.
  • Cover lightly with a cloth and allow to cool in the tin for 15 minutes. The cloth will keep the steam close, making for a soft crust.
  • After 15 minutes uncover the buns and transfer to a wire rack to cool completely. If you leave them to cool completely in the tin, they’re prone to sogginess.
  • To serve: Cut in half and toast both sides. When toasted, spread with salted butter. For added decadence, add some slices of vintage cheddar cheese. The contrasts between the hot spicy bread, the fruit, the richness of the butter and the sharp, cool and creamy tang of the cheese is sublime.