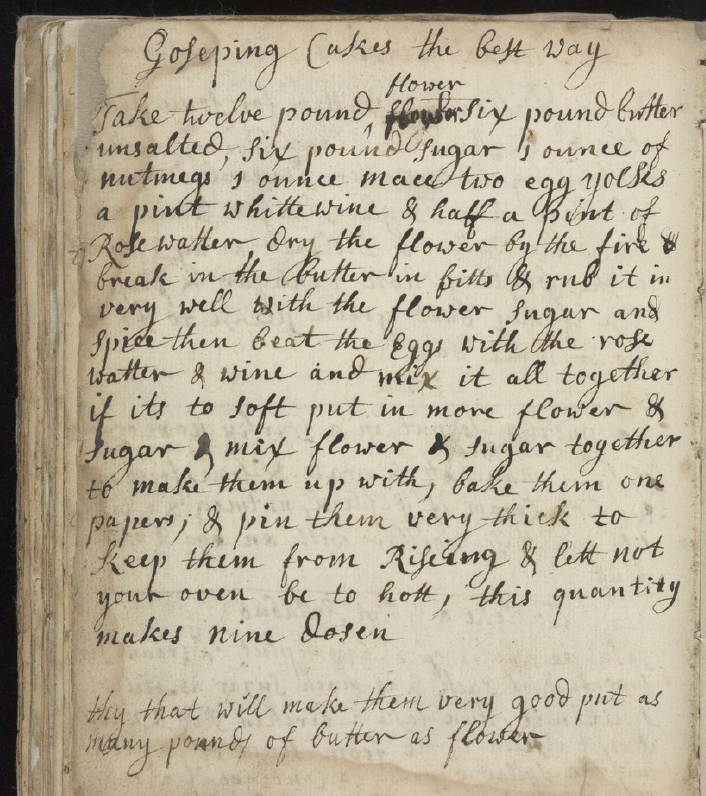
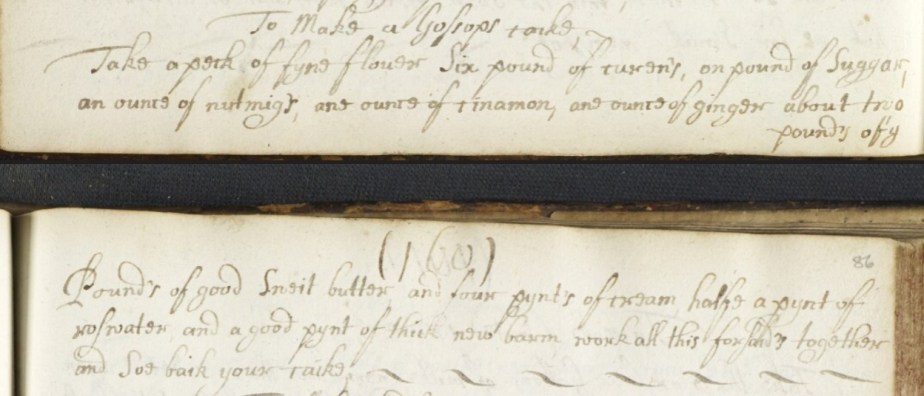
I’ve been reading a lot of bakestone recipes lately, and, spoiler alert, if you like Welsh Cakes, then this recipe is about to become your new favourite.
This recipe comes from a small but delightful mid-20th century recipe book. “Croeso Cymreig: A Welsh Welcome”, originally published by the Wales Gas Board in the 1950s (mine is from 1957). I’ve seen a couple of editions on the second hand market (AbeBooks) for about £20, but more modern editions seem available for as little as £3. These newer editions are published by Gwasg Dinefwr Press or John Jones Press under the title “Recipes from Wales – 113 Traditional Welsh Recipes”. Alternatively, you can view a copy online for free at Archive.com.¹
One of the reasons why I like this book is that it includes several variations of the same recipe. Some of them have different cooking methods too, for example, there are three Teisen Lap (‘moist cake’) recipes that can be cooked in an oven, in a Dutch oven in front of the fire, or on a griddle.
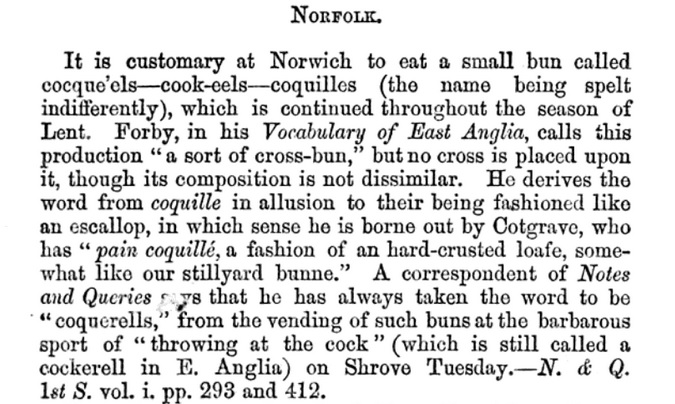
Slapan originates in North Wales. The book contains two Slapan recipes – ordinary Slapan, and Slapan Sir Fon (Anglesey Slapan). The difference between the two seems to be that Slapan is made with mixed fruit, and Slapan Sir Fon is made with currants only. Doing some more reading, I found a third version – Slapan Dafydd (Saint David’s Slapan) – which is made with sultanas only.
There are subtle variations in both the liquid used (milk/buttermilk) and leavening agents (baking powder, bicarbonate of soda, and also a little of both), but essentially it is the same method for all: rub the butter into the flour, add the rest of the ingredients and bring together into a soft dough with the eggs and liquid. Spoonfuls of the dough are then cooked on a bakestone, turning halfway through. An important aspect of the appeal of these teatime dainties is the speed with which they can be brought to the table – not much more than 30 minutes from start to finish. Perfect for when company drops by unexpectedly.
Taste
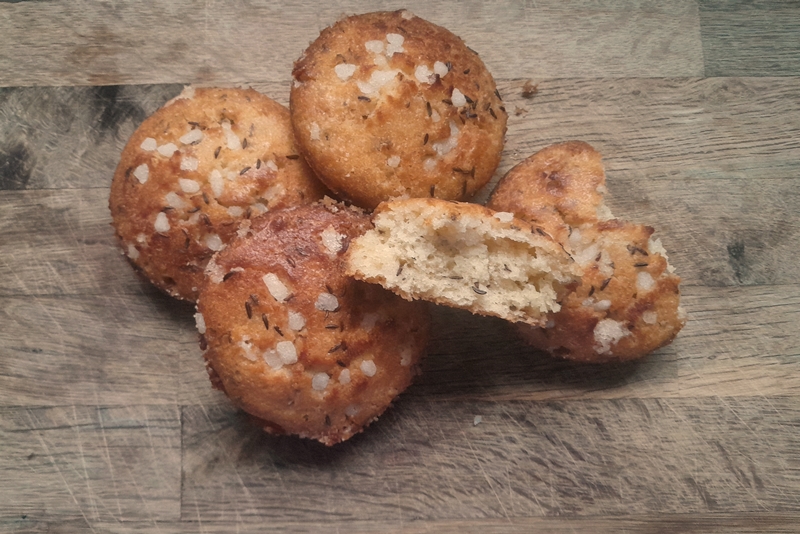
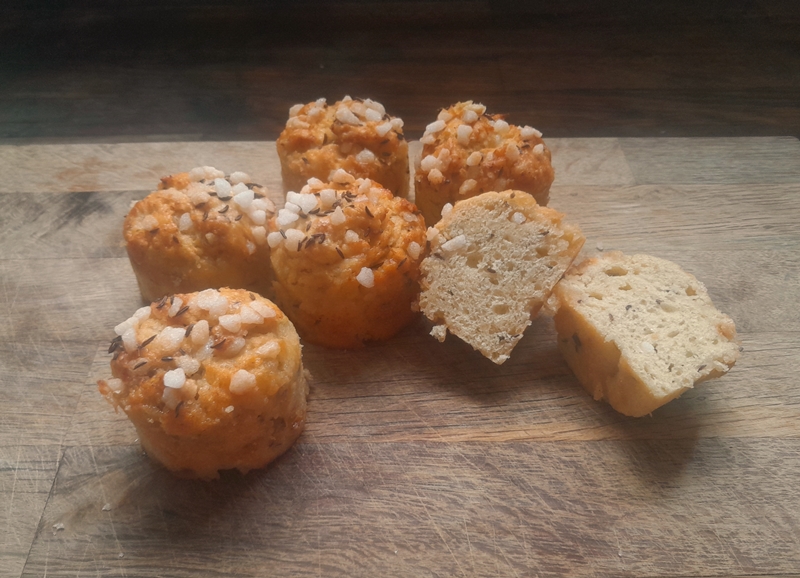
So what are they like to eat? Really delicious, actually. I mentioned above that Slapan are similar to Welsh Cakes, and they are, but without any of the spicing of the latter. Also in contrast, they are very light. With all the love in the world, even Welsh Cake devotees must admit they’re decidedly firm in texture. The texture of Slapan is much closer to a scone, or a muffin, but decadently rich with butter. They are not overly sweet, the dried fruit contributing a lot, so there is relatively little sugar added. Slapan are best served warm from the pan, split and generously buttered. Crisp outsides give way to a soft, cake-like centre, and with lashings of delicious butter melting inside, it’s a surprisingly rich treat.
Equipment
You don’t need a bakestone to cook your Slapan, a non-stick pan and a heat source with serve just fine. Slapan are baked, not fried, so there is no need to grease the pan. The traditional method is to spoon the mixture onto the bakestone using two spoons, but I found my small ice-cream scoop² much easier to use, in addition to making small, delightful 2-bite Slapan.
Slapan
Each batch makes approximately 12 Slapan. If you’re using gluten-free flour, then you may need to add extra flour (see note below).
120g plain flour/gluten-free flour³
60g chilled butter – cubed
20g sugar (caster or soft brown)
¼ tsp salt
scant ½ tsp baking powder
30-50g mixed dried fruit/currants/sultanas
1 large egg
2-ish tbs milk
- Put a non-stick pan onto a medium (number 5 on my 1-9 electric hob) heat and let it come to temperature while you mix up the dough. if you’re using gluten-free flour, you should delay this until the mixture half-rested.
- Put the flour, butter, sugar, salt and baking powder into the bowl of a food processor and blitz until the mixture resembles breadcrumbs.
- Crack the egg into a mixing bowl and add milk for a total of 90ml of liquid. Whisk together well (I use a stick blender), then add the flour mixture and dried fruit.
- Fold together until the mixture forms a smooth-ish dough. The consistency should be like that of a fruit cake, or mashed potatoes. Definitely too soft to roll out.
- Using a small ice-cream scoop, or two spoons, drop the dough into the now hot pan. Drop them around the edge, rather than the middle, so that they don’t scorch. Cooking them all at once will make it tricky to turn over, so do two batches of six or seven.
- Bake for 5 minutes. A light crust will form on the bottom of each heap.
- Using two cocktail sticks, carefully turn each Slapan over.
- Bake for a further 3-4 minutes until the underside is as browned as the top.
- Cool on a wire rack.
- Split, butter and serve warm.
Bonus Recipe: Christmas Slapan
Here’s my own take on a Slapan variation, seen top right in the photo – with the addition of candied peel, mixed spice and a splash of booze. Much quicker to rustle up than mince pies.
120g plain flour/gluten-free flour³
60g chilled butter – cubed
20g soft brown sugar
¼ tsp salt
scant ½ tsp baking powder
½ tsp mixed spice
15g candied lemon and orange peel, finely chopped
15g dried cranberries or barberries
20g dried currants
1 large egg
1 tbs brandy
1 tbs cream sherry/madeira
- Method as above.
¹ You need to sign up to be able to borrow books, but it is free, no strings attached.
² A small ice-cream scoop of 4cm diameter, roughly 30ml volume.
³ I’ve made this recipe with two different gluten-free flours. Schar’s Baking/Patisserie flour (red bag) contains a thickener (guar gum), and so the recipe took the same quantity of flour as regular flour. Dove’s Farm Freee gluten-free flour contains no thickener, and they recommend adding xantham gum when using. I didn’t have any, so I ended up adding more flour (60g in 2 batches of 30g) and allowed it to sit a while (20 minutes) to allow the excess liquid to be absorbed.